|
This is a delicious meal that is perfect for a cozy home cooked dinner - perfect for our "cool" San Francisco summer nights! 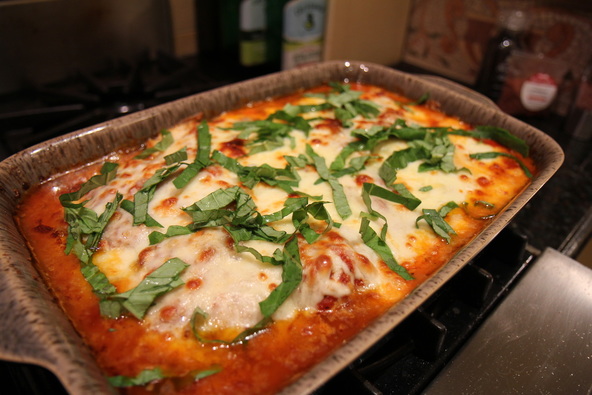 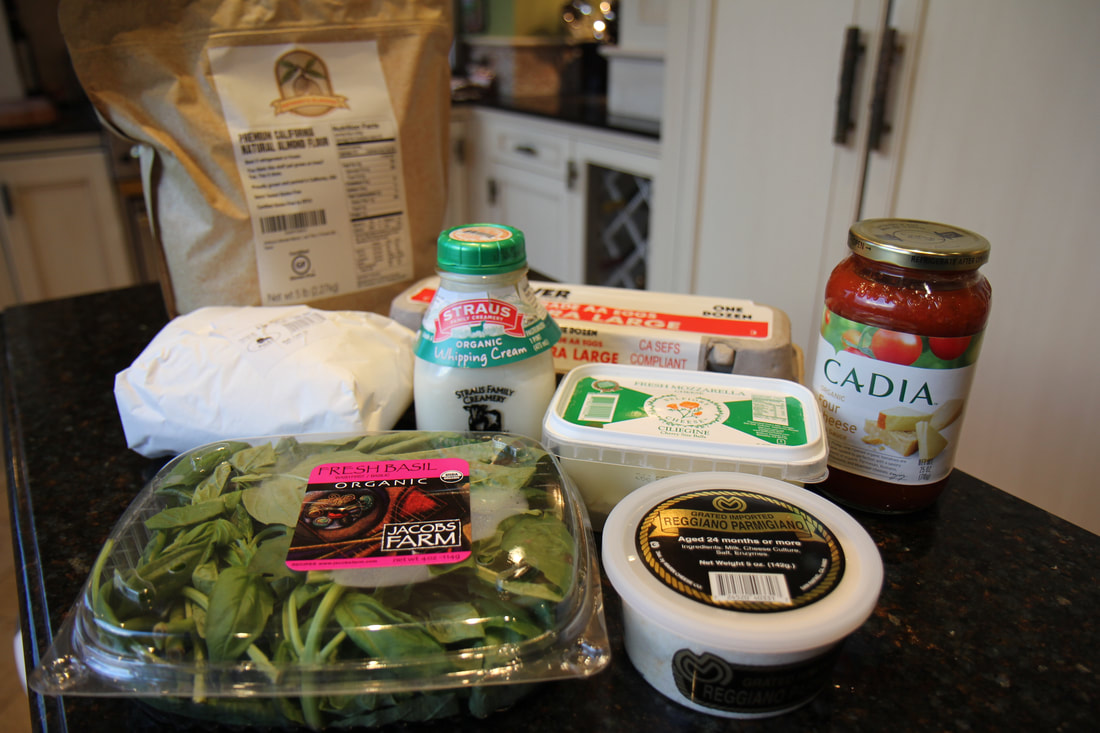 Ingredients:
Whisk your eggs and 4 Tbsp of cream together for your "wet" ingredients dish. Combine 1 cup almond flour with 3/4 cup grated parmesan, salt and pepper for your "dry" ingredients dish. Pound out your chicken breasts (you can also butterfly cut the breasts if they are larger). Dip them first in the egg mixture, then transfer over to the almond flour/parmesan cheese - pat into the chicken breast to make sure you have a nice coating. 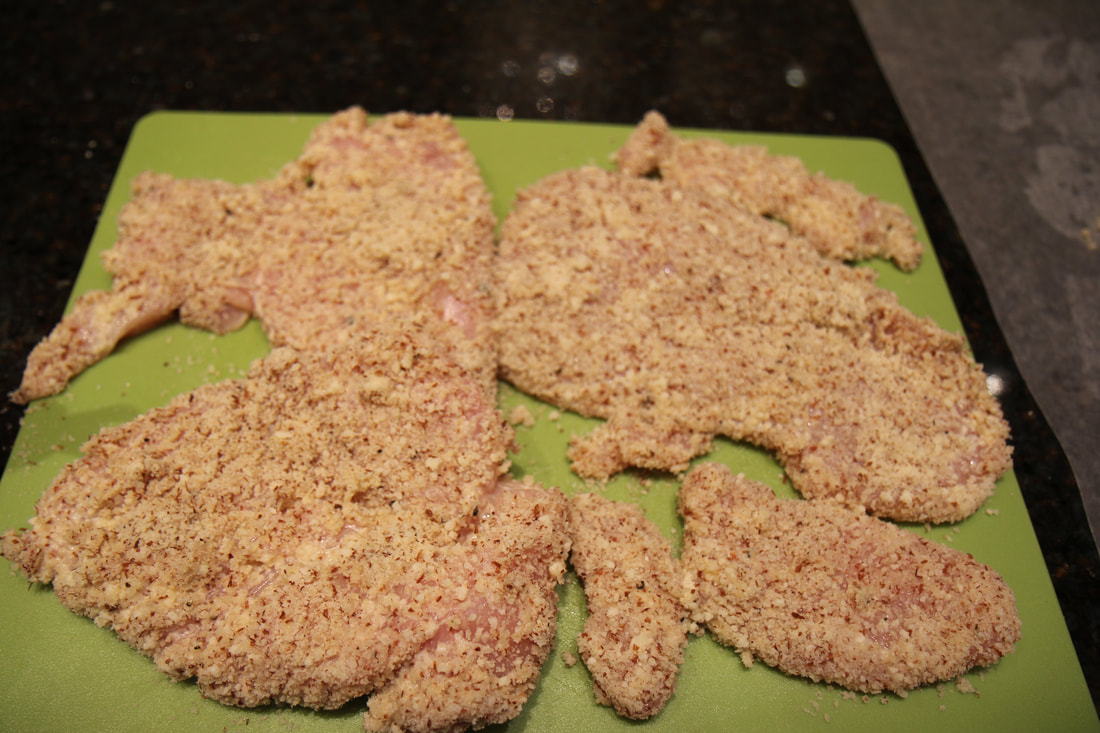 Now get ready for some fun frying! Place the coated chicken breasts in 4 Tbsp of butter and brown the breasts. You may notice some of the breading fall off, but fear not, it all goes into the marinara sauce topped with cheese to bake, so nobody will notice. Put a layer of the marinara sauce on the bottom of the pan, then place the browned breaded chicken breasts on top of the sauce. Layer with more marinara sauce, and then top with lots of delicious provolone and mozzarella - we used both regular and fresh mozzarella! 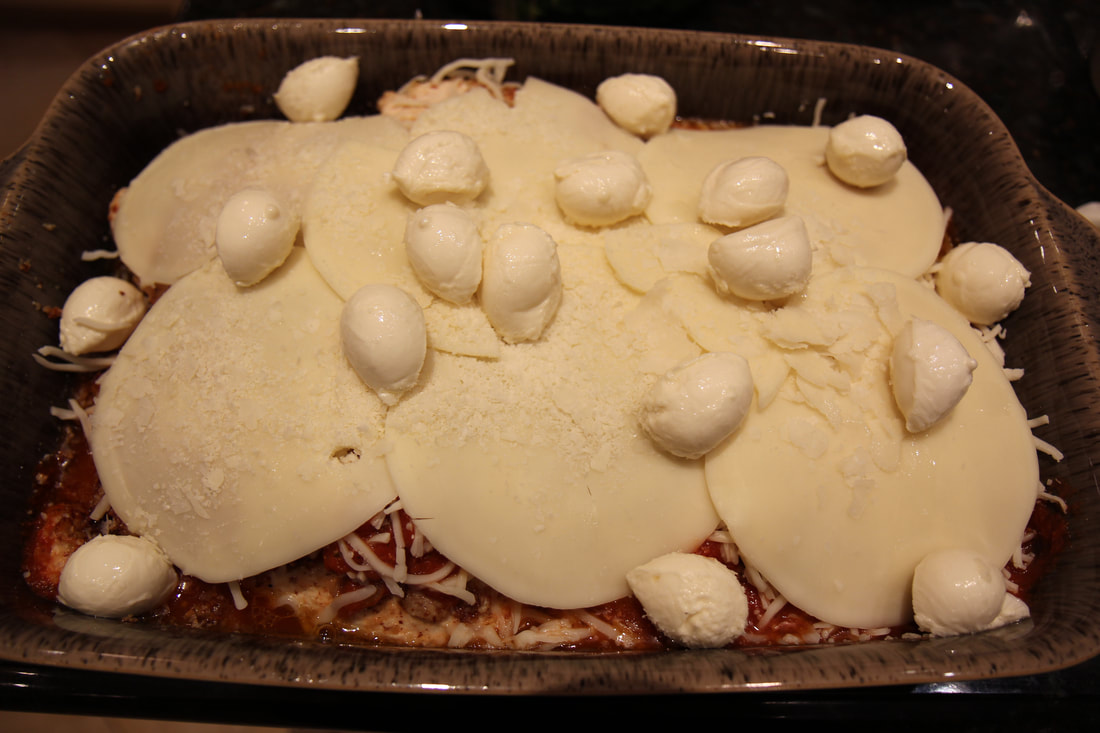 Bake for 30 mins at 375 degrees until the cheese is brown and bubbly. This dish is hot, so make sure to let it rest for a few mins before you start serving. Top with fresh basil and snuggle in to enjoy! We recommend a nice cabernet to go with this comfort meal! 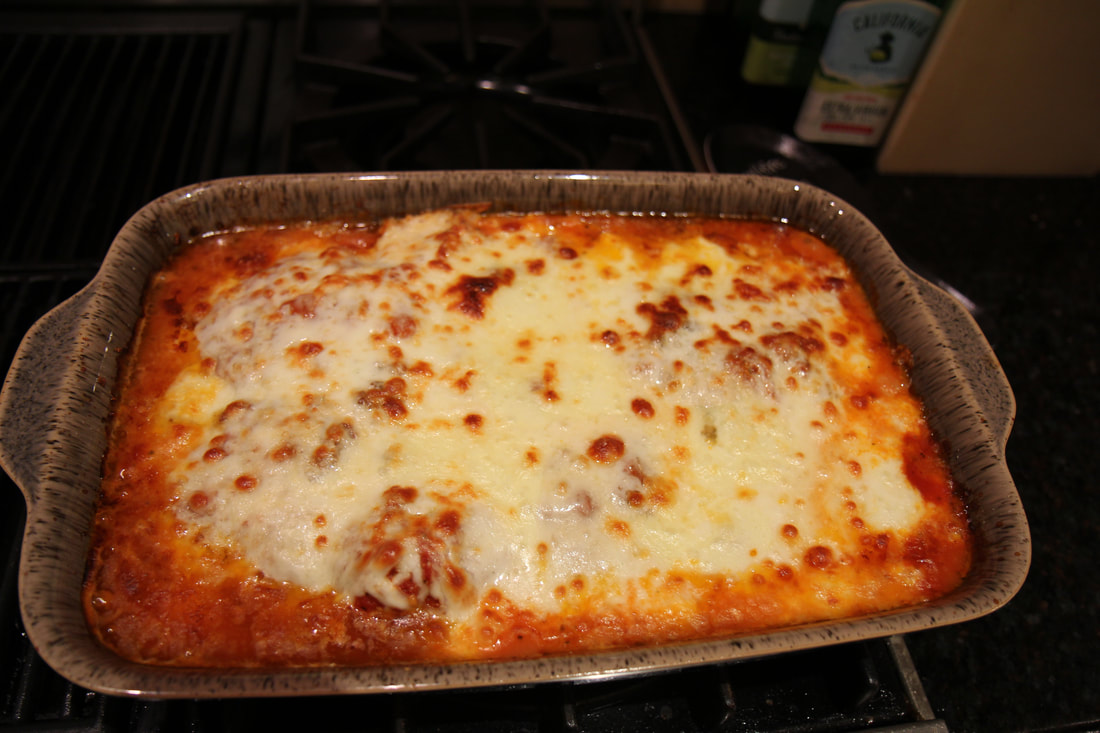 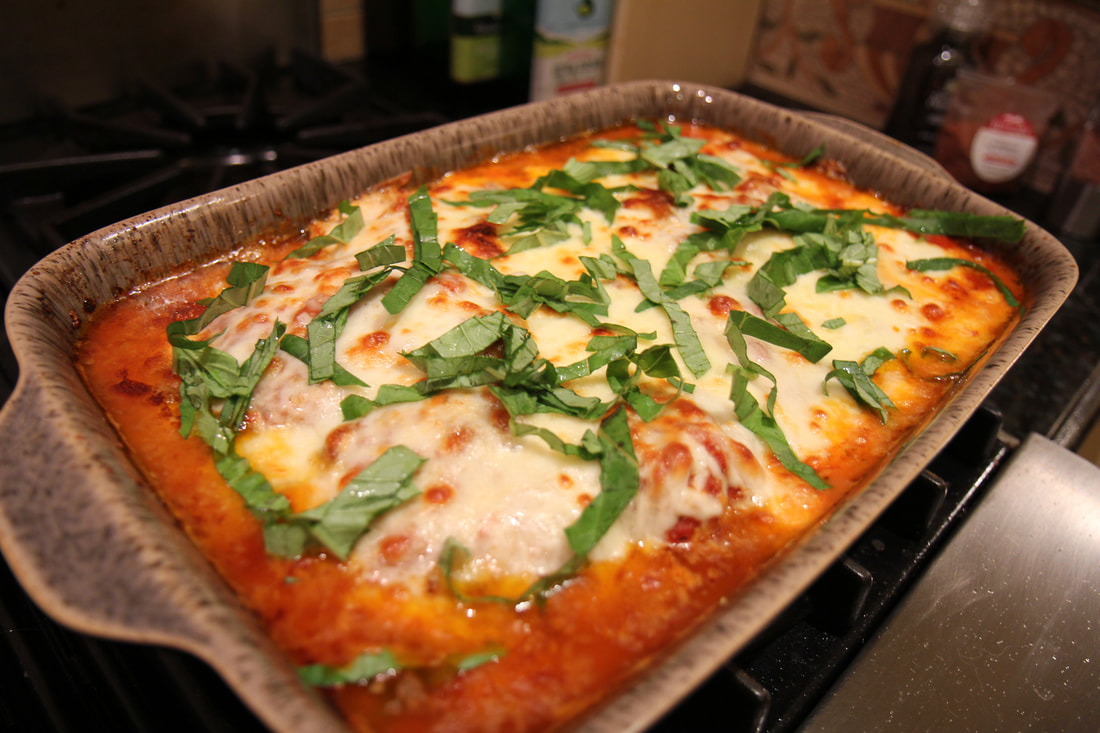
1 Comment
Here's a great idea for a dinner party that will really impress your guests - Shabu-shabu! It is so easy, fun and interactive that everyone will really enjoy. It doesn't take too much prep time, and provides for everyone to be the chef of their own meal. We also started with a sashimi appetizer that tasted like it was from your favorite sushi restaurant, simply by using fresh and local ingredients. Just follow these easy steps! 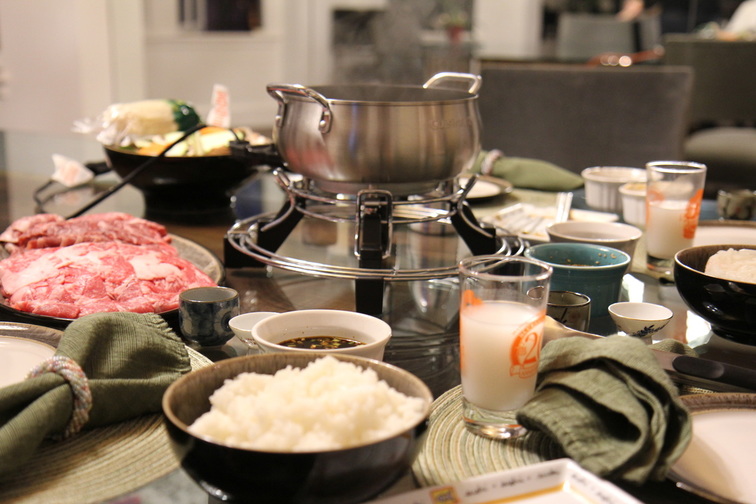 Ingredients:
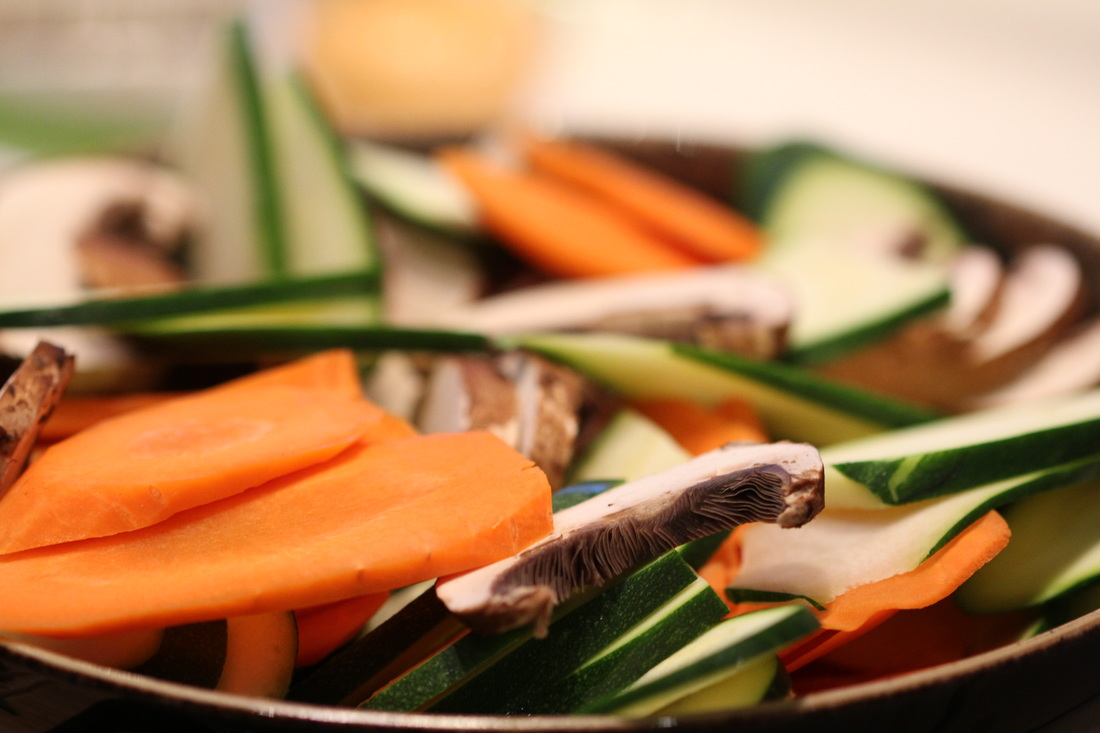
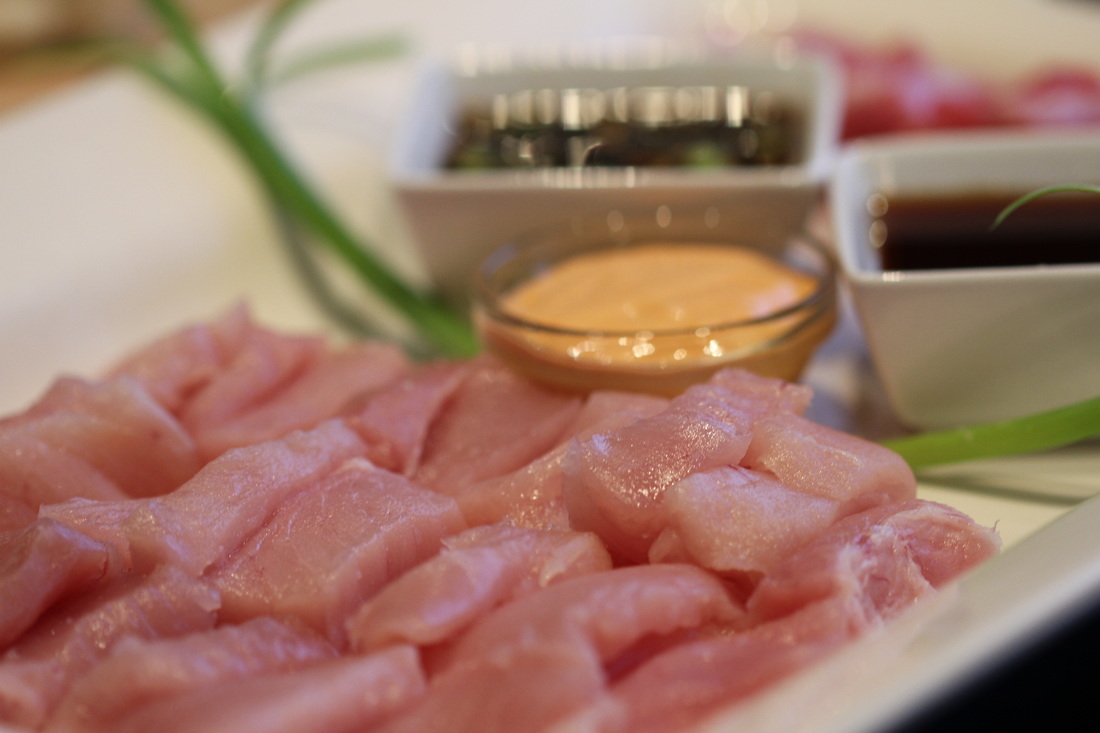 We love this fancy appetizer of sashimi. It is so easy and always impresses. Make sure to use a super sharp knife so you can slice the fish well without tearing. Cut into rectangle bite sized pieces, like you would get at your favorite sushi place. Serve along side soy sauce, wasabi, and spicy mayo and you are set! We garnished with some green onions too - always remember your presentation is the first thing your guests will notice! As mentioned before, it is good to choose sturdy veggies that won't fall apart as they are cooking in your broth. And we got very thinly sliced meat from our local Japanese market - the kobe beef was the best! A little pricier, but definitely worth it. The shrimp turned out really well too. You could also use chicken - just be extra careful to not contaminate anything during the process with the raw chicken - it will cook off in the pot, but you will want to be more careful with chicken. 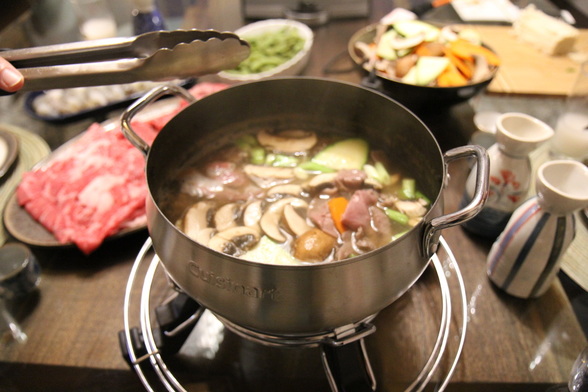 Place your veggies and meat into the simmering broth - the meat will cook very quickly (in 30 seconds to 1 minute) - the veggies (especially carrots) will take a little longer (3 to 4 minutes). Use your best judgement of how firm you want your veggies. We used tongs as they were the easiest to handle but you can also use fondue skewers. This is a progressive meal that can last for as long as you like while everyone cooks their meat and veggies to their liking. Enjoy with a side of rice and your favorite sake - we also steamed some edamame for a side dish - a fun meal for everyone!
It has been a busy summer with lots of travel (Africa, Maine, Tahoe, Fiji, Las Vegas, Santa Barbara) but we are happy to get back to posting! This dinner is going along with our low carb theme and a super easy dish to prepare. Great for the whole family! 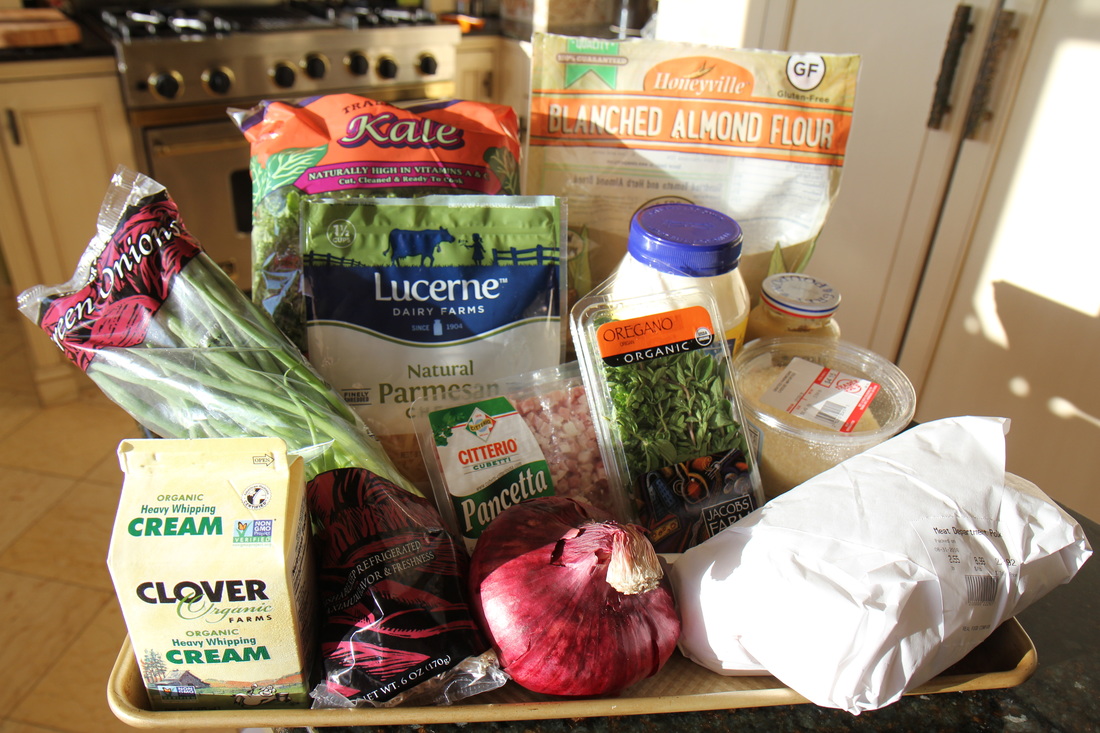 Ingredients: Chicken Fingers:
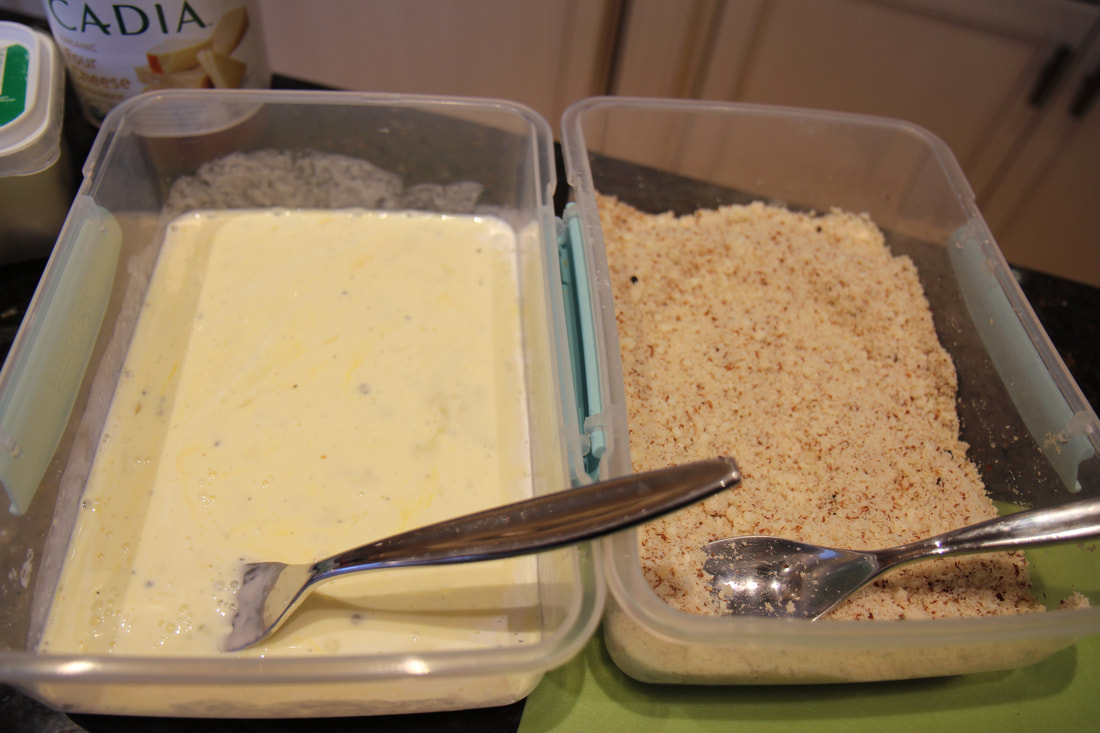
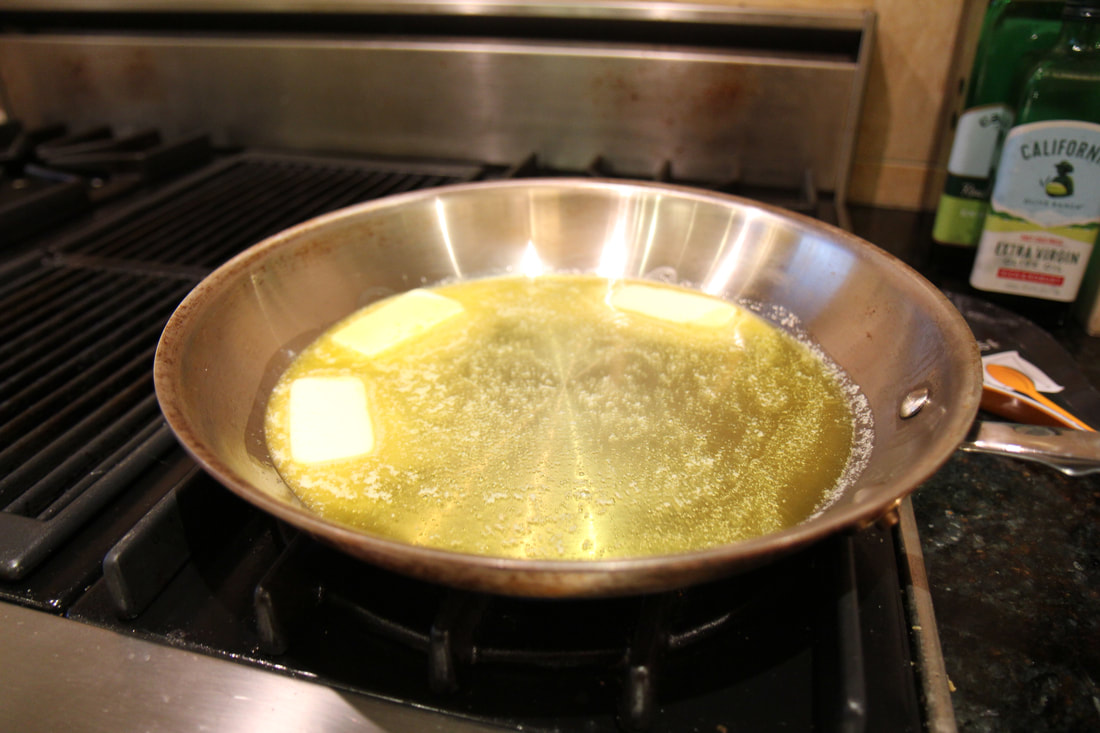
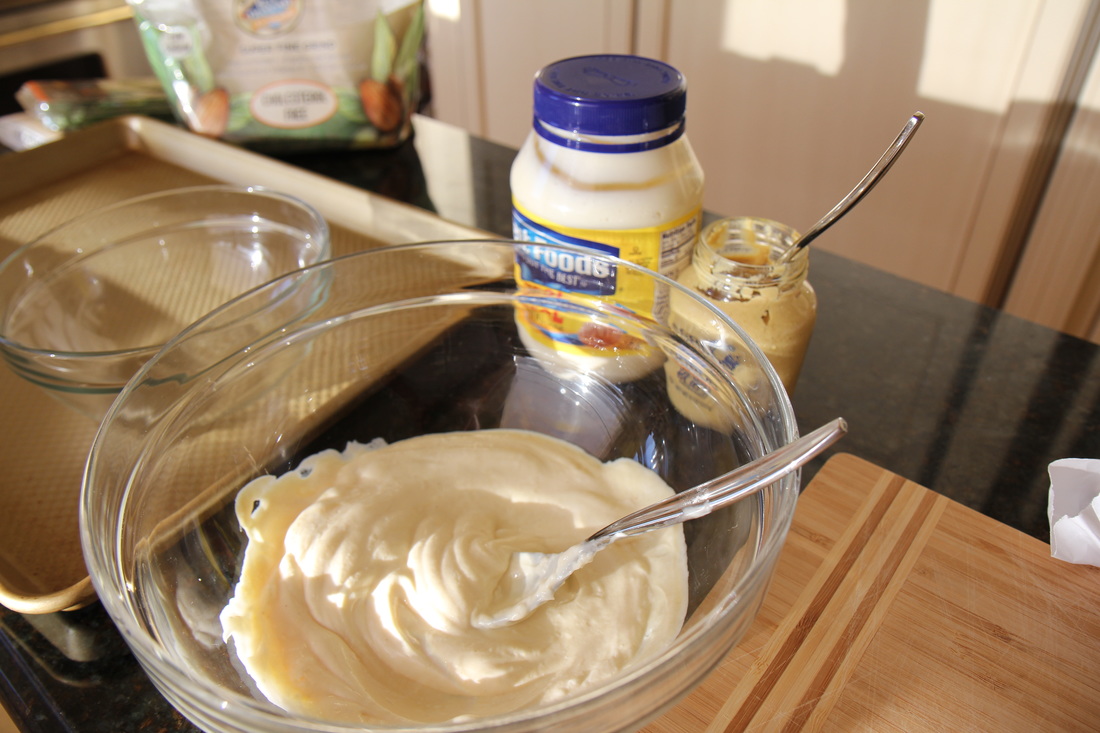
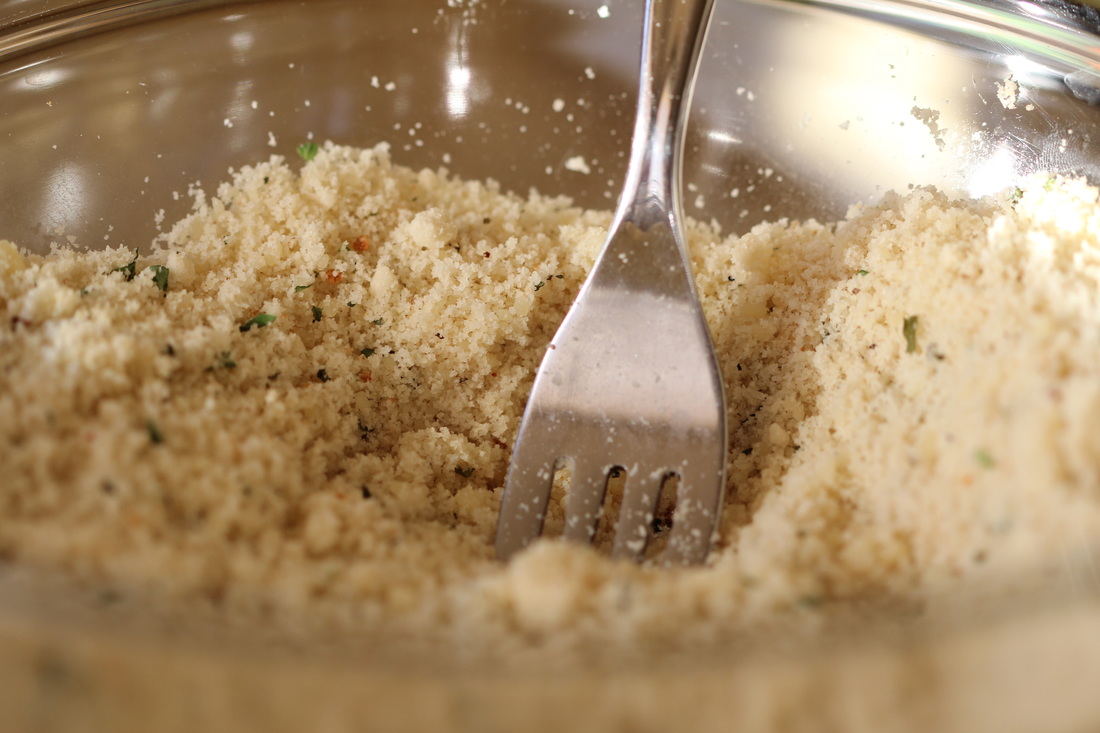
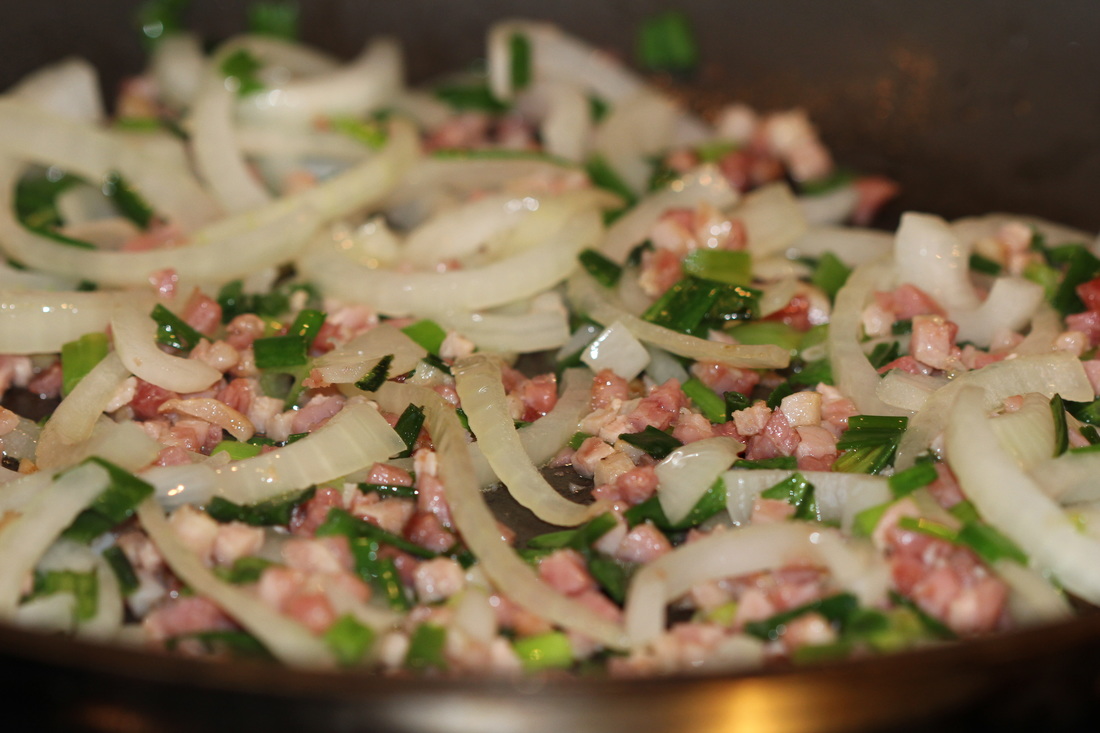
Mix the mayonnaise and mustard in one bowl. We added a little chopped fresh oregano to this mix too. In another bowl, add the almond flour, parmesan cheese, fresh oregano, and herbs. Looks like real breadcrumbs, doesn't it?? The herbs that I used are really my go-to herbs. They can brighten up any dish. I always make sure to buy more garlic powder when I am at the store as I seem to go through that one that most. Cut the chicken into strips and first place in the mayo mixture then dip into the "breadcrumb" mixture. Place on a baking sheet. 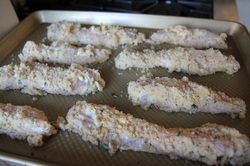 The mayo mixture will act as a binding agent and help the almond flour mixture brown up nicely. And mayo is always a fun secret ingredient to any dish! Bake the chicken at 400 degrees for 23-25 minutes, until golden brown and cooked fully through. 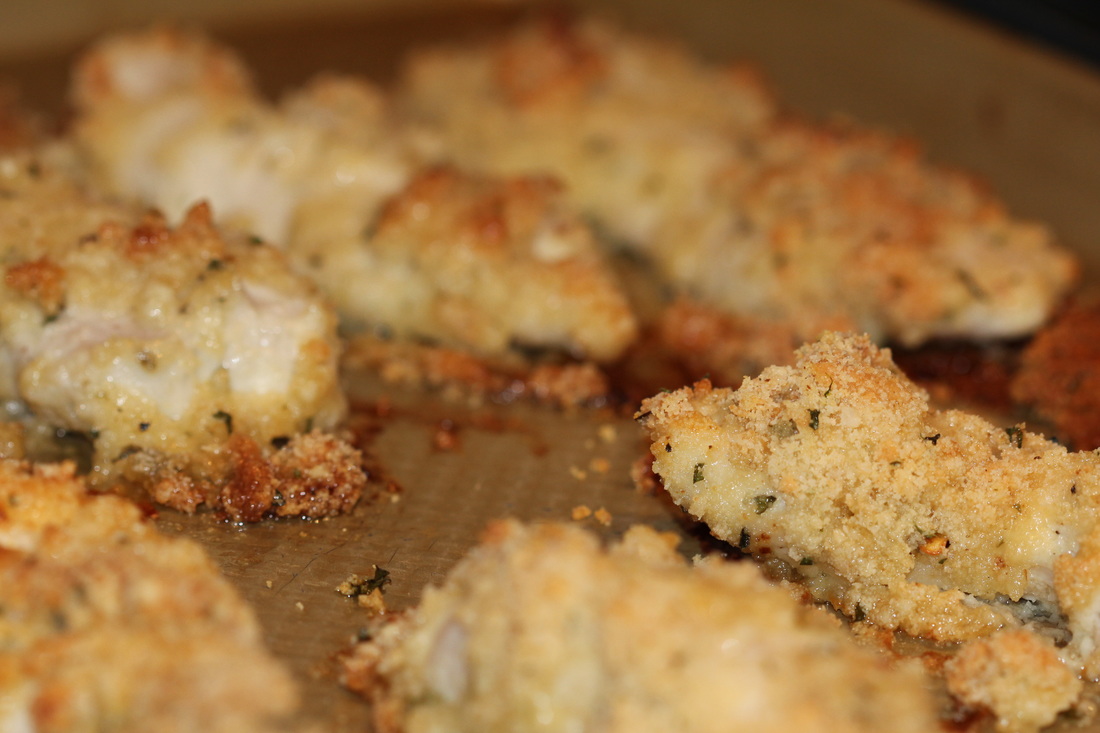 While the chicken is baking in the oven, place pancetta in a large frying pan (no oil needed at this point) and let the pancetta brown. Then add the onions. This is also a great time to get a sip of your wine that you will surely be cooking with. Add handfuls of the kale - keep adding as this will wilt down quickly. 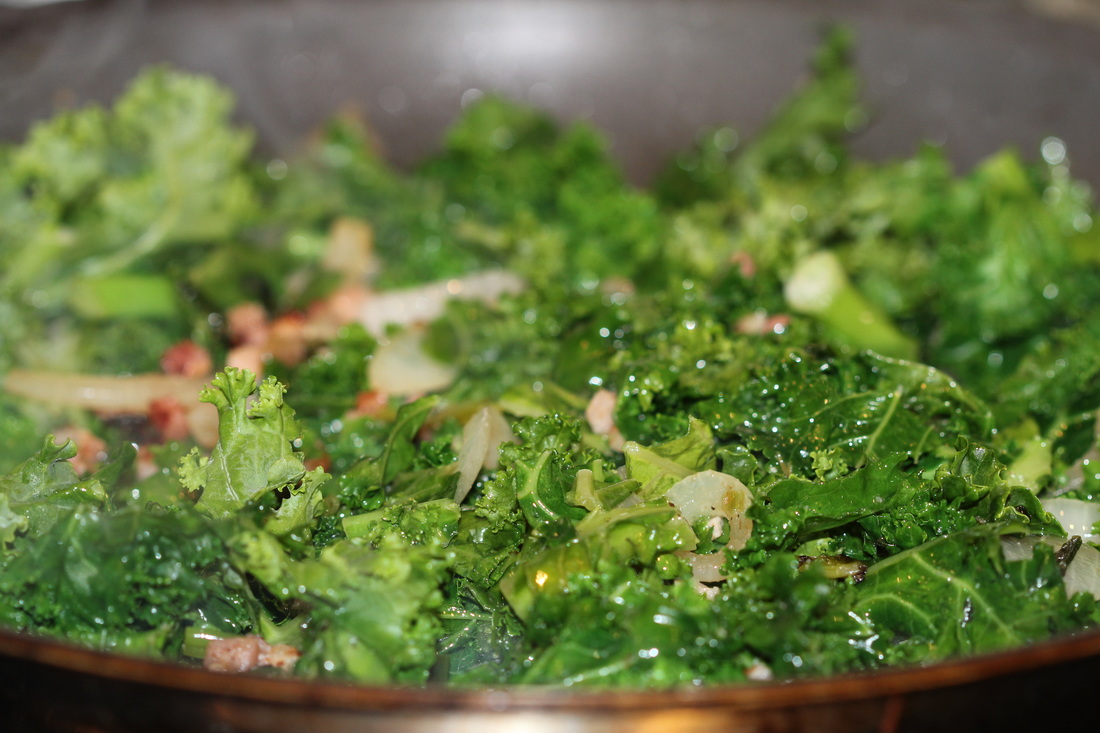 Once the kale has wilted, add 2 Tbsp of cream and grated parmesan cheese to finish. Plate with the chicken fingers. For the chicken fingers, we used Woody's BBQ sauce (low carb BBQ sauce) and ranch. I'm thinking of trying to pan fry the chicken next time to get more crisp on the outside, or even broiling the chicken. Regardless, it is a delicious dish that I think you will really like! Of course we had it with some Chardonnay. Enjoy!!! 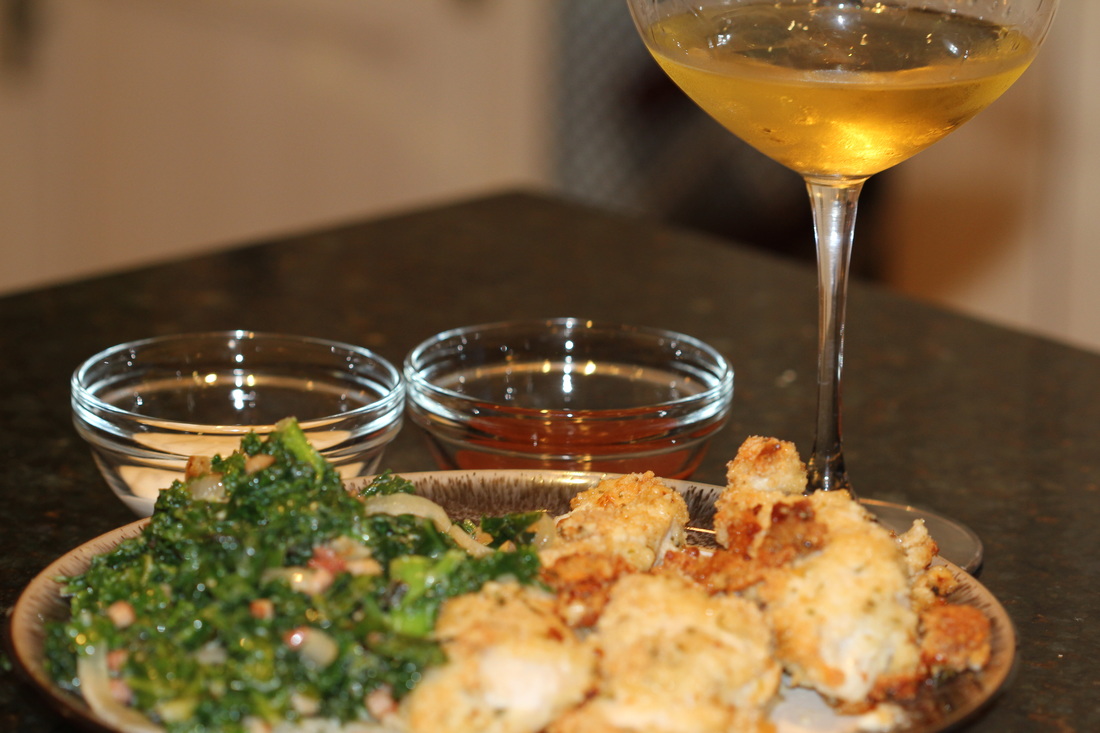  David and I are absolutely loving cooking in our new kitchen - not a bad view to look at while doing the dishes! Tonight I decided to try making the elusive cauliflower crust pizza. I have seen so many recipes and posts about this, so I decided to give it a try myself. And to my great joy (and slight surprise), it turned out wonderful! 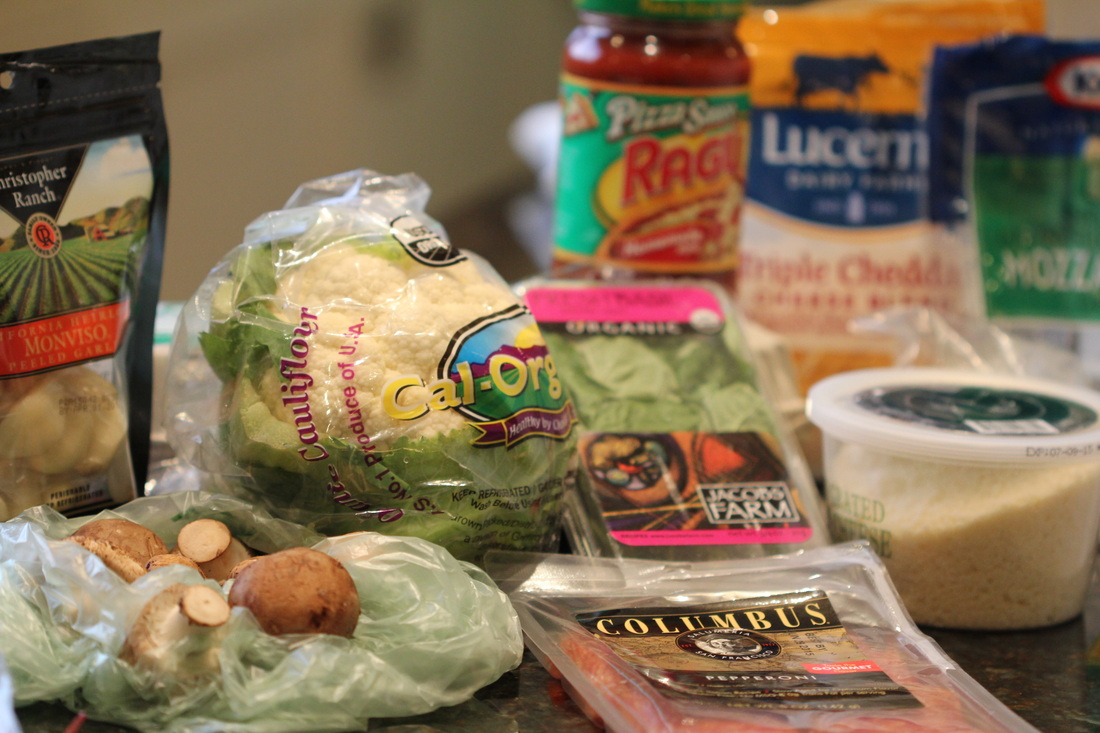 Ingredients Crust:
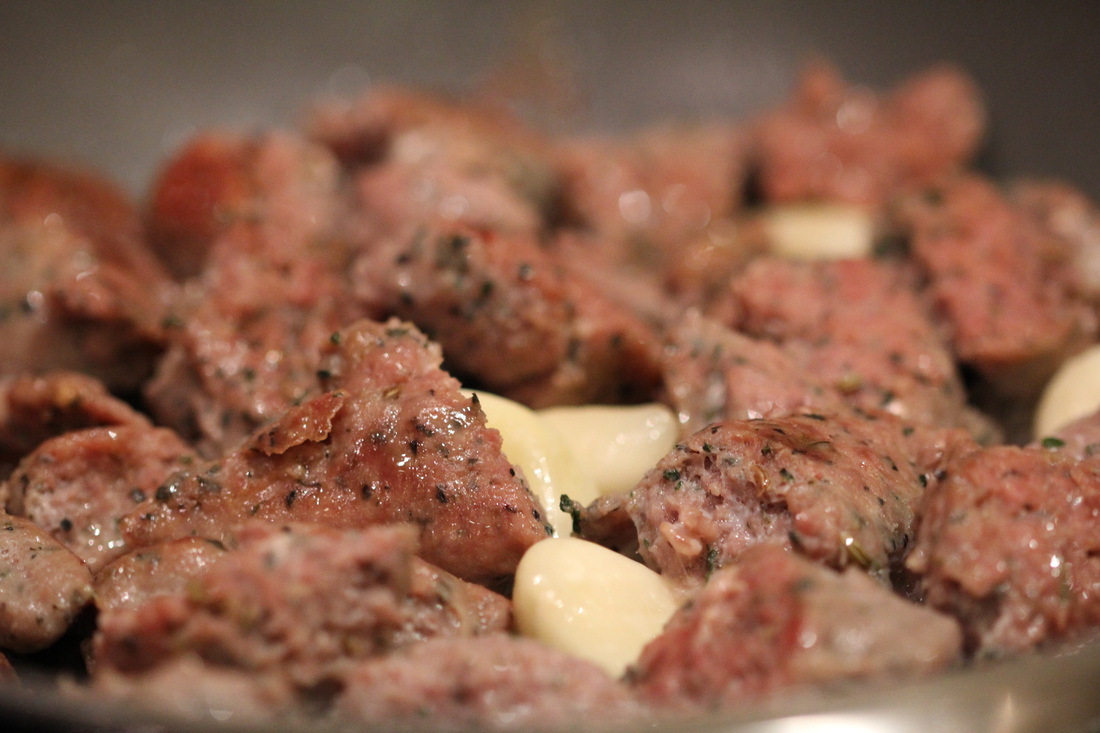
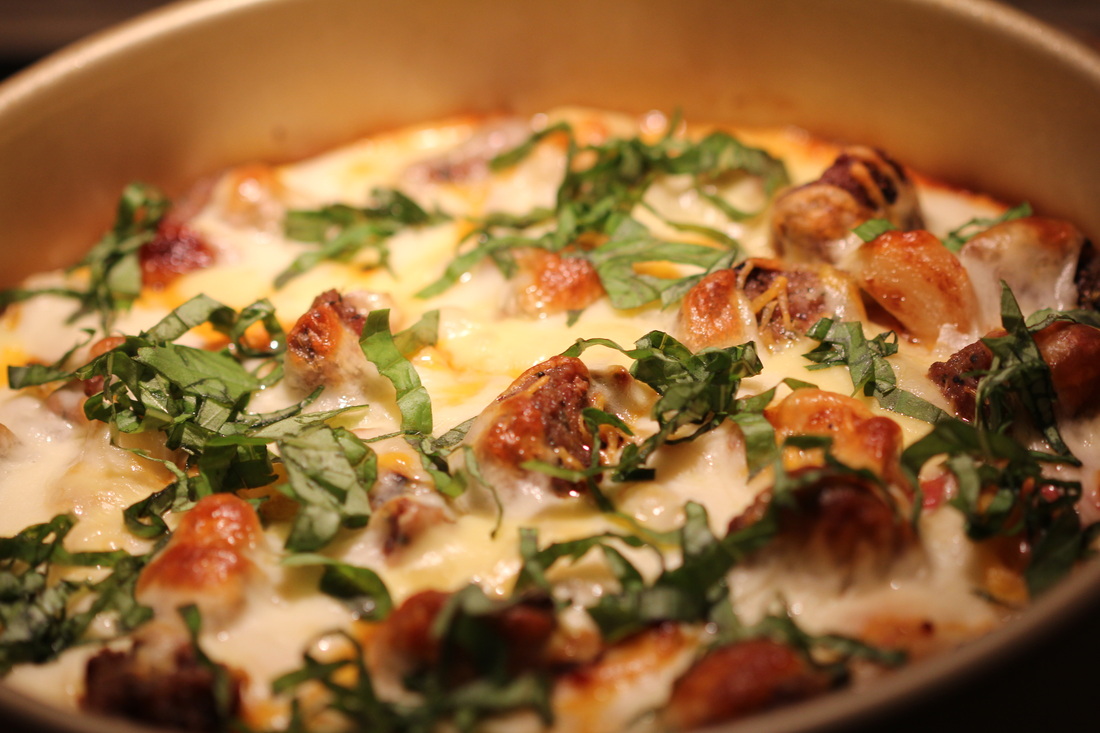
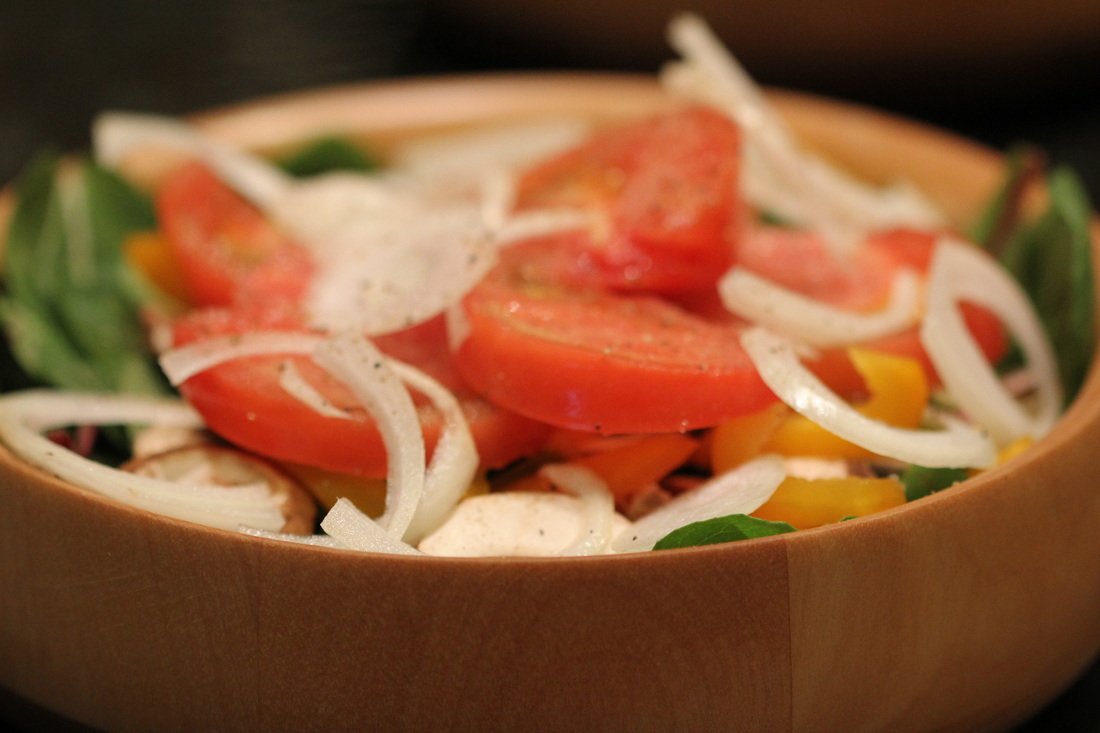
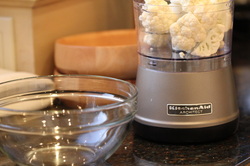 For the crust, clean and cut the cauliflower into chunks, then blend in your Cuisinart. Once all blended, put in a microwave safe bowl and microwave for 4-5 minutes. Take out (and make sure to let it cool for a while), place grated cauliflower in a towel and squeeze as much of the water out as you can! Keep squeezing! Then combine with one cup of the grated parmesan, 2 eggs, and the seasonings and mix together. 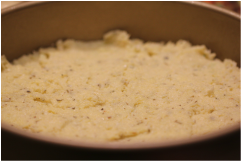 Press down onto a cooking sheet or in a round pan - make sure to spray with non-stick cooking spray to prevent any sticking. Cook in the oven at 425 degrees for about 20 minutes. One of the keys to this pizza is to be patient - let 'er cook! While the crust is getting nice and brown around the edges, I browned some Italian mild sausage (removed from the casing) along with 5-6 whole garlic cloves. David loves garlic on his pizza, so it is a good way to soften the garlic before it cooks in the oven. Even easier to keep whole, for those who don't care for that much garlic, they can easily pick it off (while maintaining the great flavor it provides). 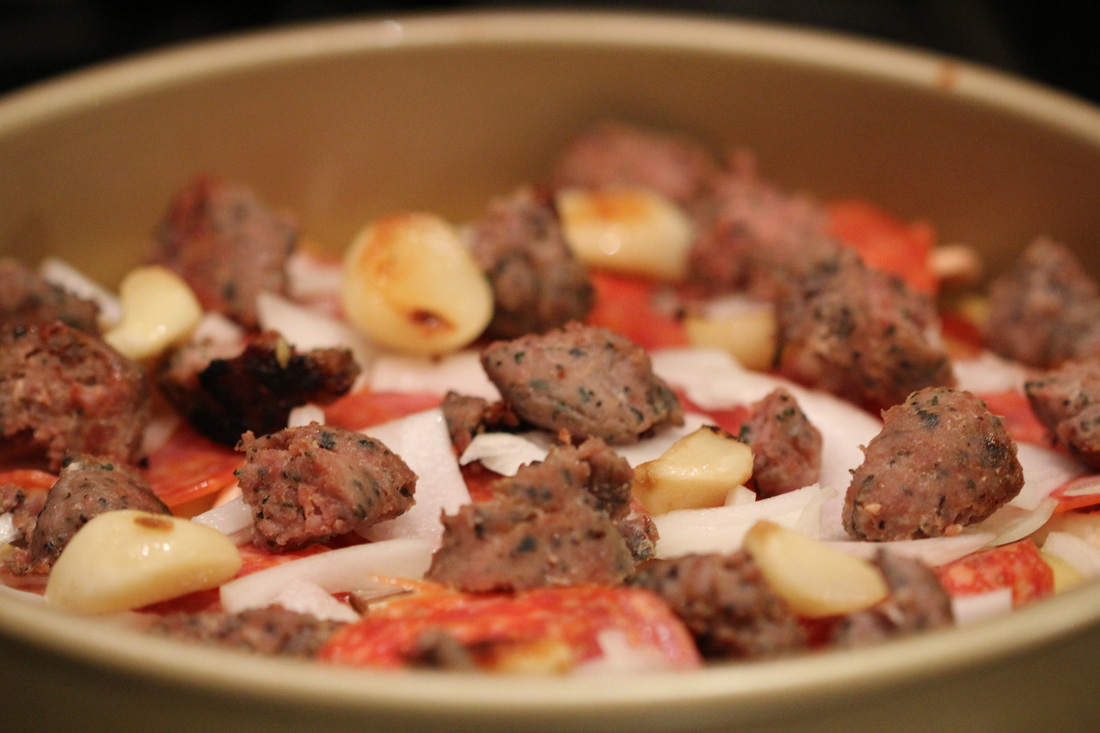 Assemble your pizza! Add the tomato/pizza sauce directly onto the crust (I would recommend being generous with the amount of sauce), layer on the slices of mozzarella and provolone, then add on the pepperoni, mushrooms, onions, Italian sausage and garlic cloves. I of course topped it with a bit of extra cheese. :) Bake at 375 degrees for 20-25 minutes until the cheese is nice and melted and begins to brown on the top. Sprinkle with fresh basil. 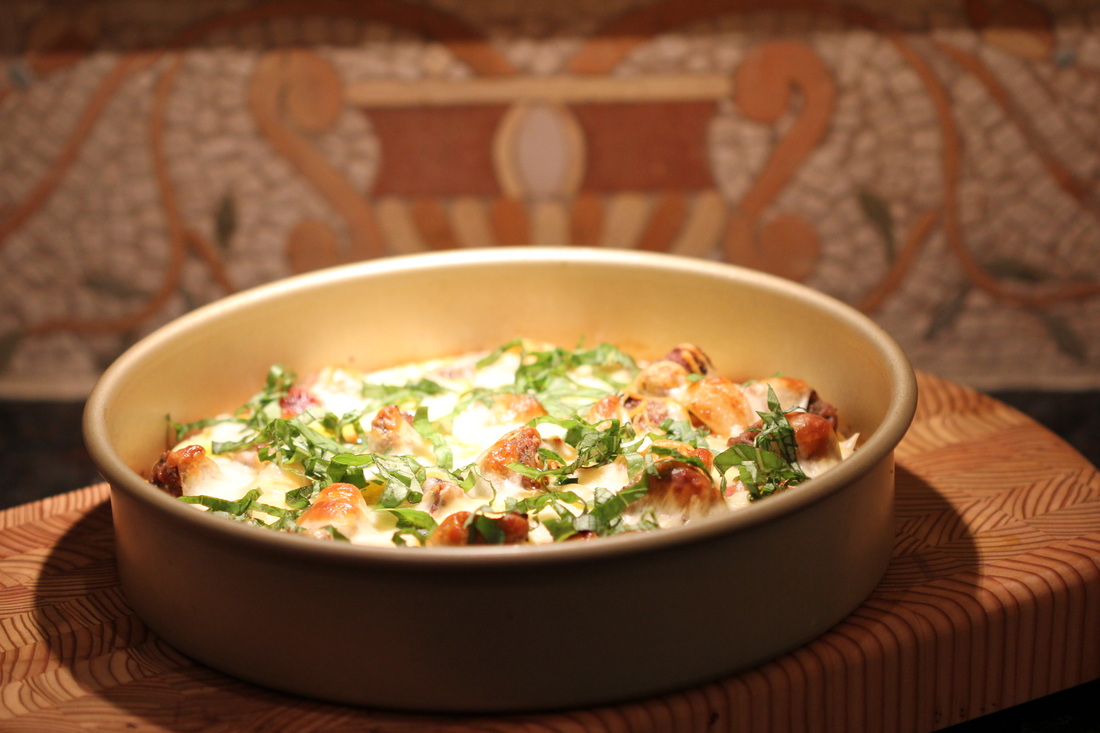 Let cool for a couple minutes to have the pizza set, cut into slices and enjoy with a classic pizza house salad - large cut tomatoes, onions, mushrooms, peppers, lettuce, and ranch dressing. Cheers to low carb pizza that tastes great!!
Happy New Year! For my first post of 2015, I am sharing a wonderful recipe for my favorite soup to make - Butternut Squash soup. And David made his delicious Chimichuri sauce that he pours over skirt steak. He is really mastering cooking steak. :) There is no real reason why I made the two of these together, so you can just make each one separately for a delicious meal on it's own. David also got me a a macro lens for my birthday, so get ready for some close up shots! 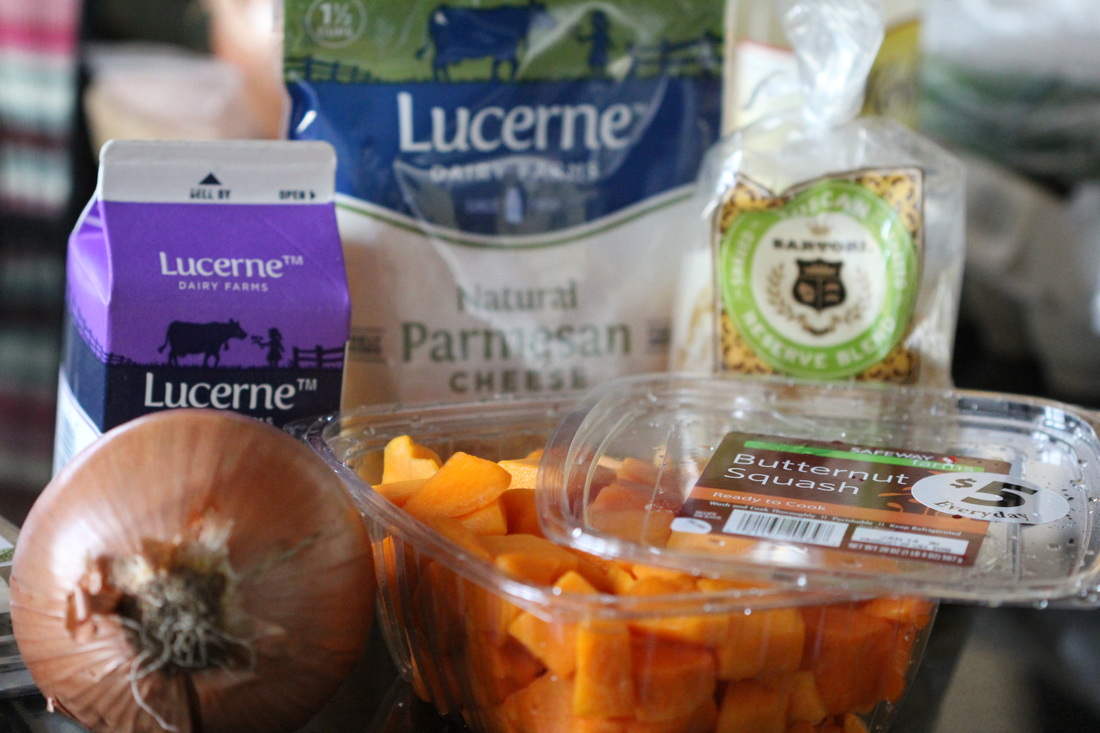 Ingredients for the Butternut Squash Soup:
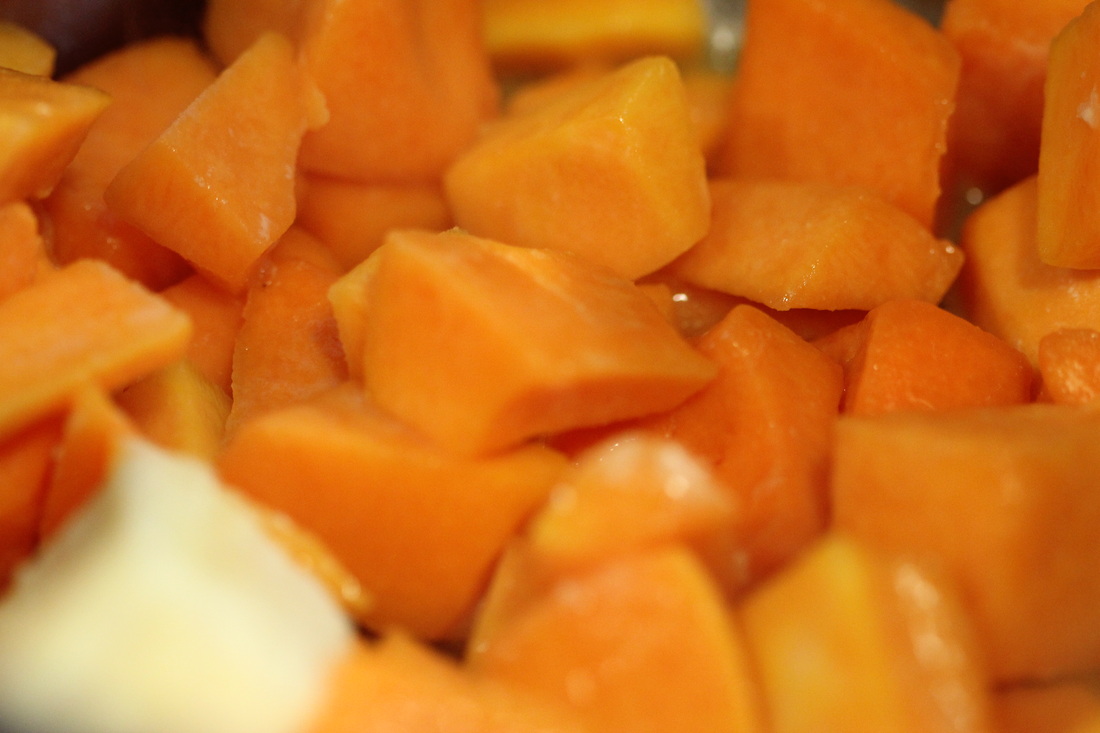 Heat up a couple tablespoons of olive oil and butter in your pot, and saute the butternut squash and onions until they are nice and soft. Add the herbs and stir. Then add in the quart of chicken stock and let simmer for about 20 minutes. Using an immersion blender, blend everything together until smooth. Then add in the Half & Half (or cream) and shredded parmesan cheese (about a half cup). Add more of each as needed. Let simmer for another 10 minutes. 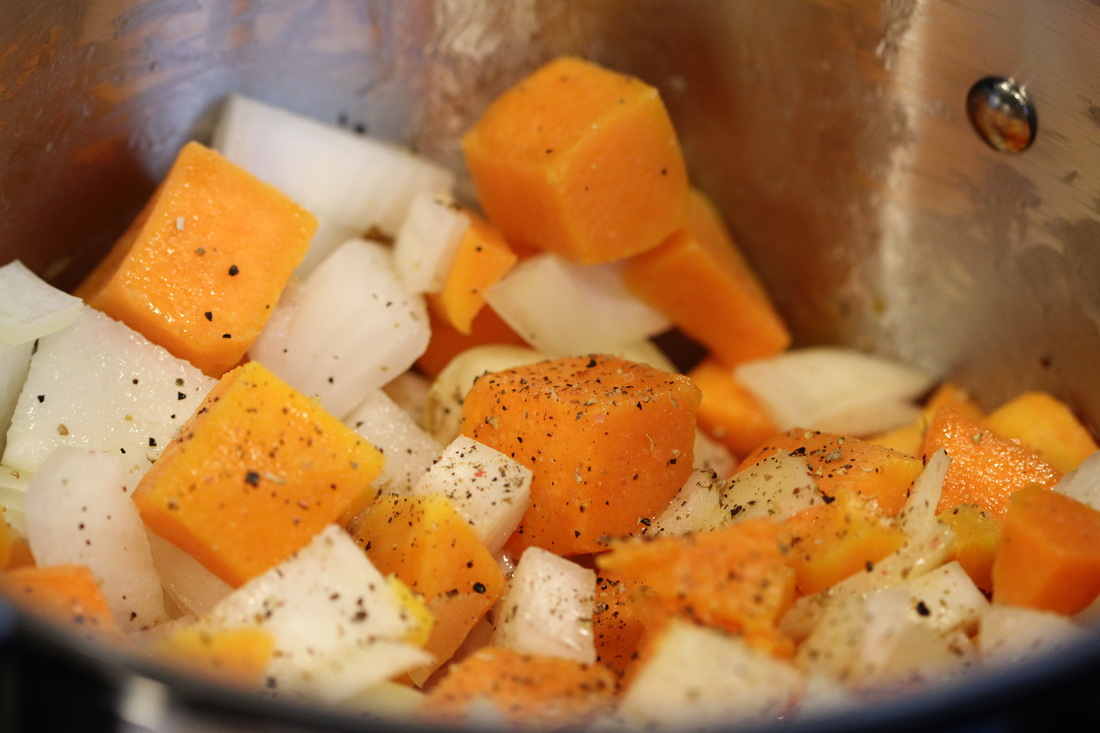 Now for the fun part - the toppings! I fried about 10-15 leaves of fresh sage in about 2 tablespoons of butter. Heat the butter (make sure not to burn it) and throw the sage leaves in there, turning a couple times until crisp. Let dry on a paper towel. This was my first time frying sage, and it turned out to add a whole new element of flavor and texture to the soup. Chop the green onions. Add a layer of shredded parmesan cheese to each bowl. Add the chopped green onions and sage. Then add a dollop of sour cream to the center of the bowl, and finish with a drizzle of truffle oil - ahhhhh-mazing! 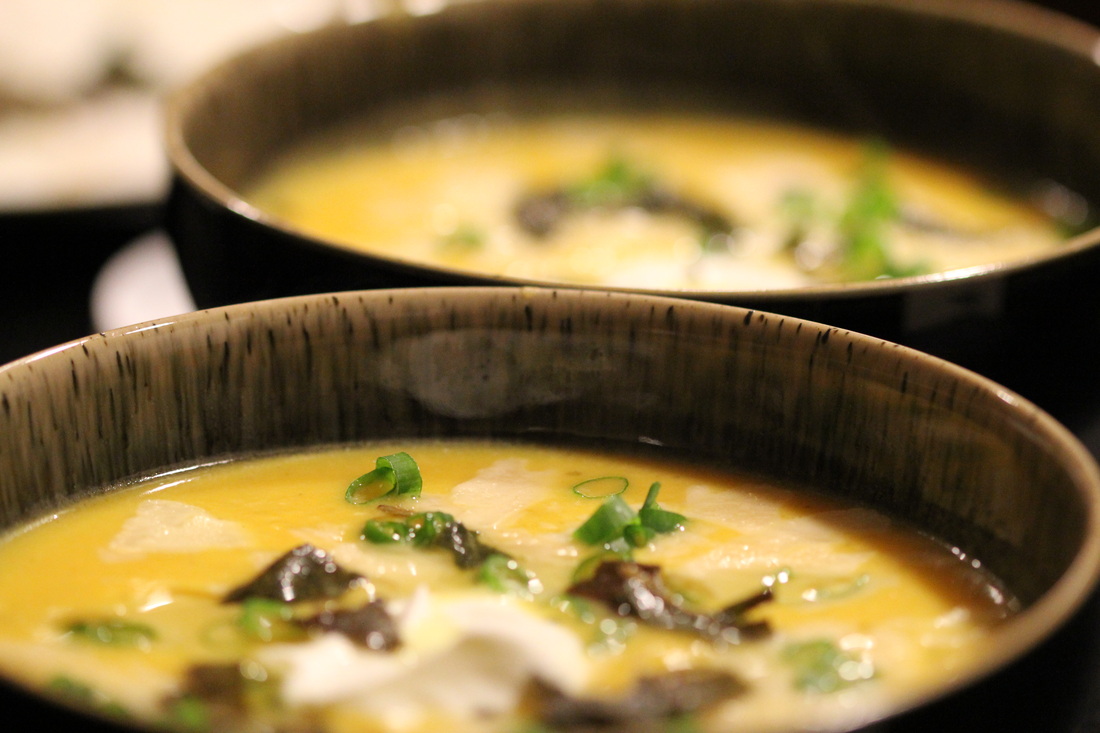 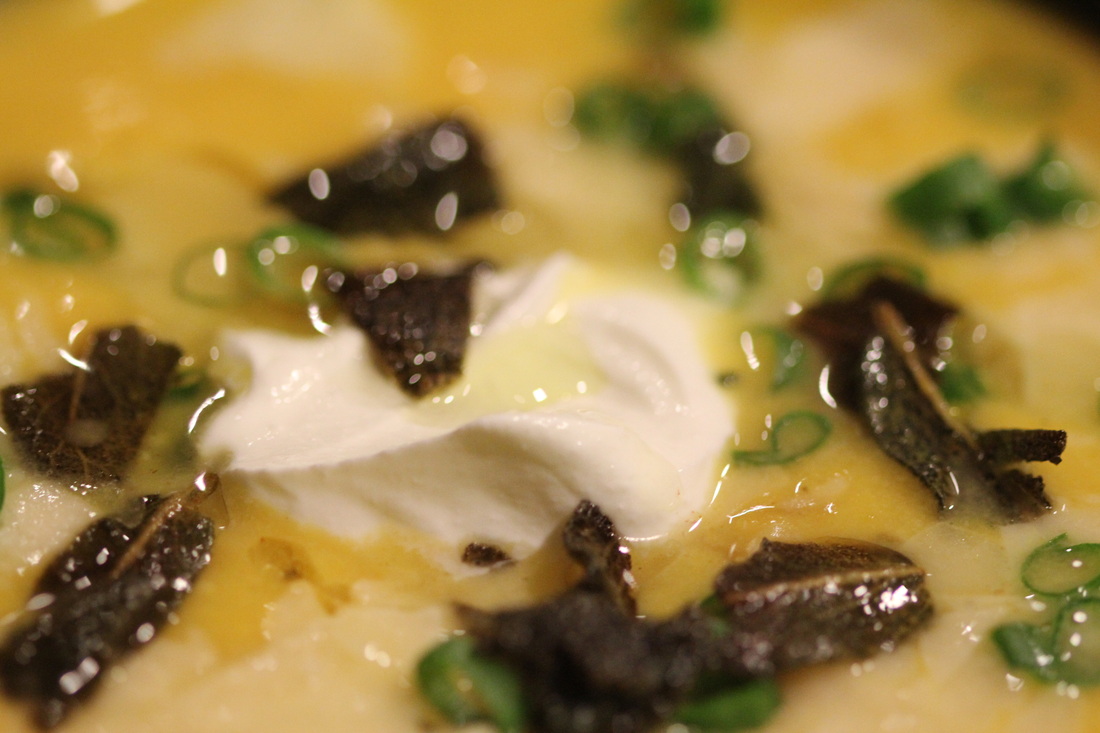 David's Skirt Steak with Chimichuri SauceDavid makes a delicious chimichuri sauce in our Cuisinart. Ingredients:
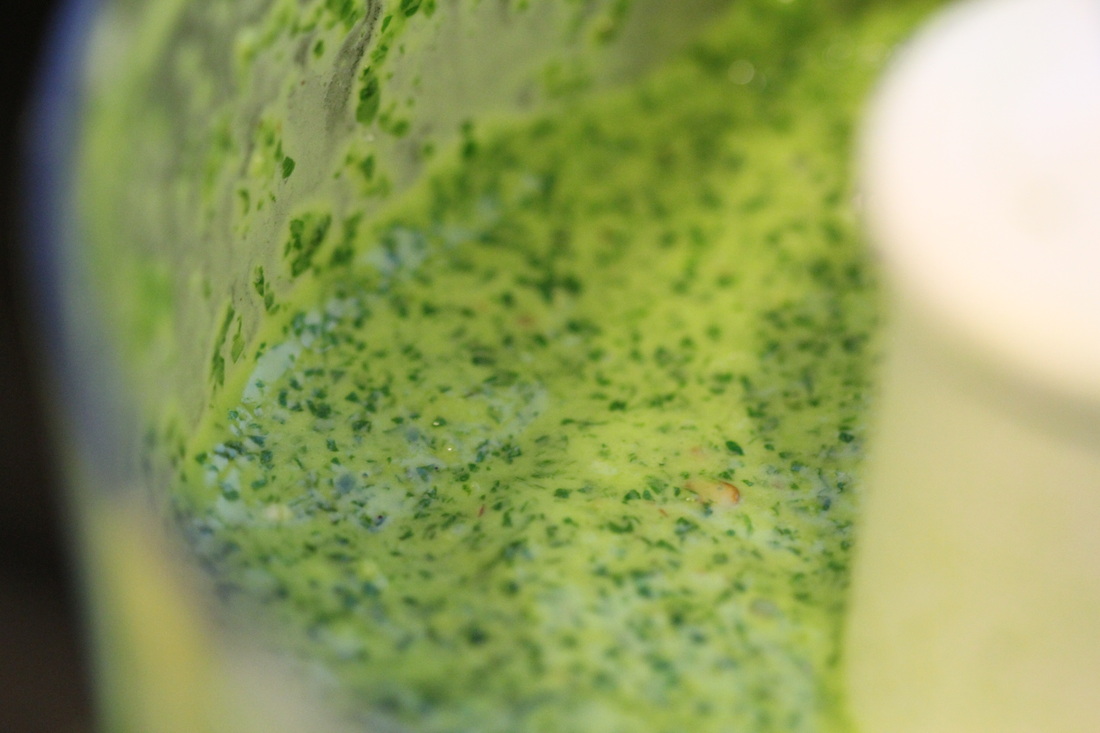 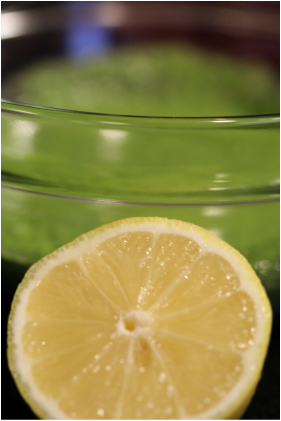 In the Cuisinart, blend the garlic (about 10 cloves depending on how much garlic you like!), parsley, cilantro, lemon juice, white wine vinegar, and salt & pepper. Once blended, start drizzling in the olive oil, until you have a nice smooth sauce. 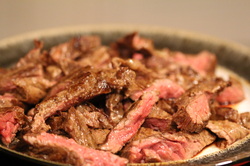 David decided to go with skirt steak. On a recent trip down to the Ranch, we tested out skirt steak vs. flank steak side by side. My sister, Holly, and I preferred the flank steak as it was a bit leaner, but David and Marc preferred the skirt steak - it has a bit more fat (which means more flavor!). Both are great, and it is really fun to do side by side comparisons. David gets a saute pan super hot, adds a bit of butter then immediately puts the steak in the pan so that it gets a great sear on it. Make sure not to over cook the meat - it should only take about 3 minutes per side. Take out of the pan and let the meat rest for a few minutes so that the juices can circulate inside. Slice against the grain and pour chimichuri sauce over the meat and serve! 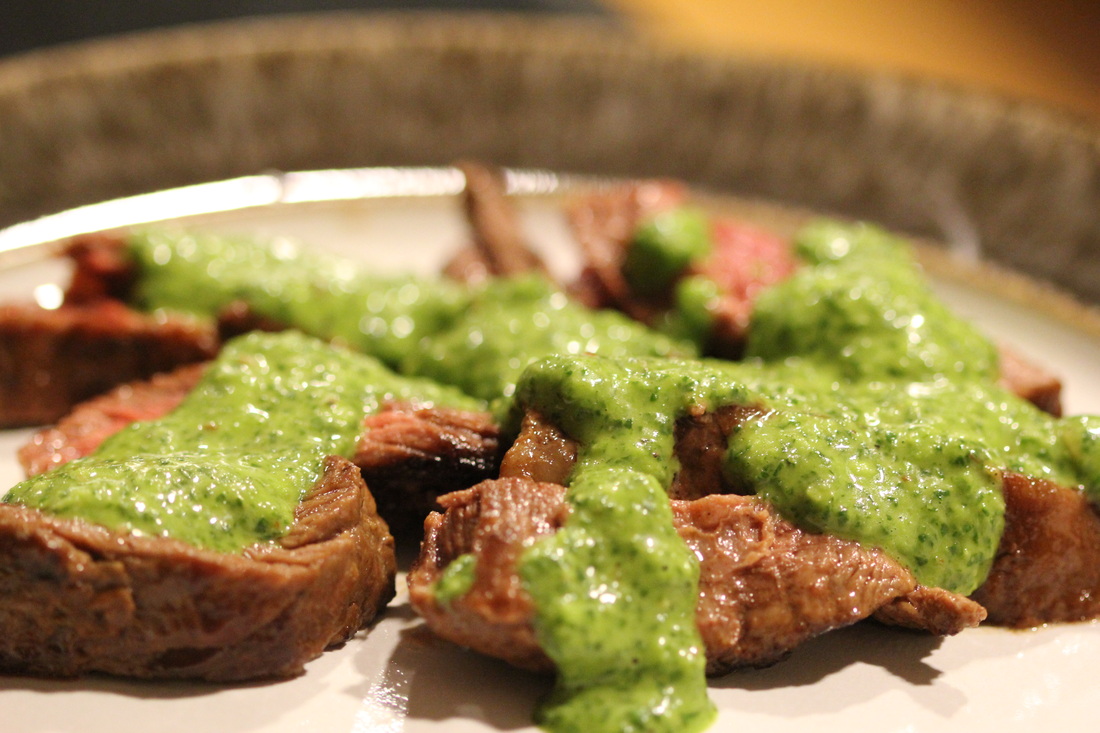 This skirt steak was super tender, perfectly medium rare (the best way to eat a steak) and went beautifully with the chimichuri sauce. And you eat with your eyes first - look at the color of that sauce!
Enjoy!!! 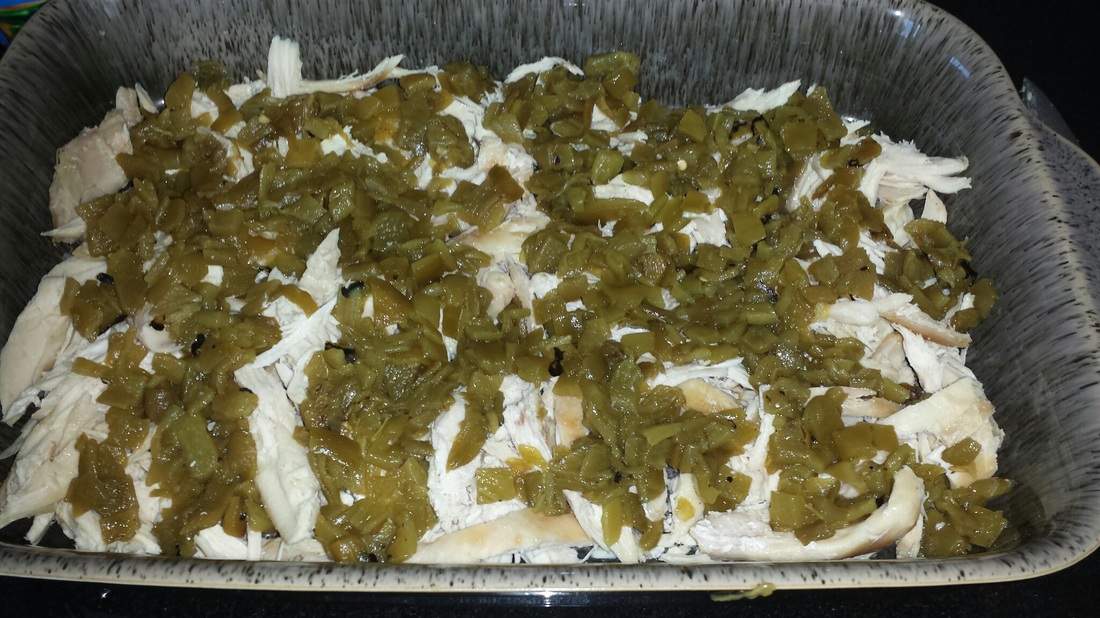 This dish was inspired by the Pioneer Woman's recipe from Food Network called "Lazy Chile Rellenos". You are supposed to use whole chiles, but I couldn't find them at the store, so decided to improvise. I also added chicken (store bought rotisserie!) to make it a heartier casserole. Ingredients: Chicken Canned green chiles - I used 2 small cans Fresh poblano pepper 1/2 red onion 2 cloves garlic Monterrey Jack Cheese Eggs Half & Half (or whole milk) Chicken stock Smoked paprika, dried chilies, cumin, garlic powder, salt pepper 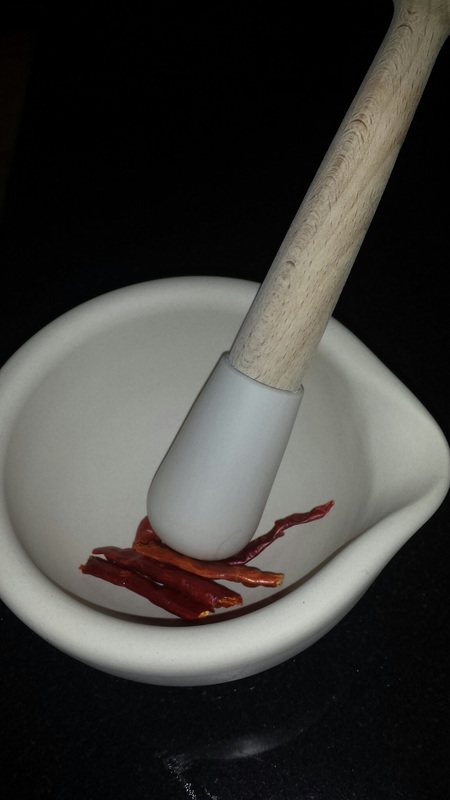 This was an amazing engagement present from my twin sister, Holly! A mortar and pestle from Williams Sonoma. It is great for grinding dried chilies! 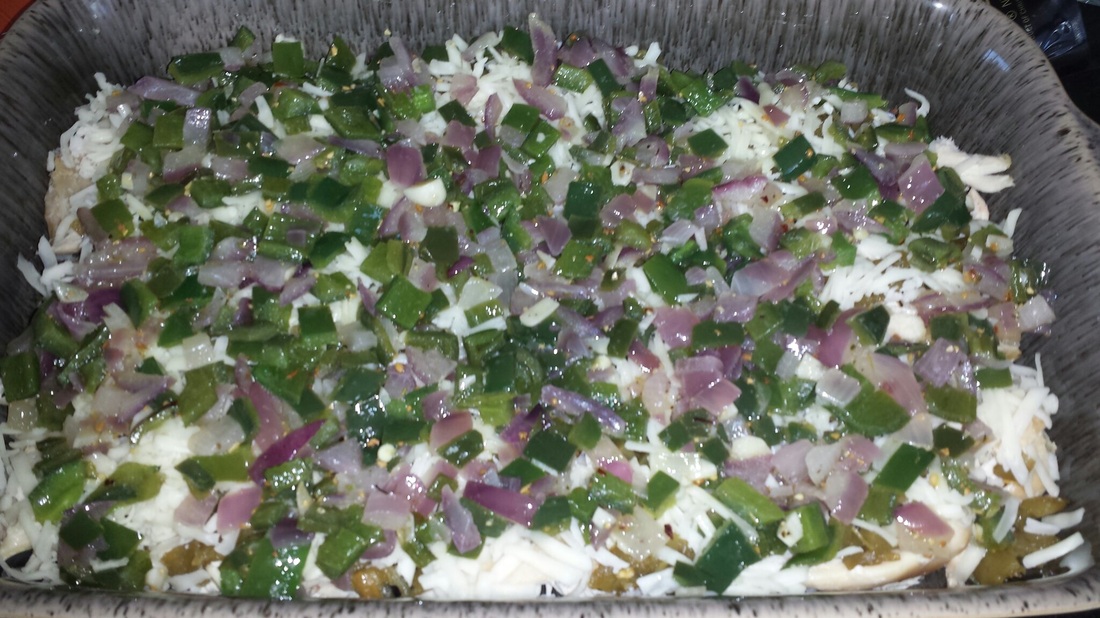 I wanted to add an extra element and layer, so sautéed 2 fresh poblano peppers, 1/2 red onion and garlic. This went on top of the chicken and canned green chilies, and a layer of cheese. 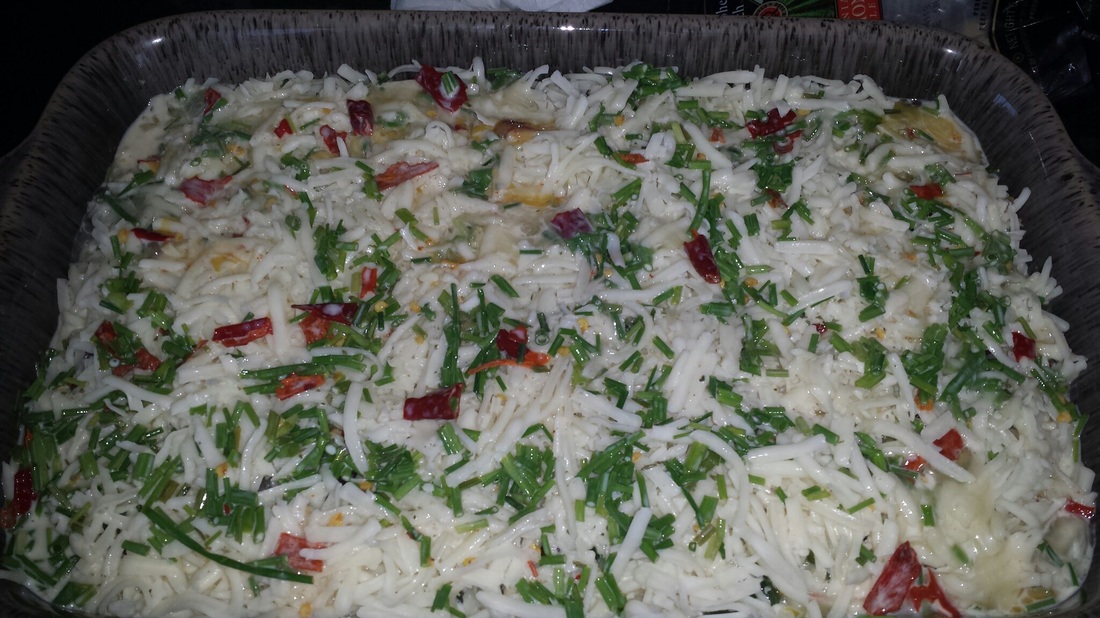 After you have all of your layers, you add the egg mixture on top which was 5 eggs, 1 cup of half and half, a splash of chicken stock, dried chilies, and chives.  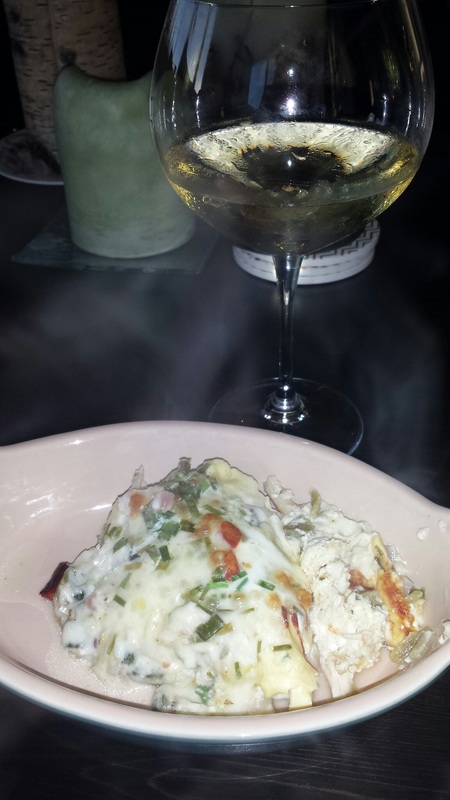 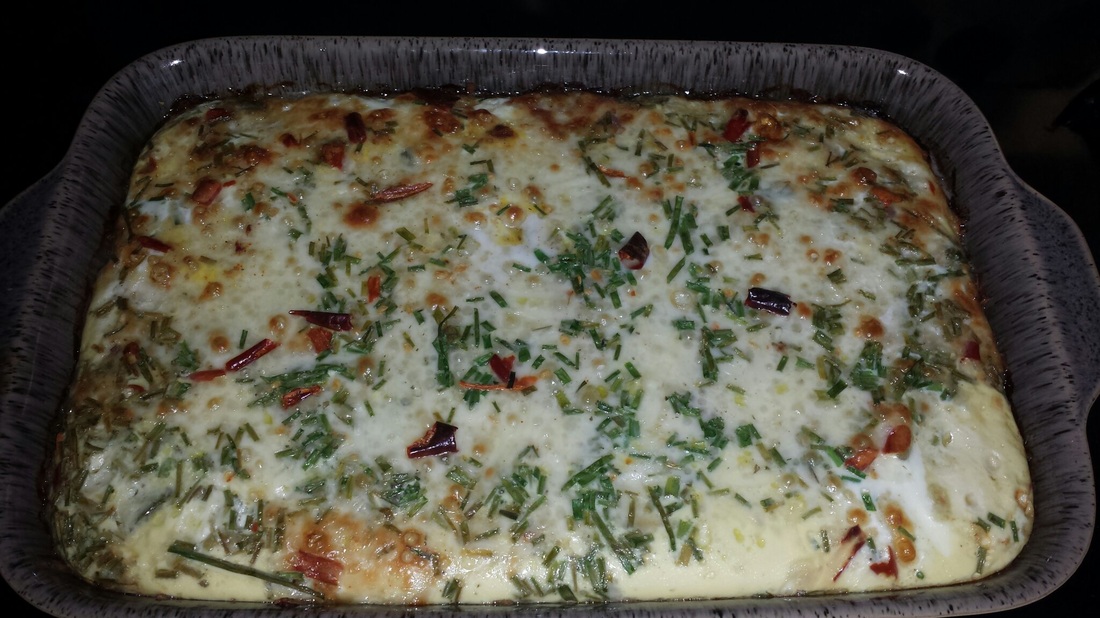 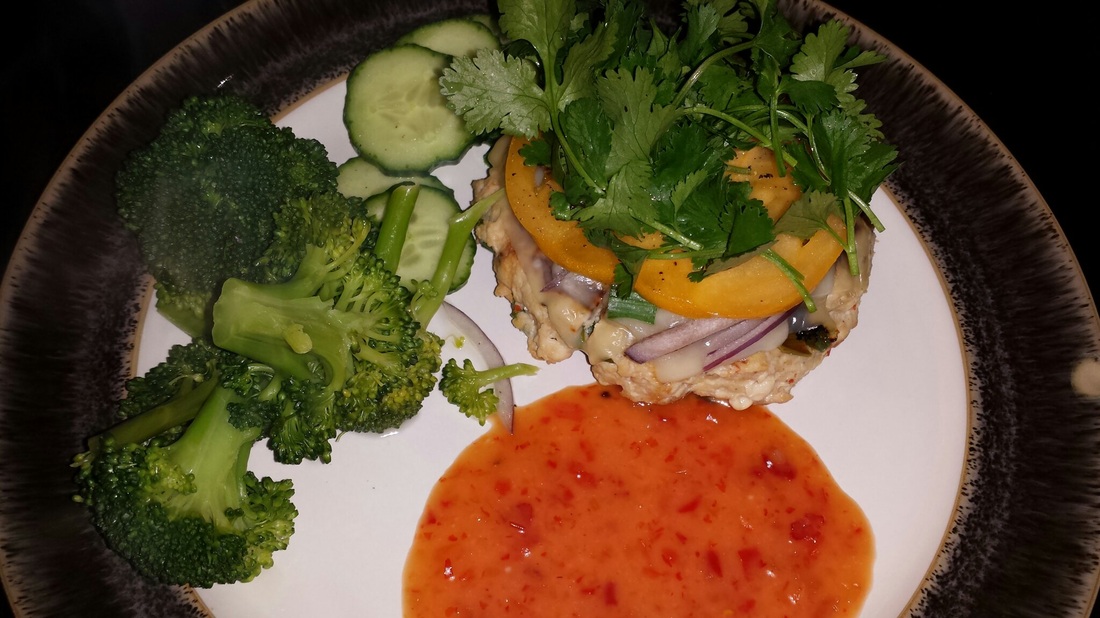 My husband and I always like to talk about what we are going to make for dinner on our shuttle ride home from work - it has actually turned into a joke as I am always the one to ask the question. This week, I tried to be creative and healthy and made Asian Turkey burgers this week - very easy and delicious! David was quite impressed!
Ingredients: Extra Lean Ground Turkey Ginger (out of the tube - super easy and full of flavor!) 1/4 cup chopped white onion Green onion 2 cloves chopped garlic Chopped parsley Ginger soy dressing (adds some oil to the burger) Sweet chili sauce Soy sauce Toppings: Swiss Cheese Thinly sliced red onion Heirloom Tomato Cucumber Cilantro Side of steamed broccoli I mixed all the ingredients together, making sure not to over mix. I thought I added too much of the ginger, so I took some out, but it turned out to be a fine amount to use and really added an "it" factor to the burgers. I grilled them on my new panini press grill and they turned out great! |
Categories
All
AuthorWelcome to our blog! We are twins who love cooking, trying new restaurants, and taking photos of food in San Francisco. We love to improvise and come up with fun, creative and easy recipes. They are meant to be inspirations for you to come up with your own unique recipes, or follow along with what we do - your choice! We enjoy taking pictures of food whether at home or out at restaurants, and of course, we love our burrata and chardonnay. Enjoy! Archives
February 2018
|


 RSS Feed
