|
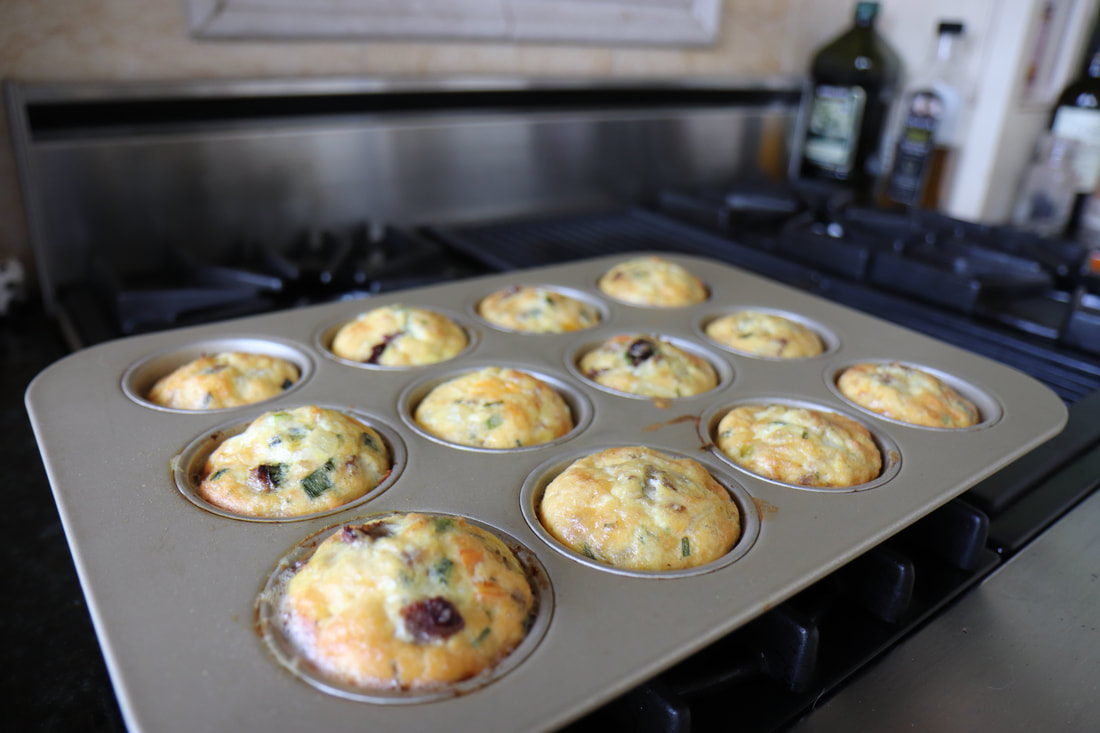
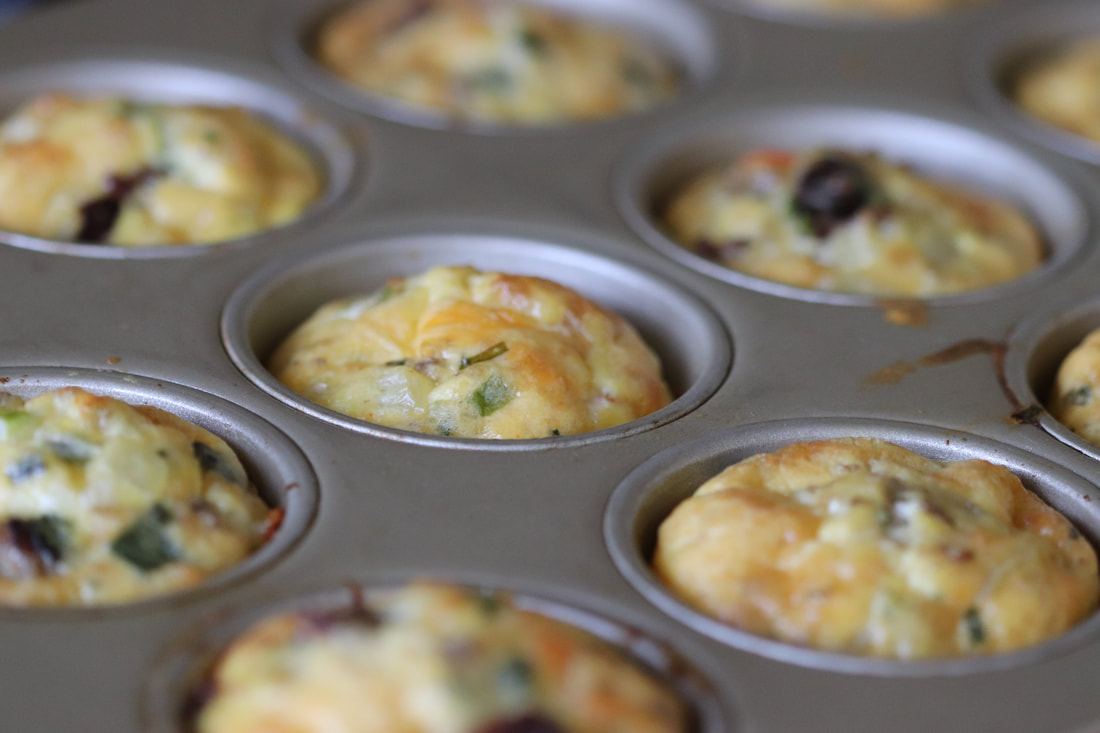
These eggs muffins are so easy and are some of the best time savers that you can do to have a hearty breakfast ready in seconds, any day of the week. Perfect for keeping things low carb and will keep you full of energy throughout the day! 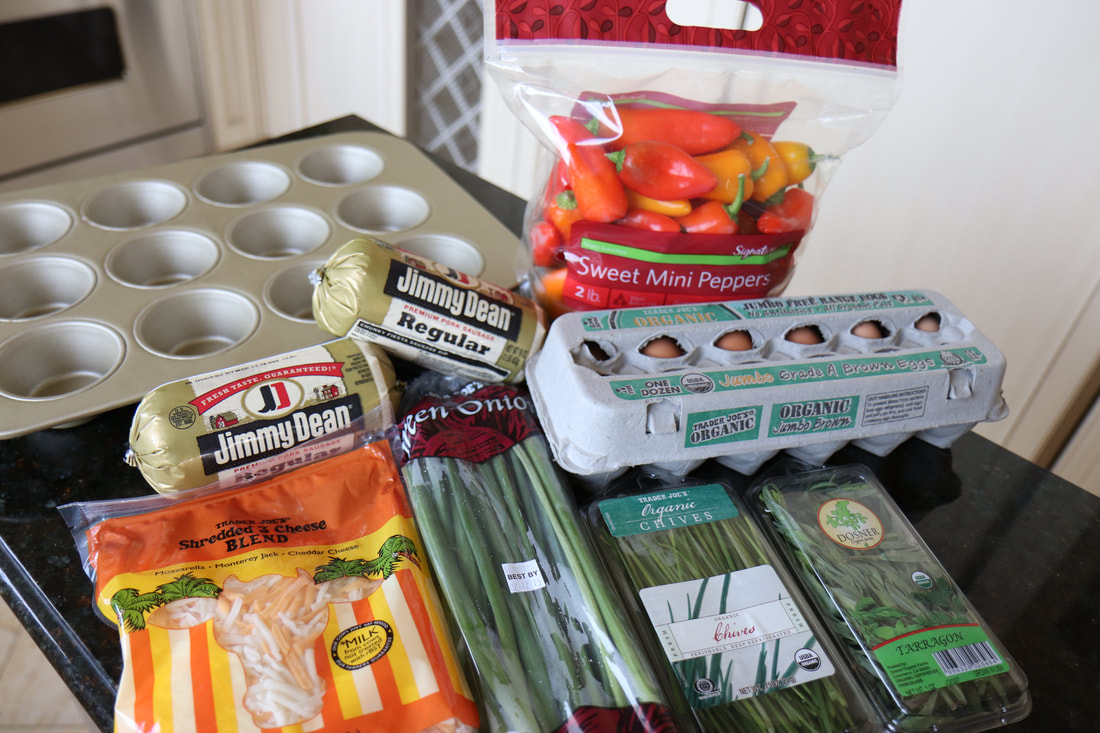 Ingredients:
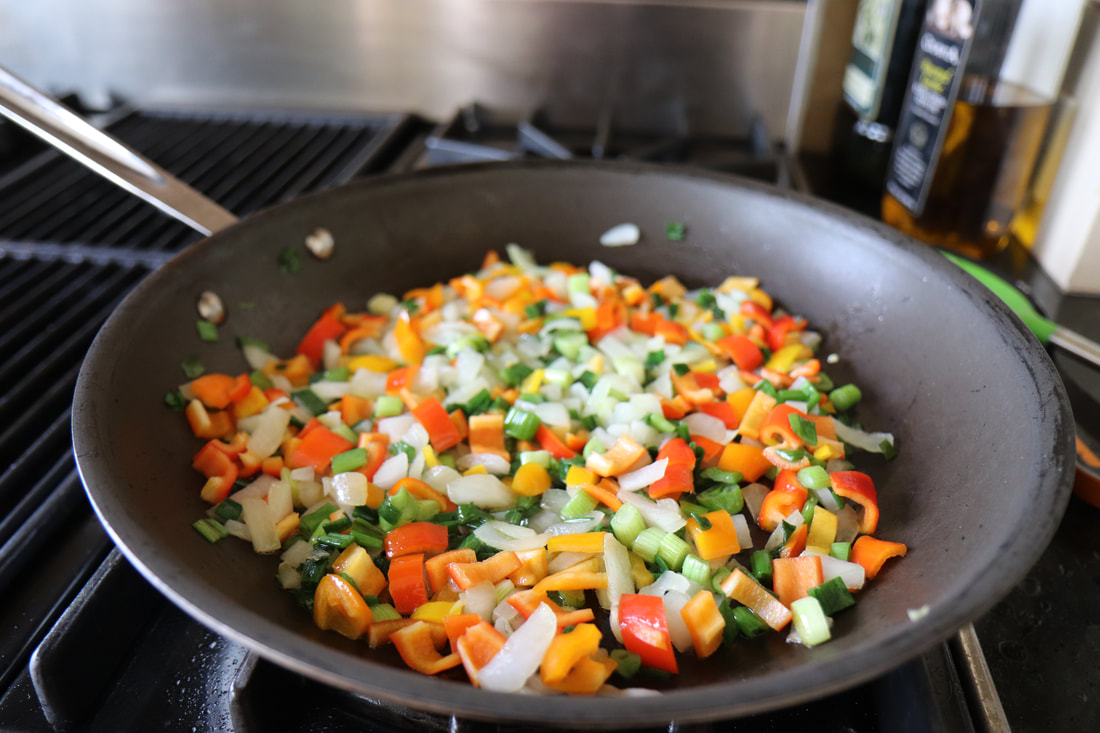
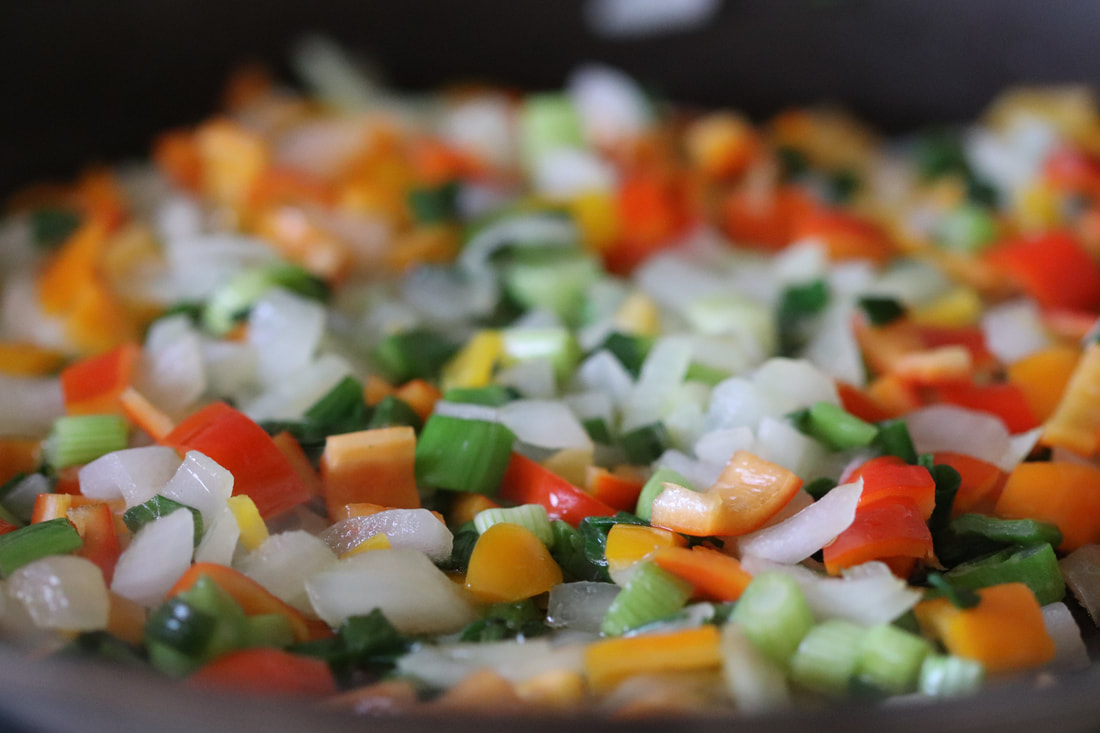
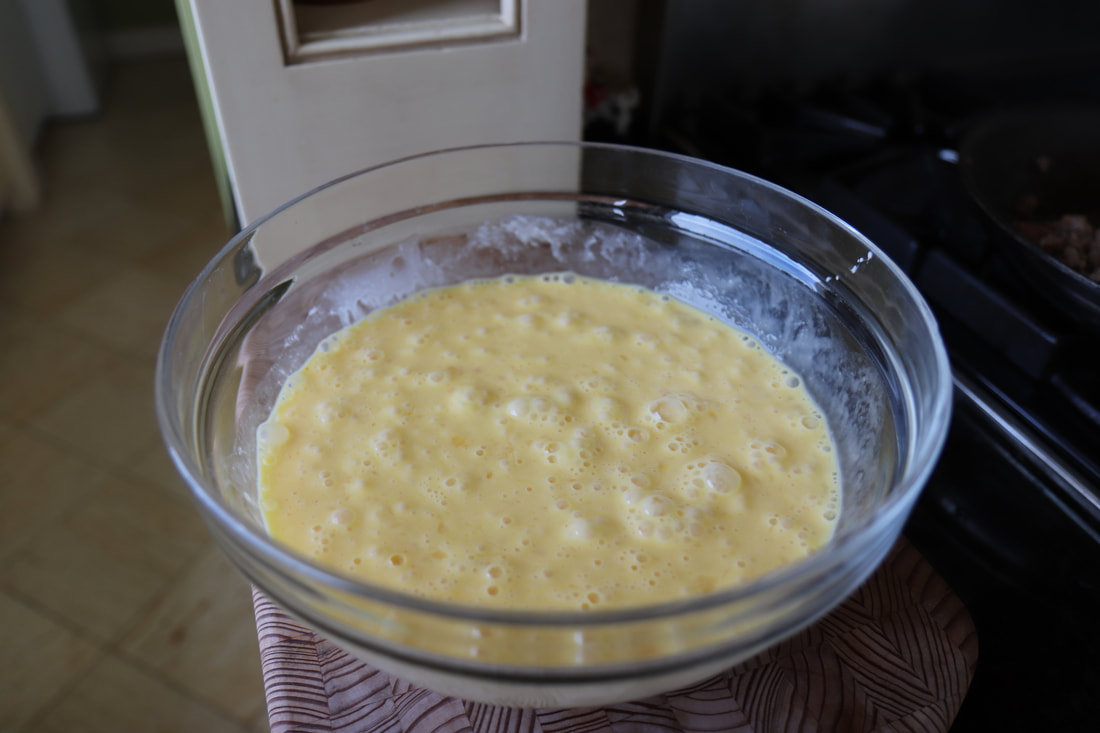
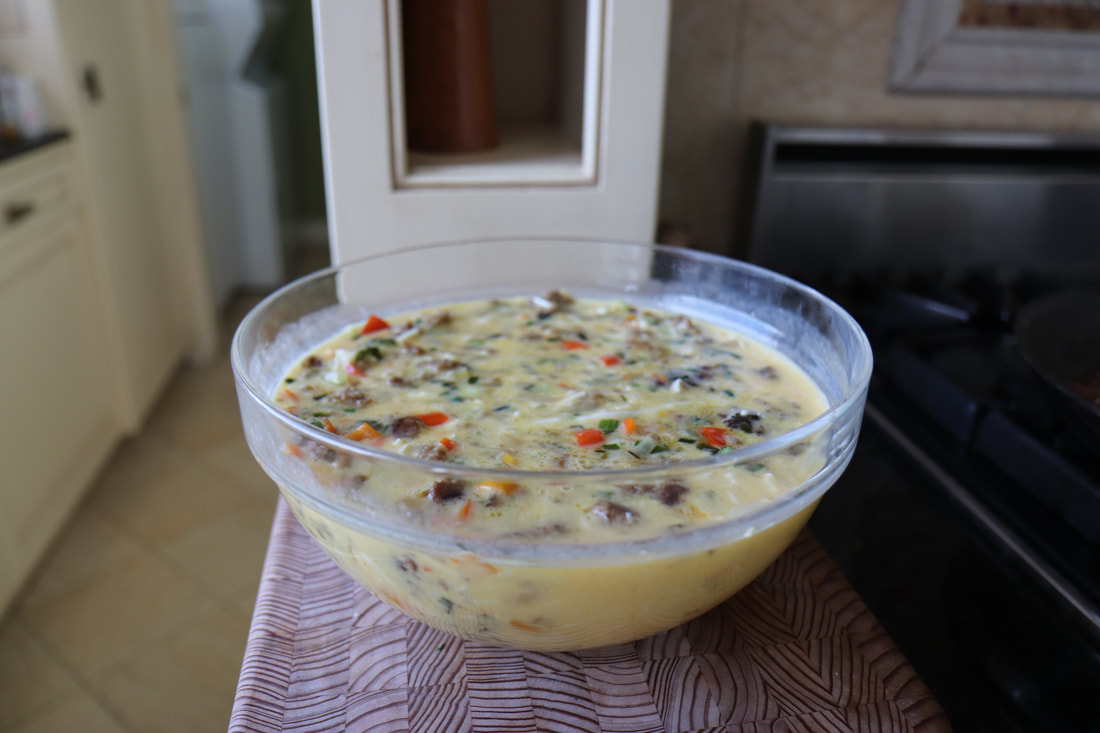
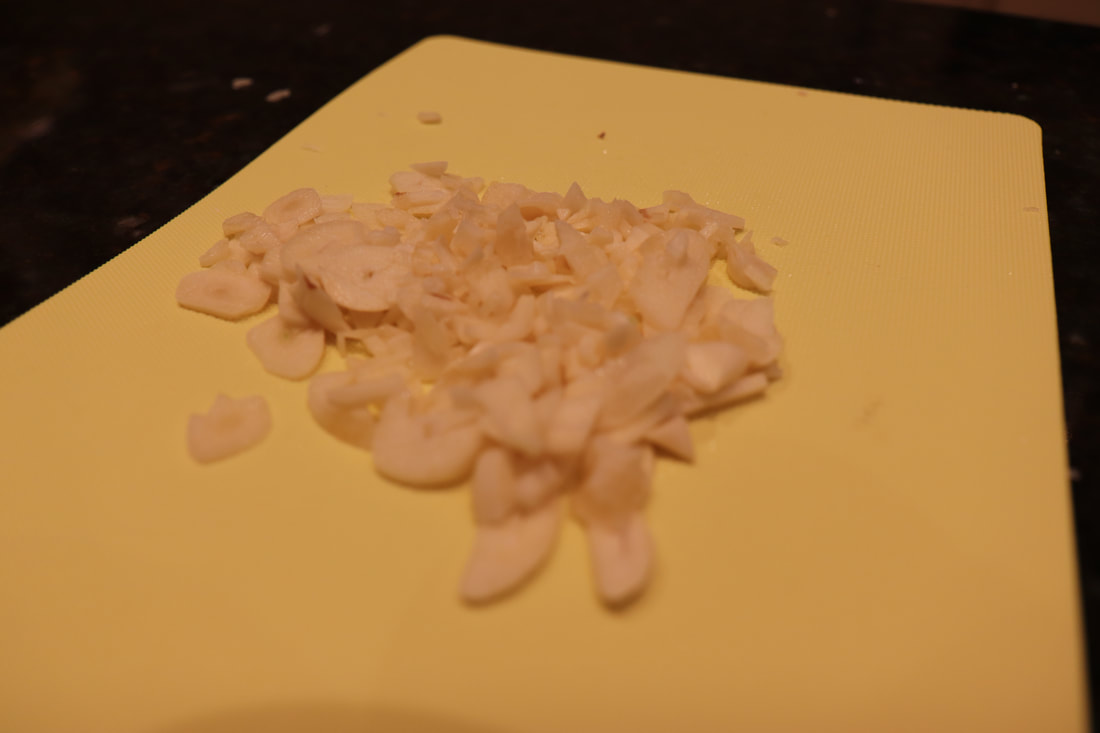
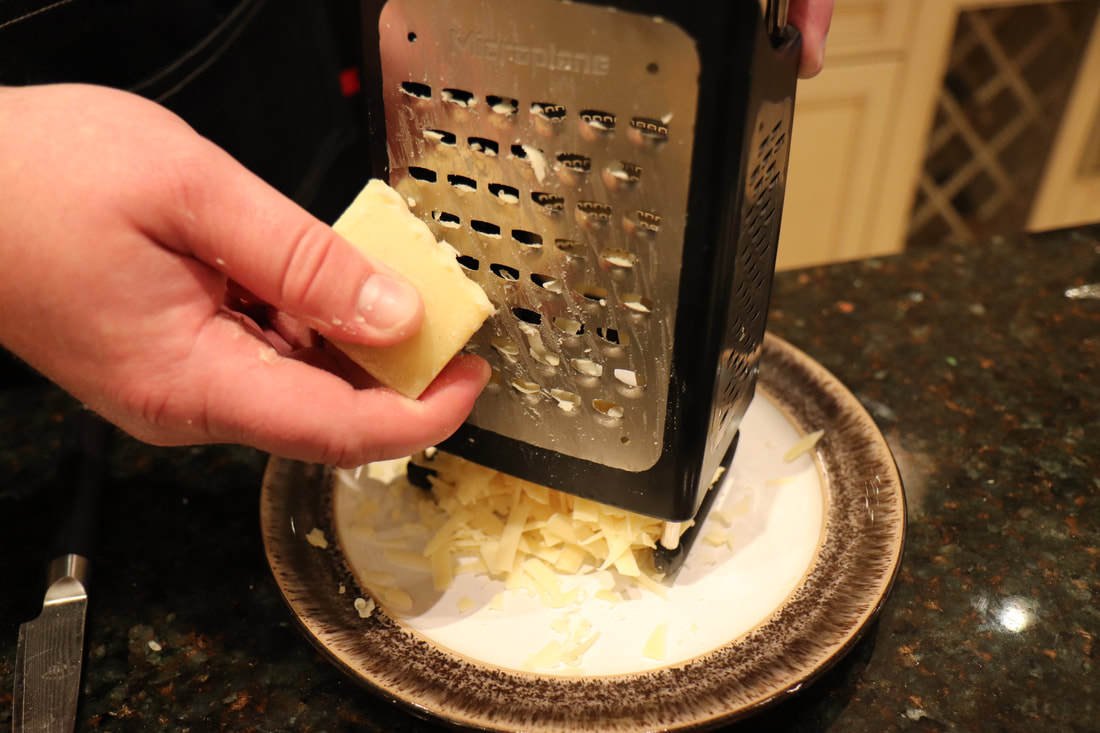
 Start by browning your sausage. I recommend placing the sausage in a flat layer over the entire hot pan and let it rest there to make sure it browns nicely - then you can flip to the other side, let that side brown, and then break it all up into bite size pieces. In the same pan with the sausage grease (you may need to drain a little bit of it) sauté your onions, peppers, and green onions until they become soft and translucent. Set aside the sausage and veggies in a bowl to cool - you may even want to stick this bowl in the fridge to cool down, as you do not want to cook the eggs when you add the eggs to this mixture. 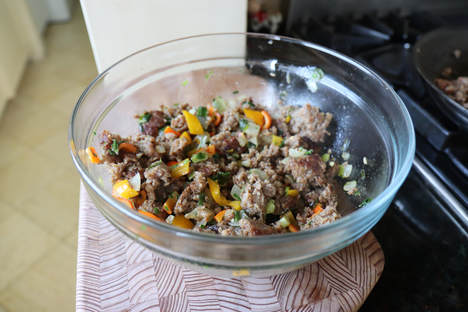 In a separate bowl, whisk the dozen eggs, half & half, cheese, salt, pepper, and garlic powder together. Add the eggs to the cooled sausage and veggie mixture. Oil a muffin baking pan and scoop the mixture into each of the divots. You can fill them up just over 3/4 of the way full. 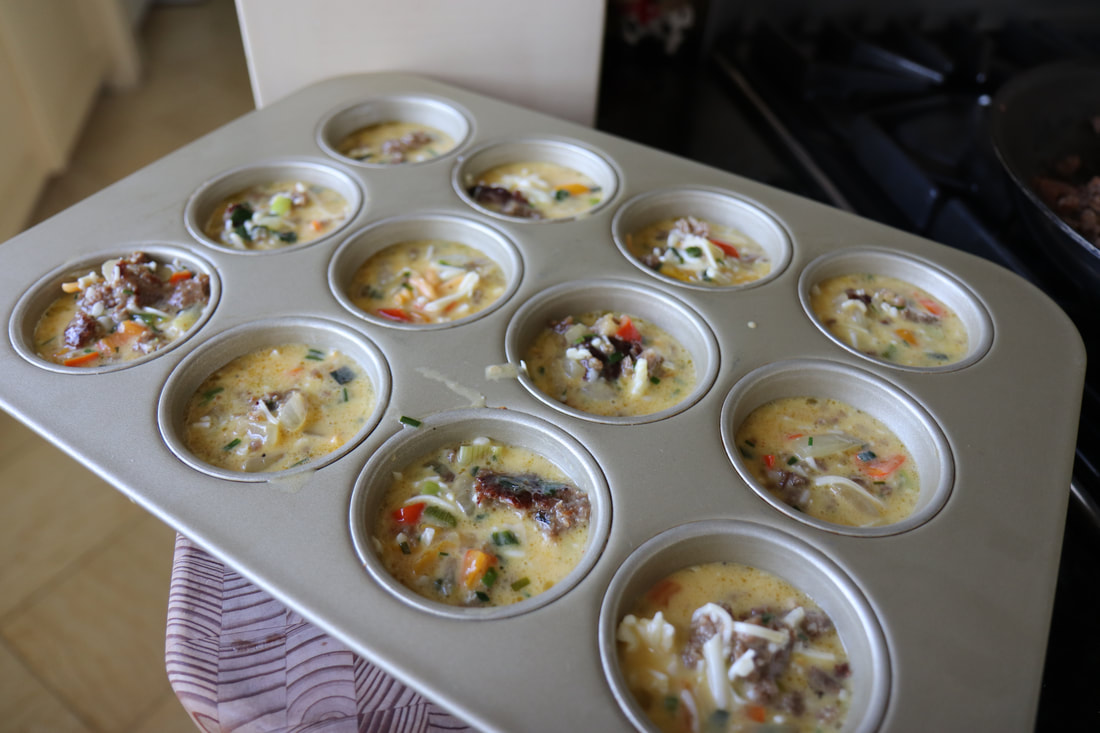 Bake at 375 degrees for approximately 20-25 minutes. You can keep an eye on them to make sure they are not bubbling over throughout the cooking process. 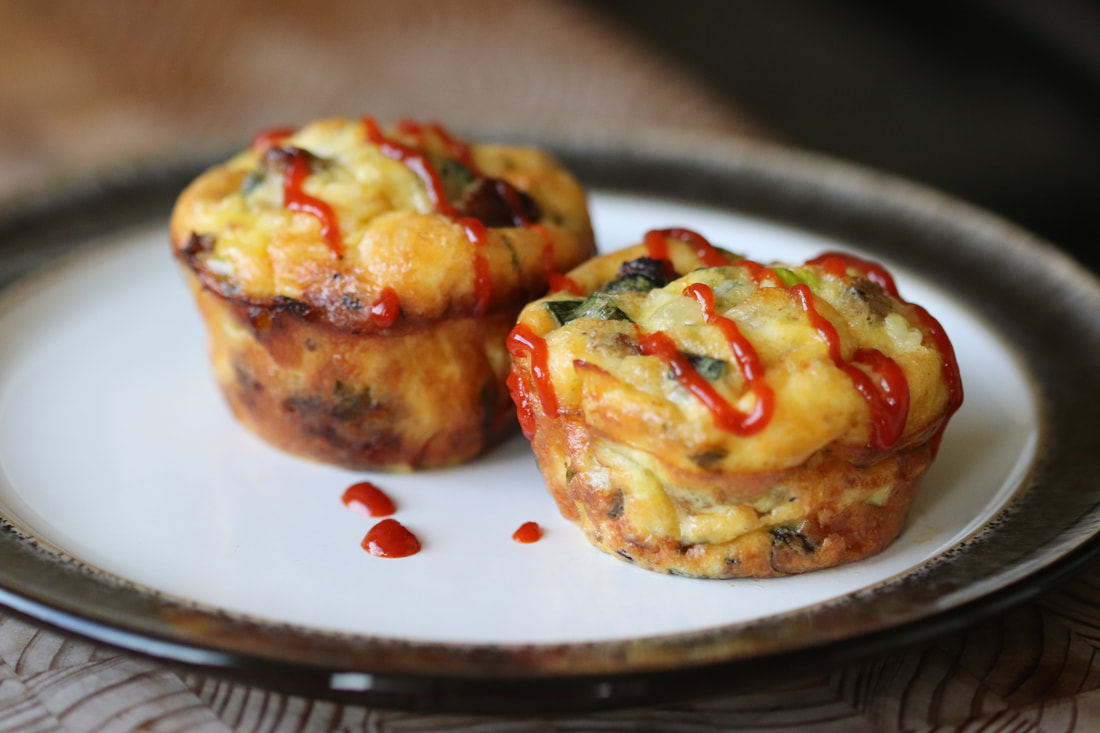 Serve with a drizzle of your favorite hot sauce! Store in an air tight container, and you have an easy breakfast that you can serve on any weekday and will keep you and your family full! Enjoy! 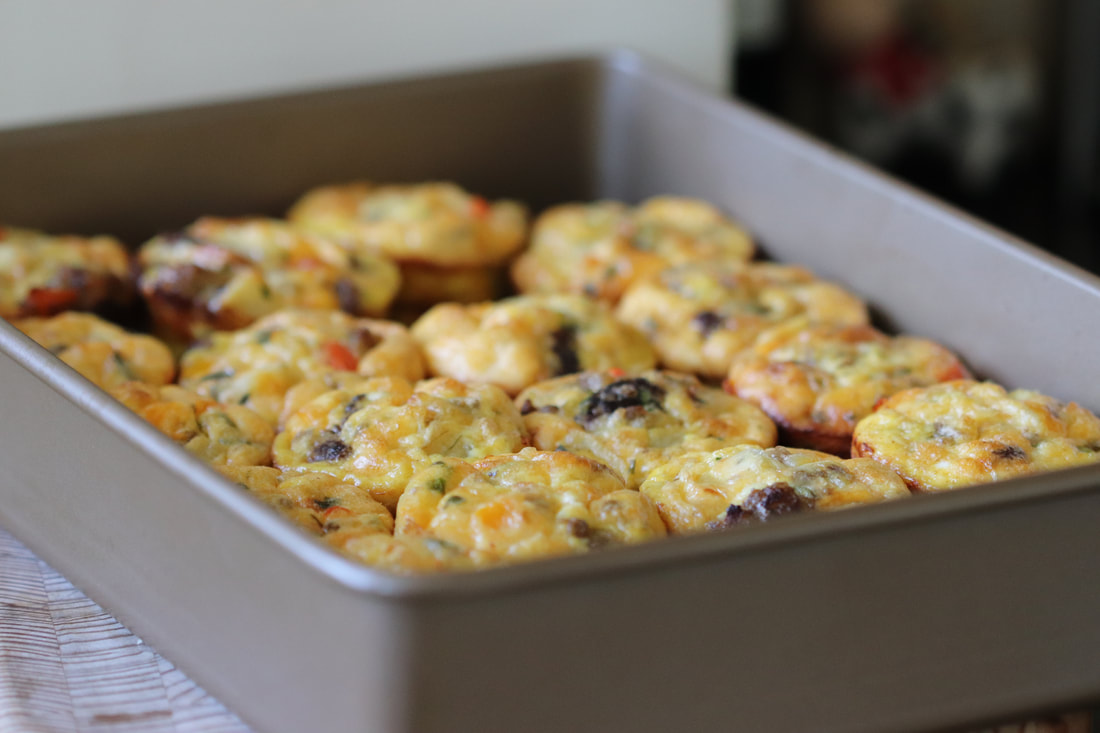
1 Comment
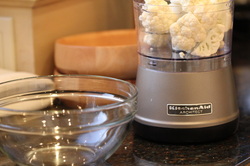
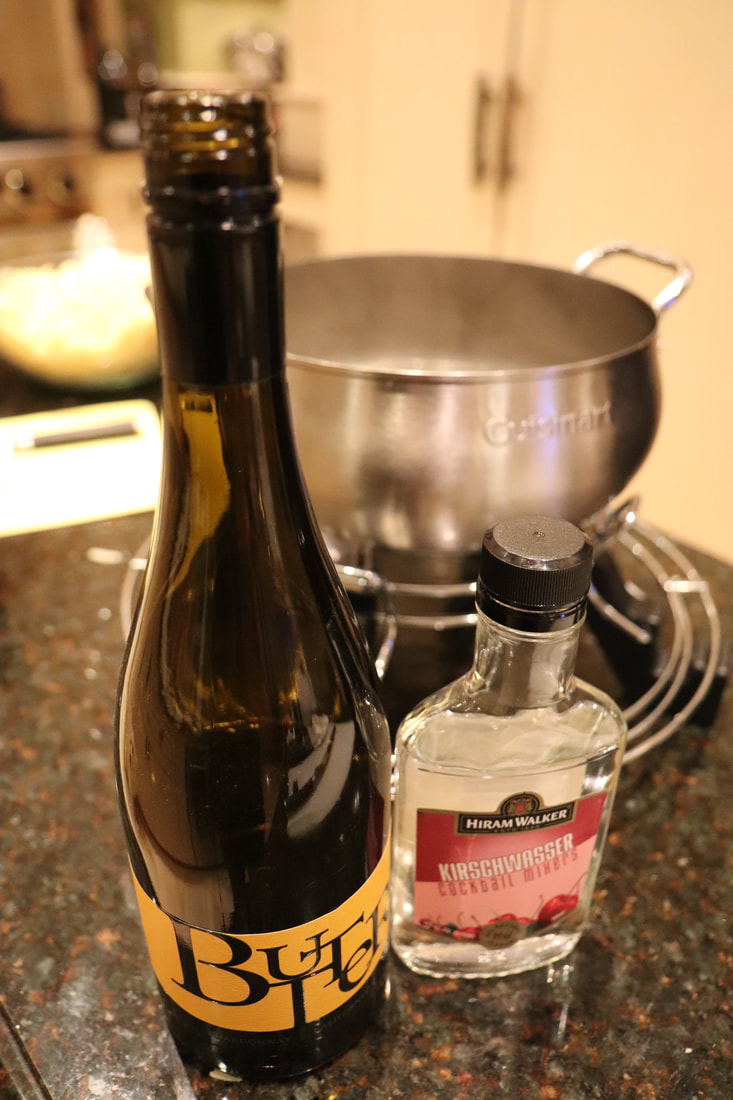
It's no secret - we love cheese. And anytime cheese can be the star of a meal, we are all in! Fondue is one of our favorite and extravagant meals to make. It is perfect for entertaining and can make for a very interactive experience for all. We definitely recommend using a high quality cheese, which is what we have done here, and grate your own! We used Emmental and Swiss cheese for this fondue. 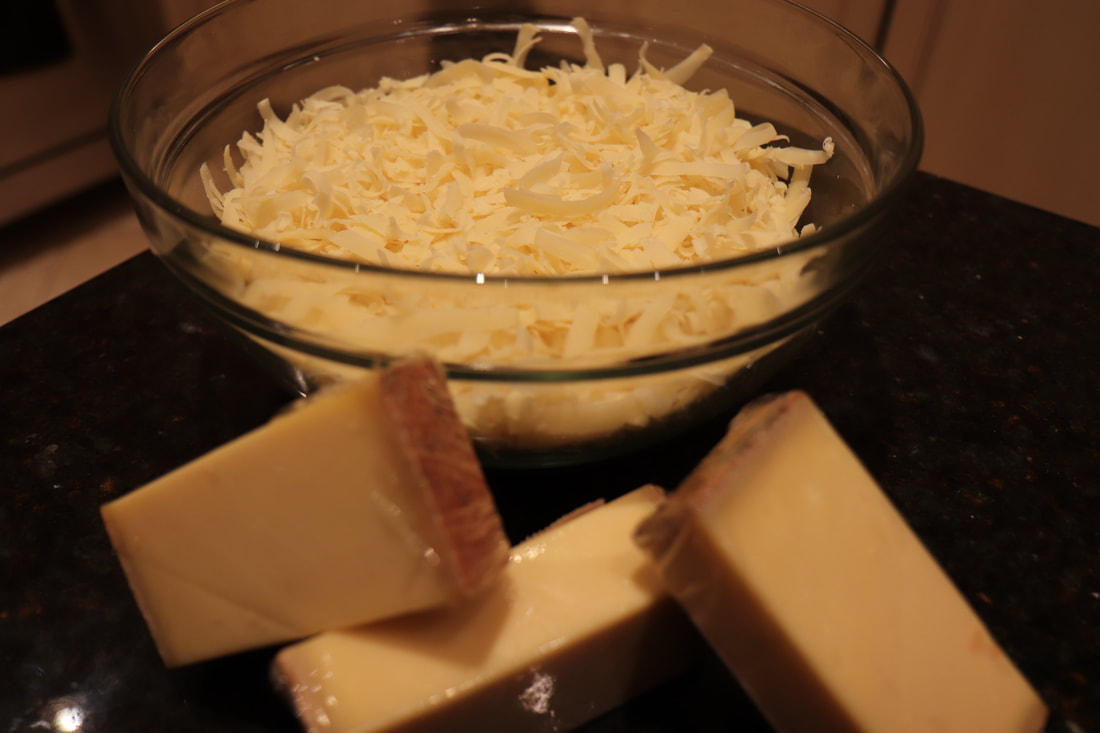 Once the cheese is grated (about 3 cups), you can add it to your fondue pot, along with 2 Tbsp of freshly chopped garlic, 2 Tbsp Kirschwasser (cherry flavored liquor), and a half cup of chardonnay. 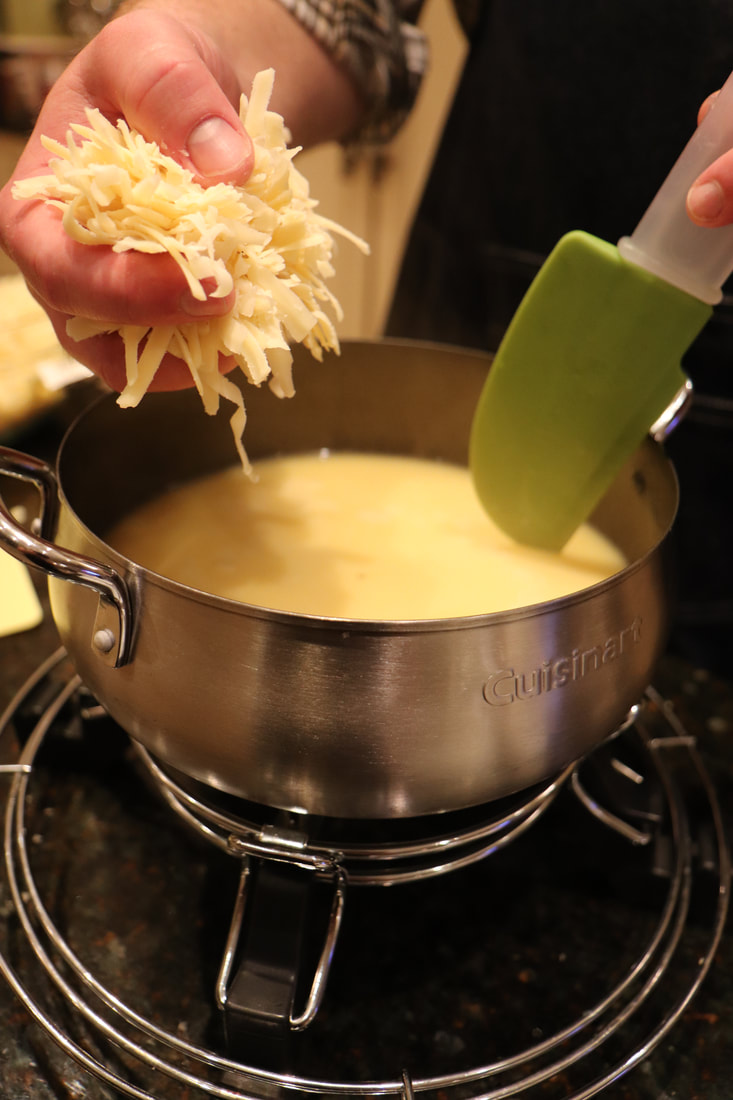 Keep adding the grated cheese and it will all meld together to become one glorious pot of bubbly cheesy goodness. We chopped french bread, olive loaf bread and salami as well as vegetables like broccoli, cornichons (small pickles), and cauliflower. It's nice to have a variety. 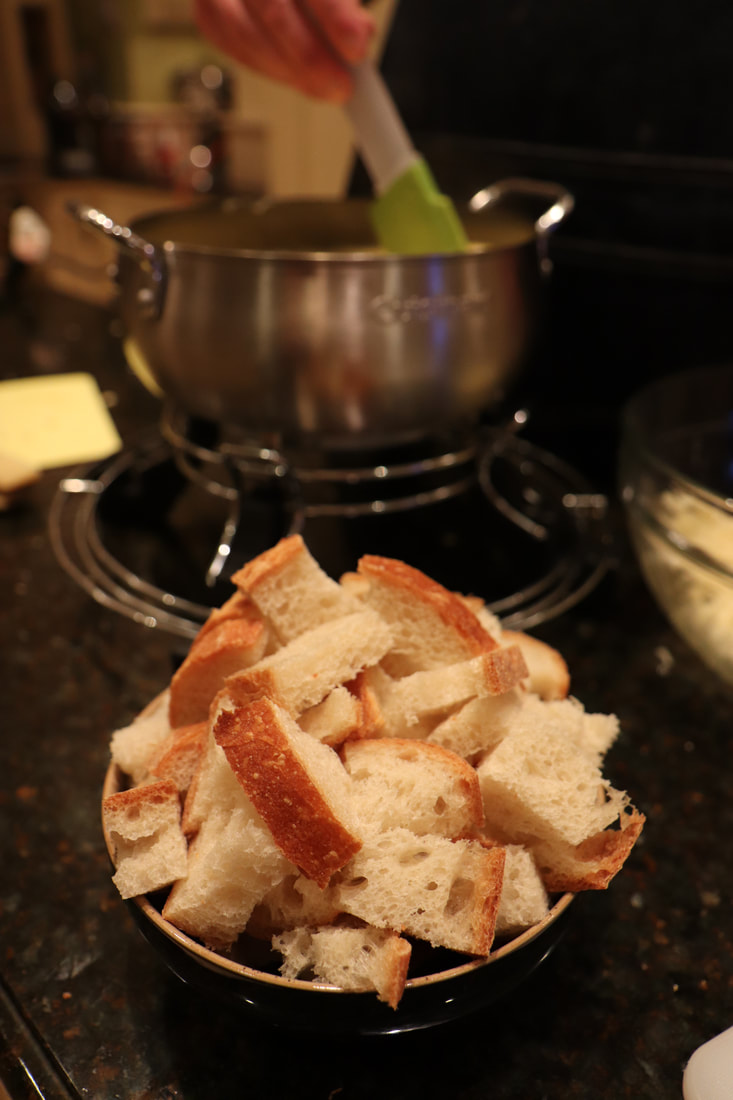 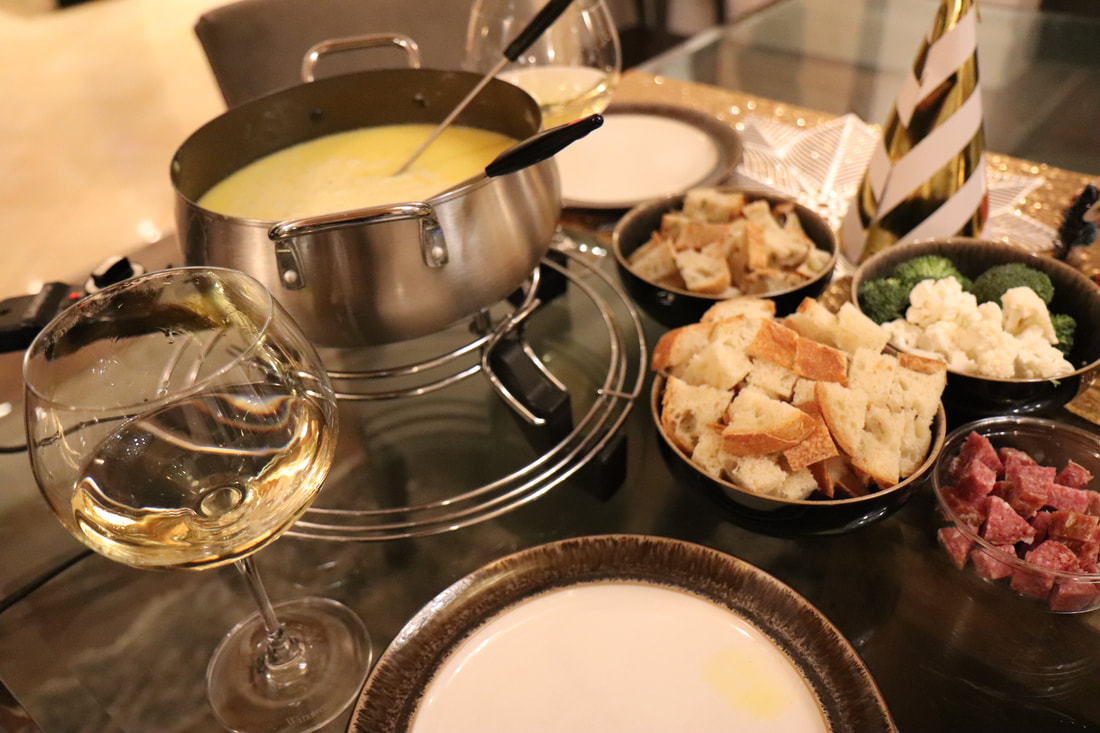 This is a wonderful dinner party idea and something that everyone can be involved with. And of course it goes great with Chardonnay!
This is a delicious meal that is perfect for a cozy home cooked dinner - perfect for our "cool" San Francisco summer nights! 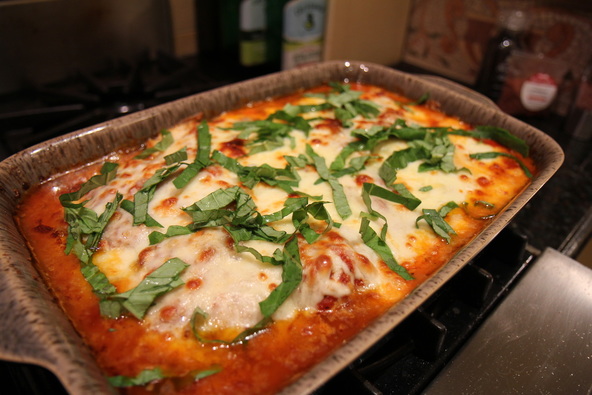 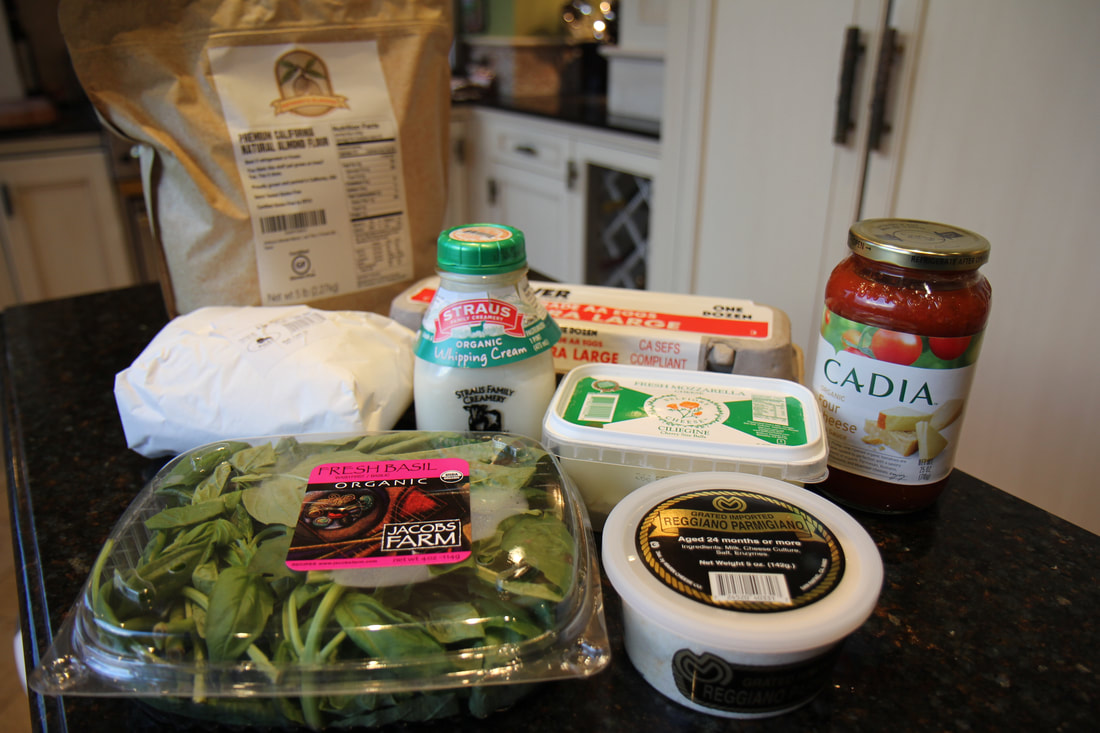 Ingredients:
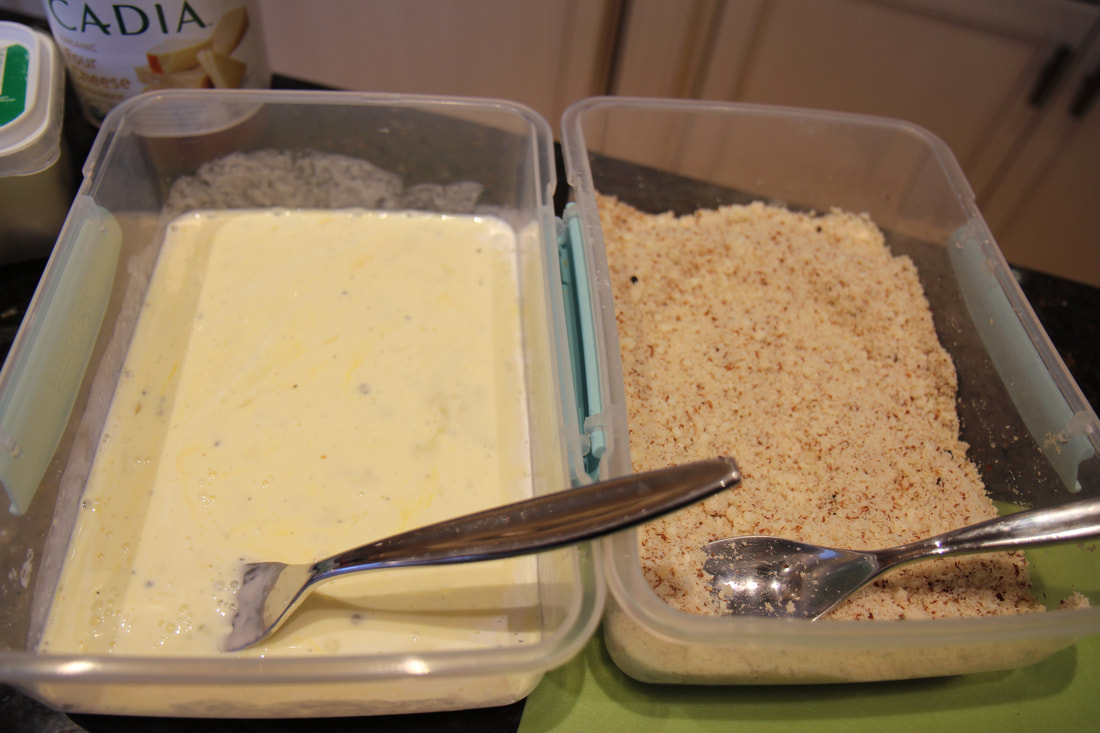
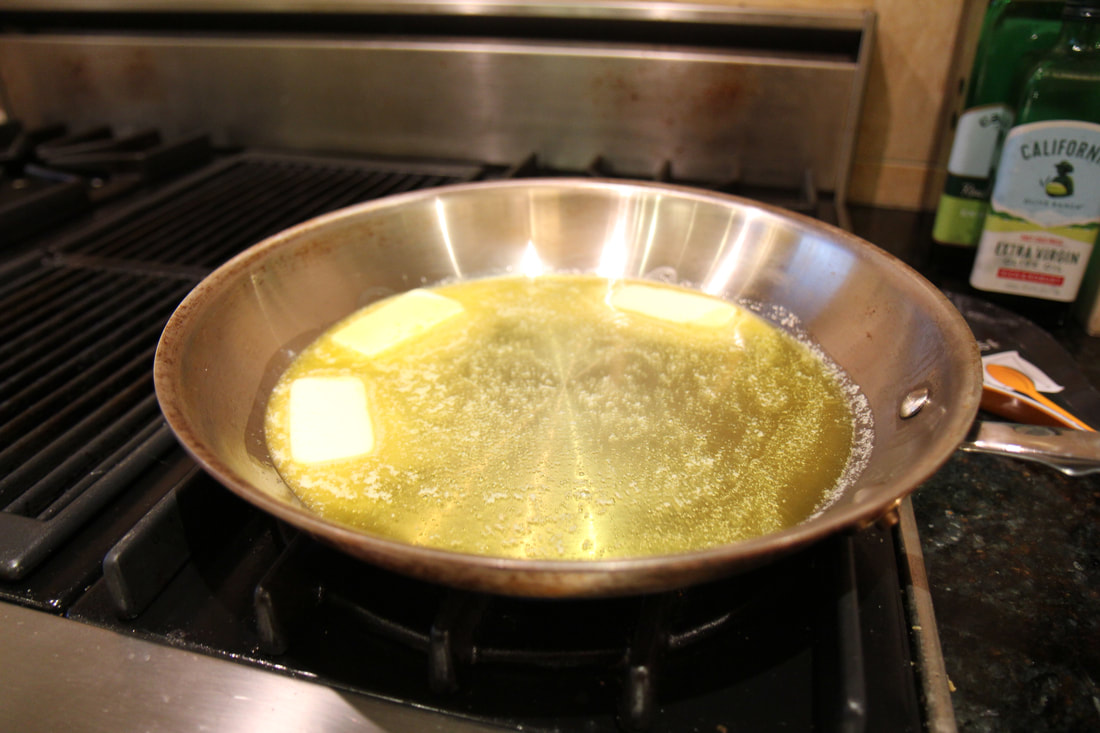
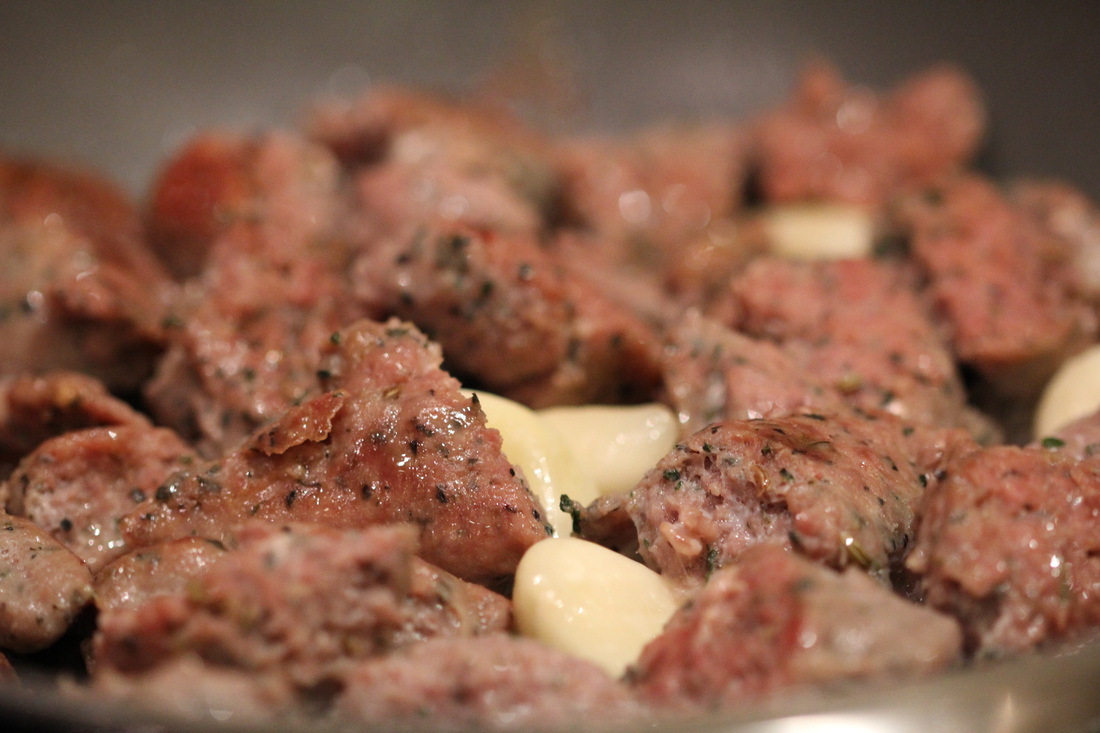
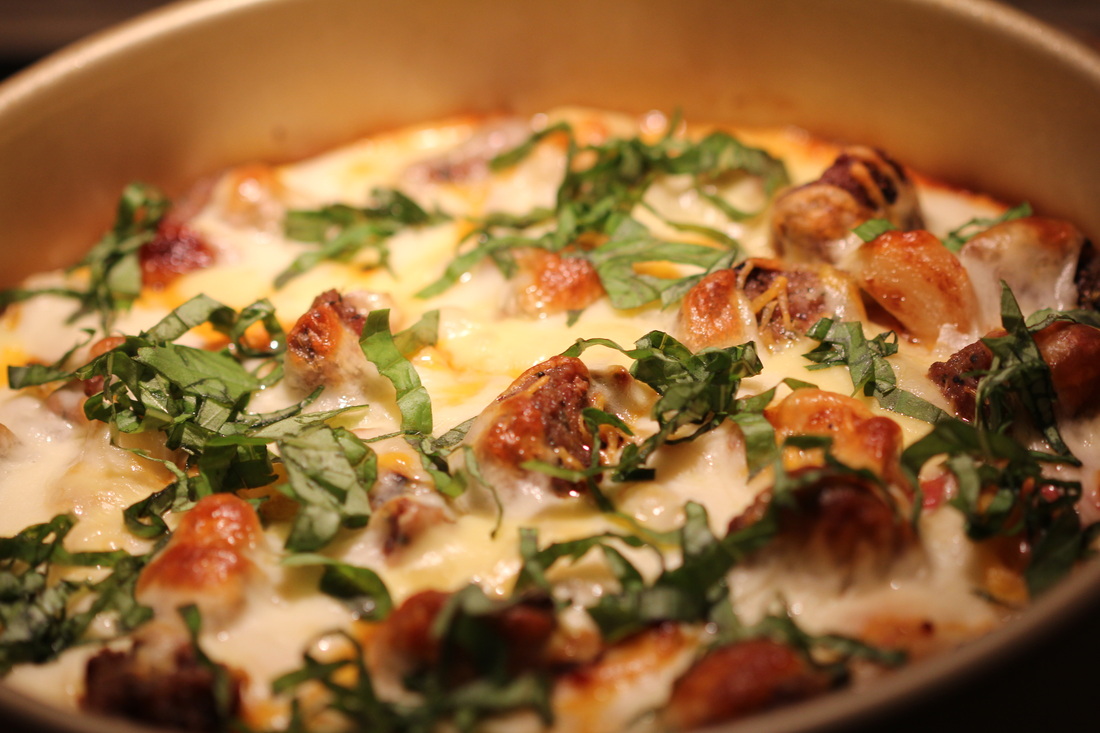
Whisk your eggs and 4 Tbsp of cream together for your "wet" ingredients dish. Combine 1 cup almond flour with 3/4 cup grated parmesan, salt and pepper for your "dry" ingredients dish. Pound out your chicken breasts (you can also butterfly cut the breasts if they are larger). Dip them first in the egg mixture, then transfer over to the almond flour/parmesan cheese - pat into the chicken breast to make sure you have a nice coating. 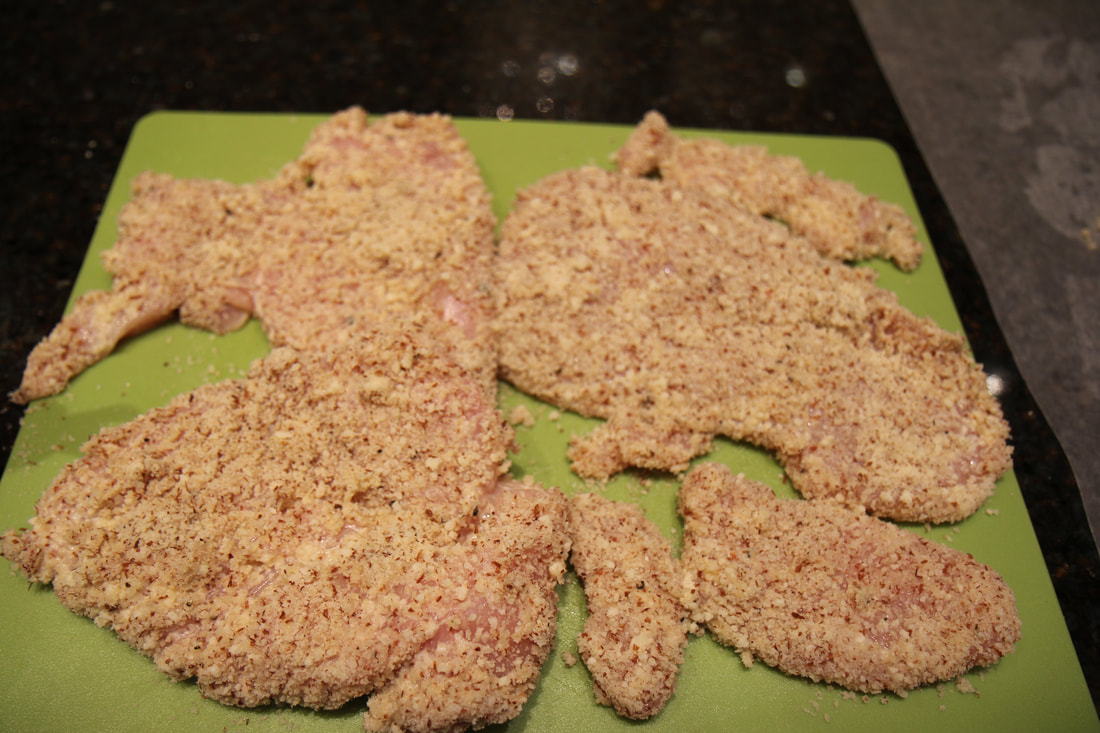 Now get ready for some fun frying! Place the coated chicken breasts in 4 Tbsp of butter and brown the breasts. You may notice some of the breading fall off, but fear not, it all goes into the marinara sauce topped with cheese to bake, so nobody will notice. Put a layer of the marinara sauce on the bottom of the pan, then place the browned breaded chicken breasts on top of the sauce. Layer with more marinara sauce, and then top with lots of delicious provolone and mozzarella - we used both regular and fresh mozzarella! 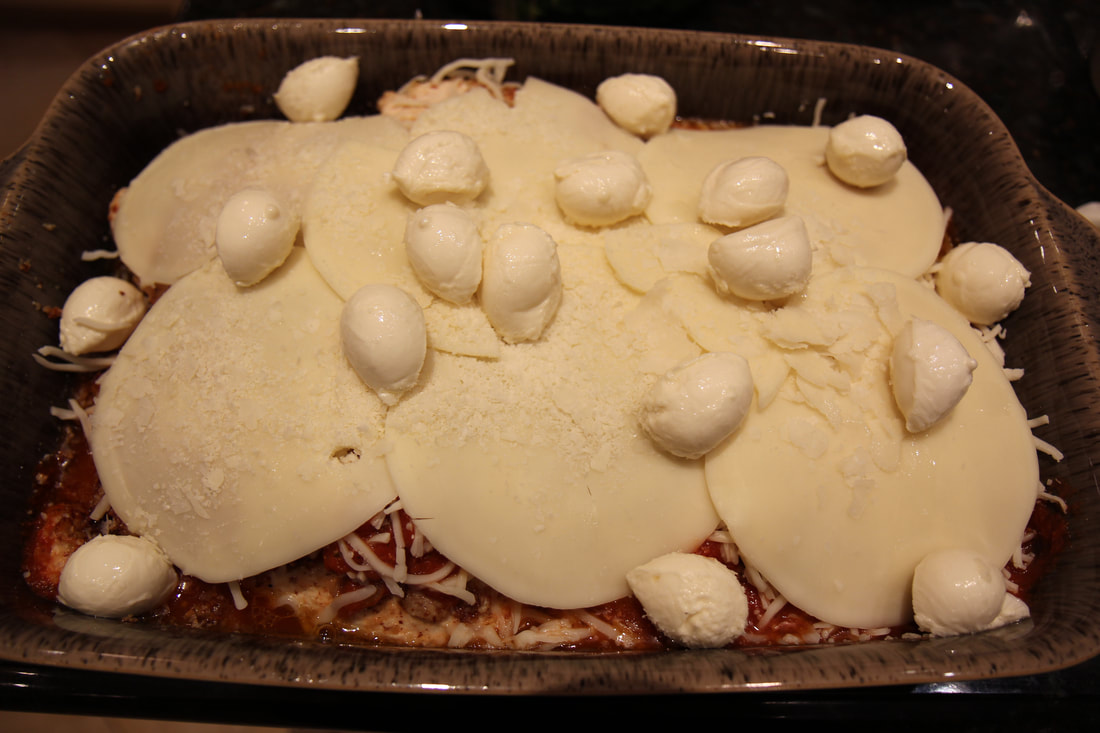 Bake for 30 mins at 375 degrees until the cheese is brown and bubbly. This dish is hot, so make sure to let it rest for a few mins before you start serving. Top with fresh basil and snuggle in to enjoy! We recommend a nice cabernet to go with this comfort meal! 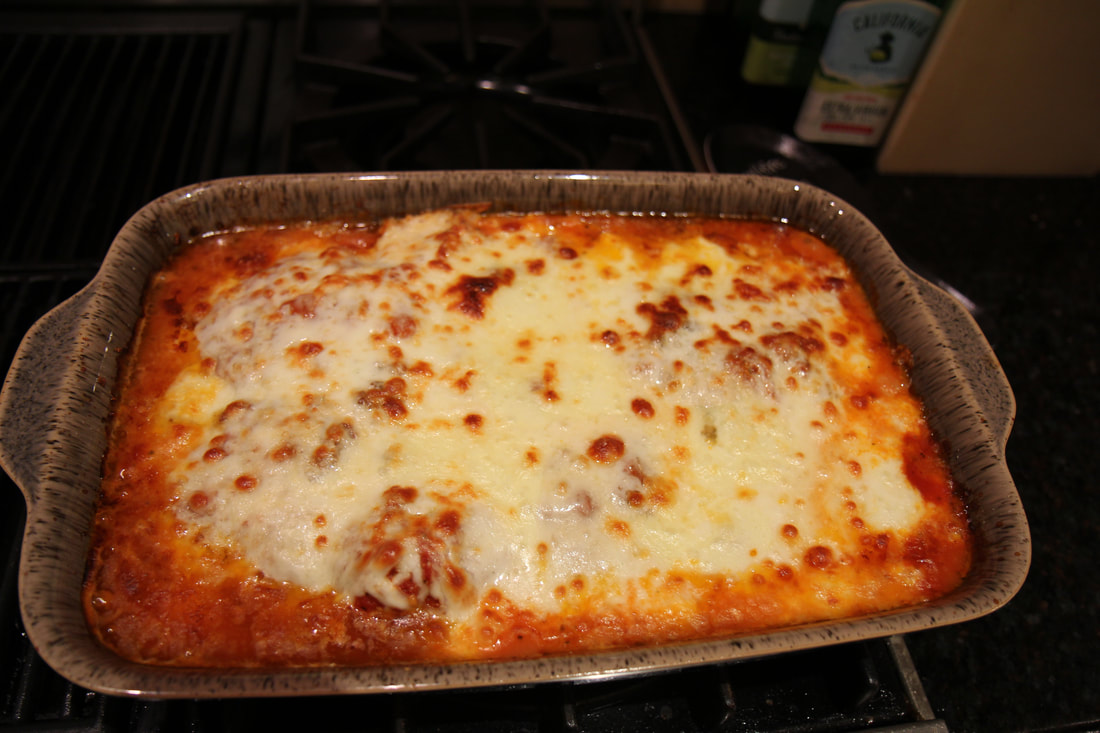 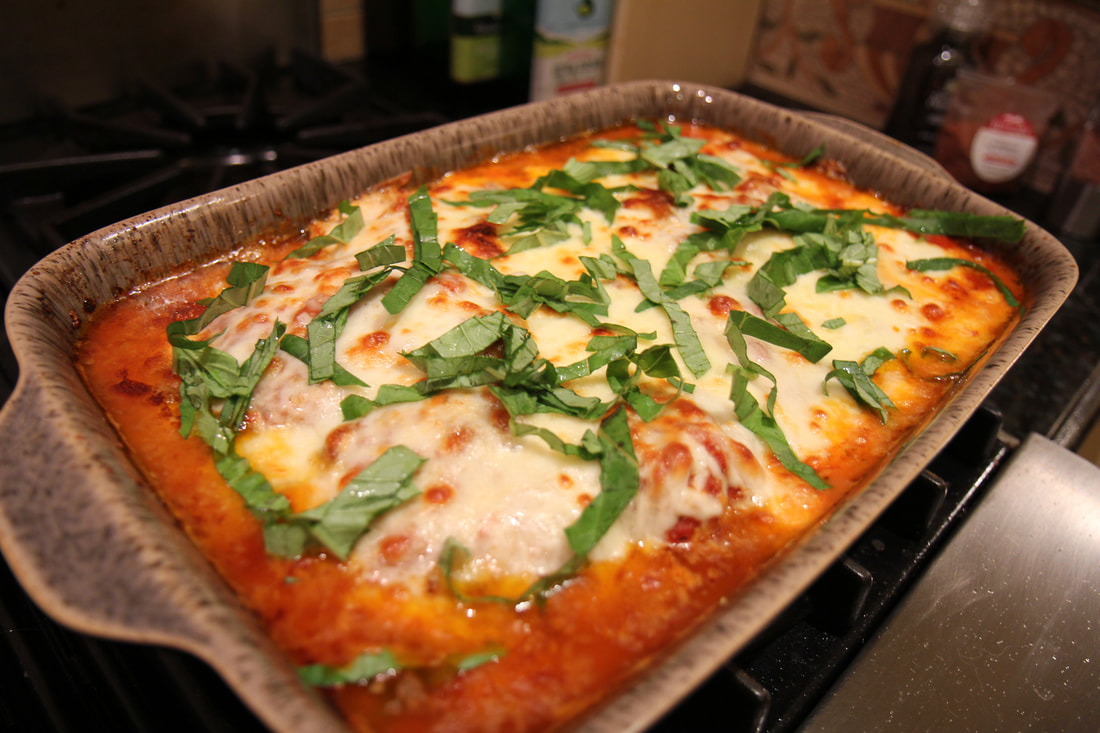 These lamb burgers are a great way to put a new spin on burger night. The feta fondue sauce oozes over the lamb to provide that moisture that lamb usually needs, and really melds the whole thing together. And the baked sweet potato fries could not be easier - and you would swear they just came out of the fryer. Follow along and try this recipe out! You won't be disappointed. 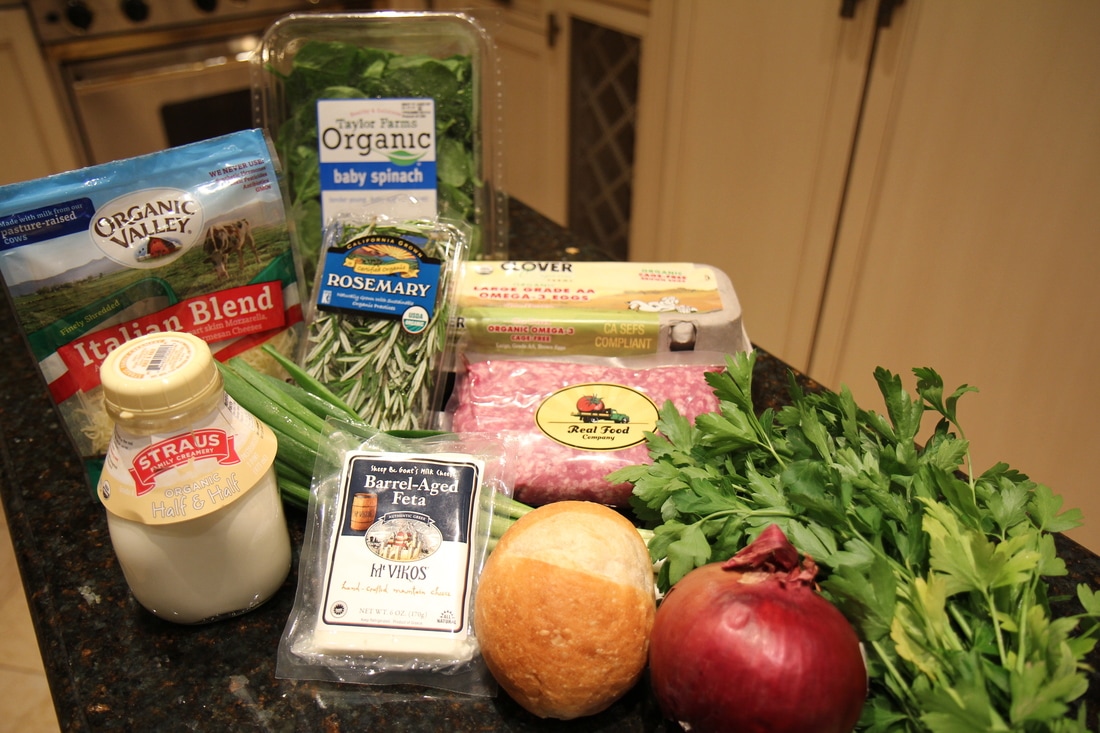 Ingredients:
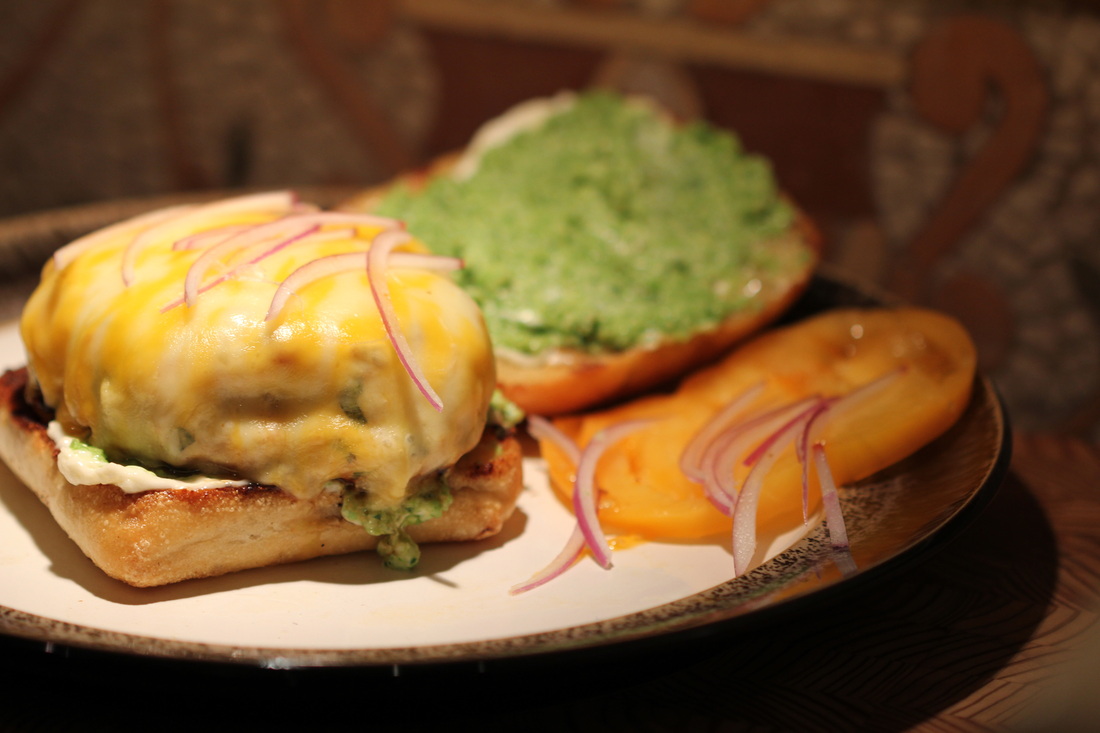
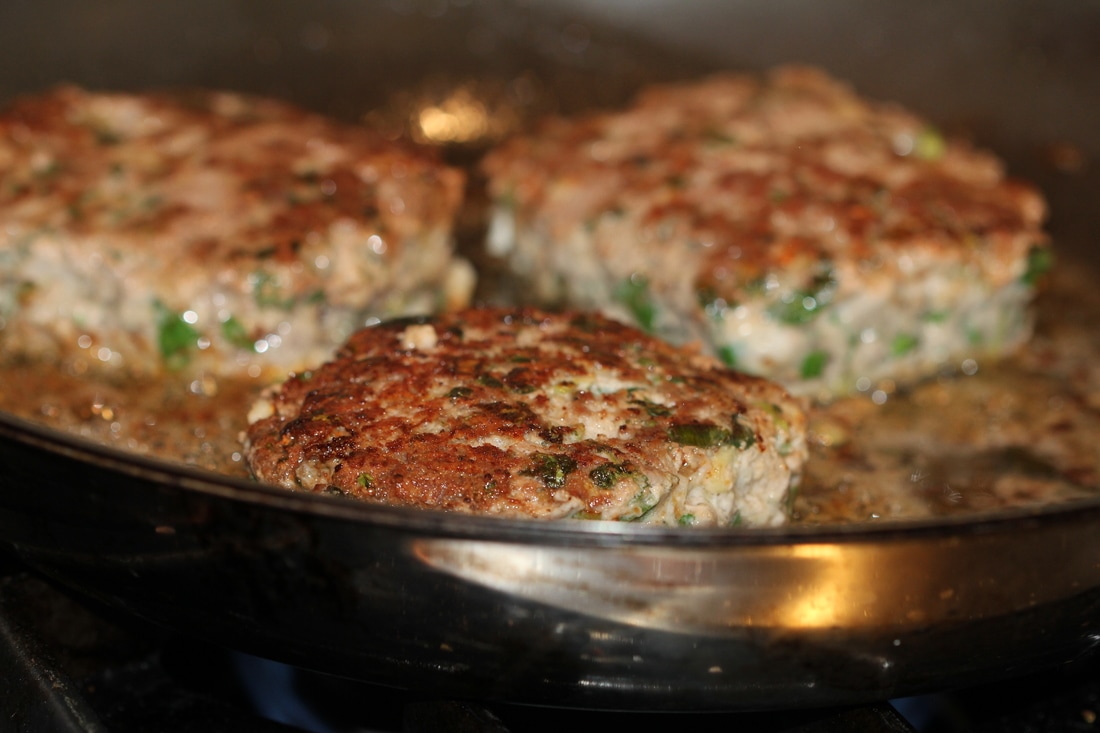
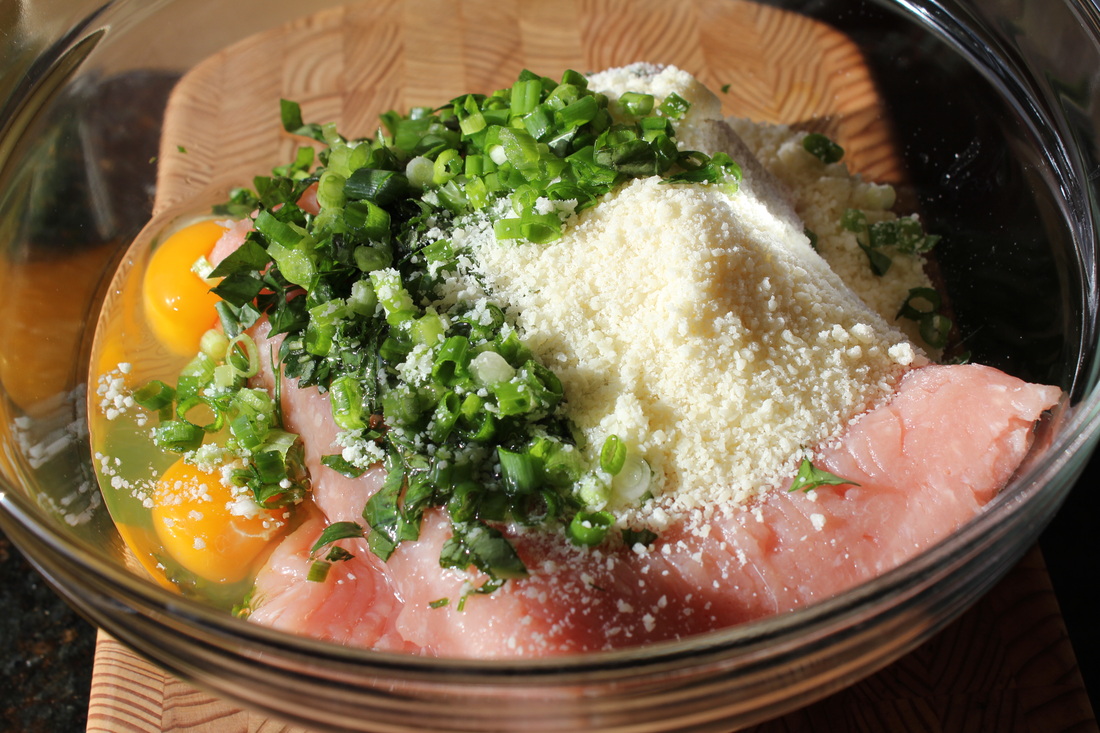
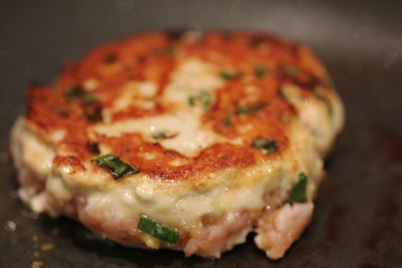
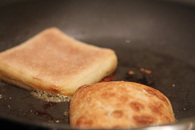
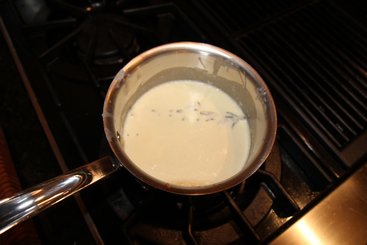 To begin this meal, I started with preparing the feta fondue sauce. I added my half and half (about one cup) into a sauce pan and added 2 sprigs of rosemary to infuse the cream with a delicious rosemary flavor. You'll take this out once it has simmered for about 20 minutes. This will also give the half and half a chance to thicken. 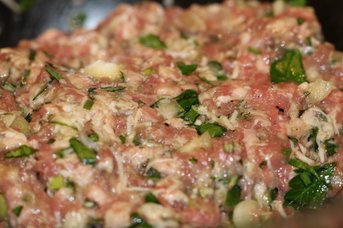 Mix the ground lamb, chopped rosemary, chopped parsley, chopped garlic, chopped green onions and egg all together. Season with salt and pepper (I also added in a bit of garlic powder and red pepper flakes for some extra spice). The best tools to use to mix this? Your hands! Form into patties and set aside to let the flavors meld together. 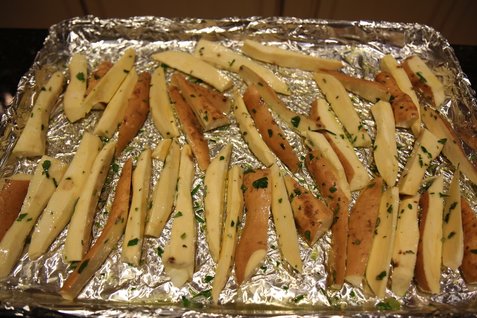 Cut your sweet potatoes lengthwise so they look like "fries" - I peeled some and left the skin on some, and those were definitely my favorite, so I would recommend to leave the skin on all of them. A bit of extra fiber is always good too! Place on a foil lined baking sheet, and toss with olive oil, chopped rosemary and chopped parsley (about 2 Tbsp of each), salt and pepper. Bake for 30 mins at 400 degrees (so that they get nice and crispy!). Take them out once during the process to flip them around to make sure they get cooked equally on all sides. (You can adjust the cooking time based on how crispy you like your fries.) 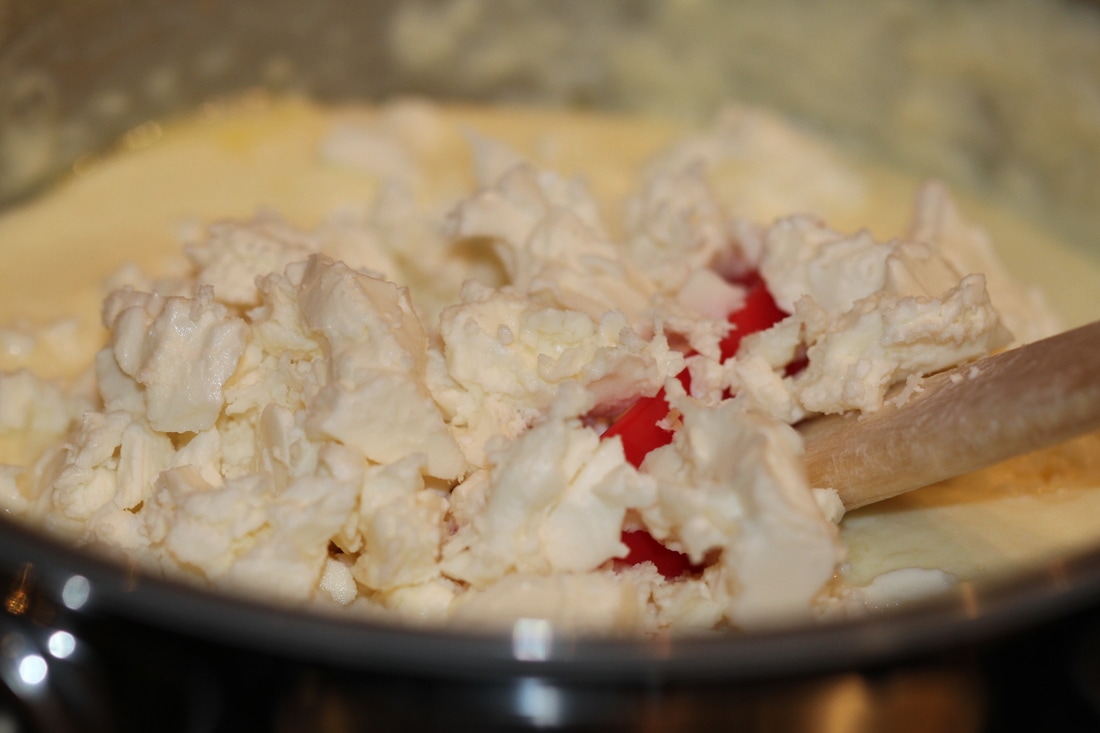 Now that your half and half (or heavy cream) has thickened, remove your rosemary sprigs and add your crumbled feta and Italian blend shredded cheese. Mix well and let it simmer so it gets nice and gooey. You want this to be thick so it stays on top of the burger. If you find that it is too thin, you can add more cheese or even some corn starch to thicken up. Remember, you want this to have a fondue consistency! Place your patties in a heated pan with a Tbsp of olive oil (lamb is not too fatty, so you'll want to add some fat into the pan so the patties don't stick). Cook for about 3 mins on each side. Don't move the patties around when they are in there, so that they get that nice brown crust. Get your buns nice and toasty too! 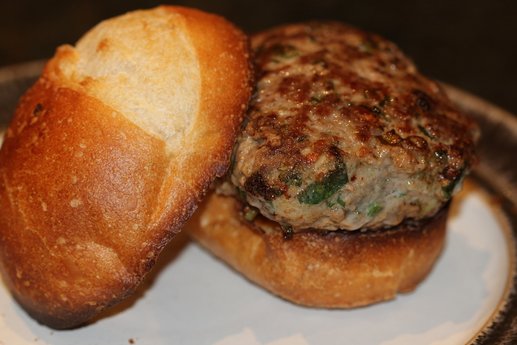 Great start but we're not finished just yet... Next step is to add on the creamy feta fondue sauce, spinach, and thinly sliced red onion. You could also add on some dijon mustard to the bun if you like. 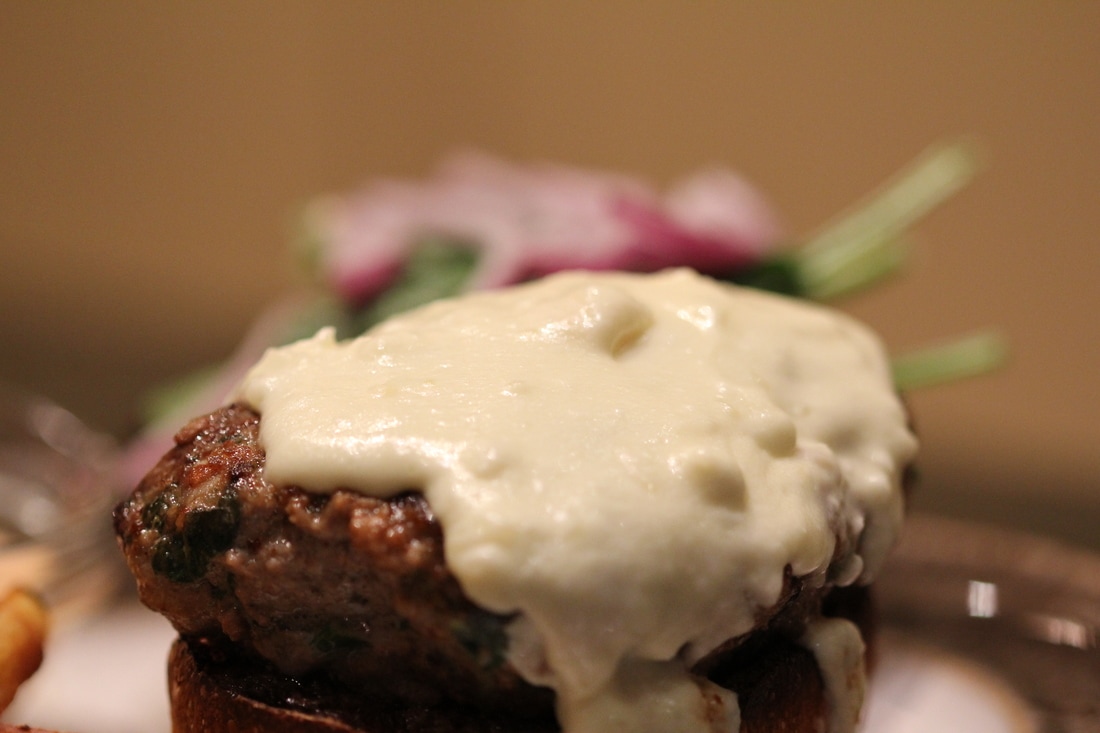 Grab your crispy sweet potato fries from the oven (so they are nice and hot to serve!). I made a quick fries sauce with mayonnaise, ketchup, and Sriracha. 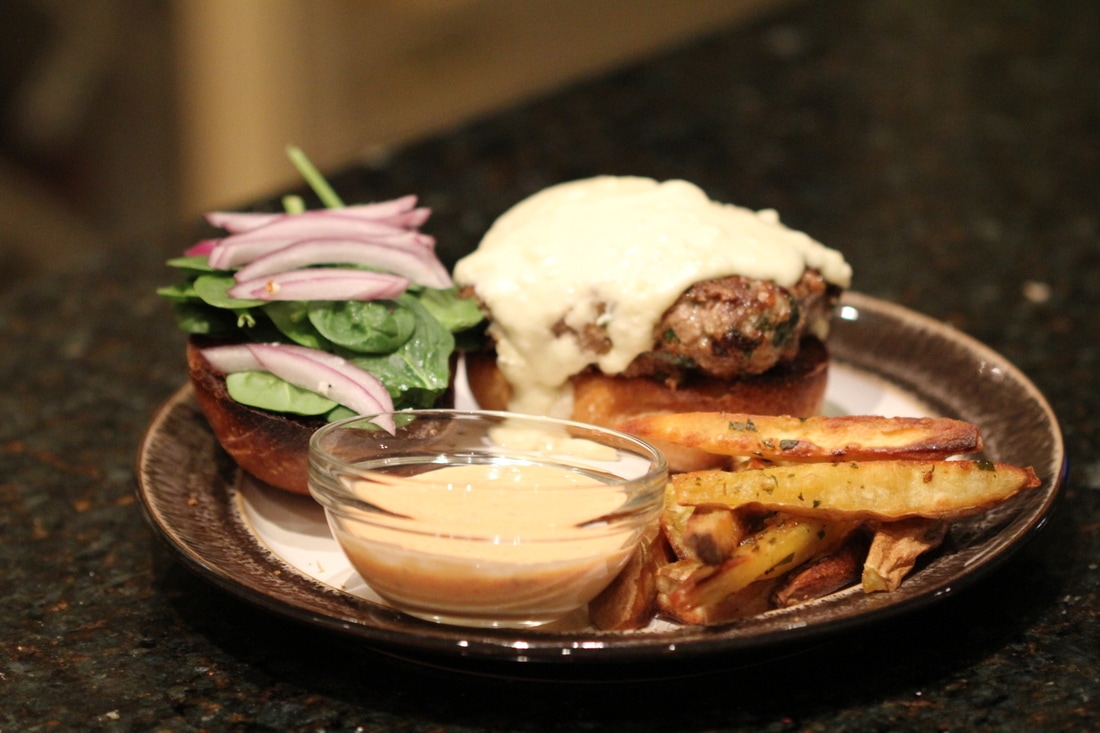 Serve and enjoy this different spin on burger night! 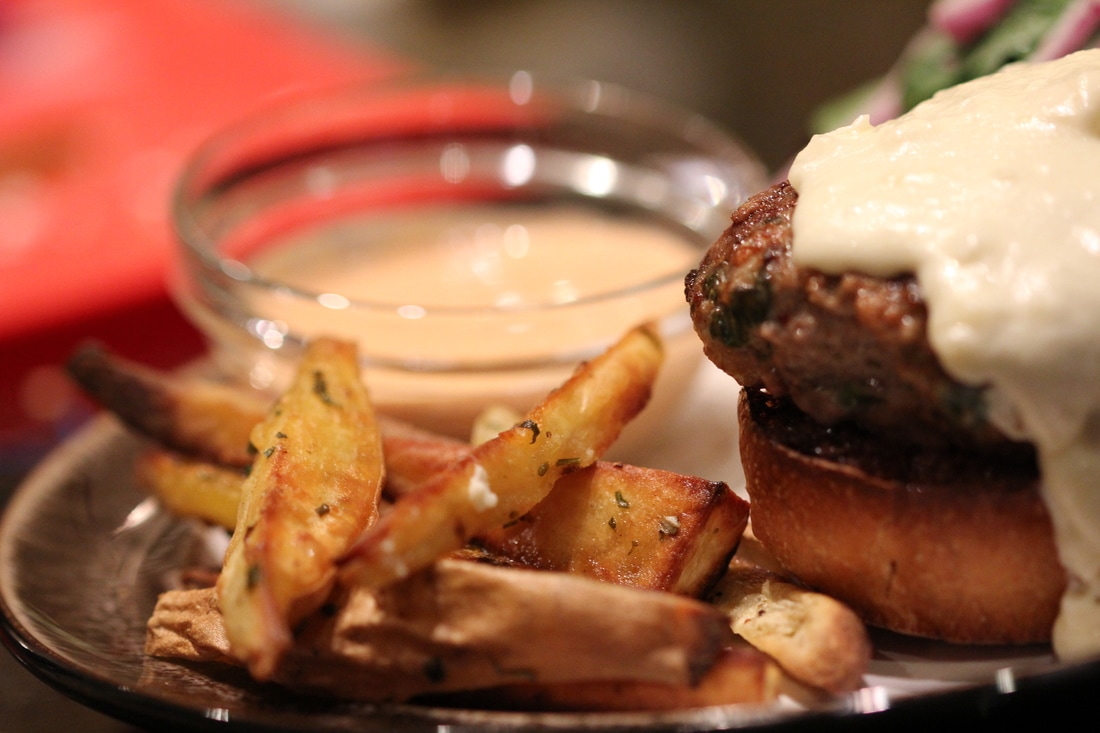 This has honestly been one of my favorite recipes that we have created to date! It was really easy, not too expensive, and absolutely delicious. Not to mention making our flat smell great with BBQ pork! 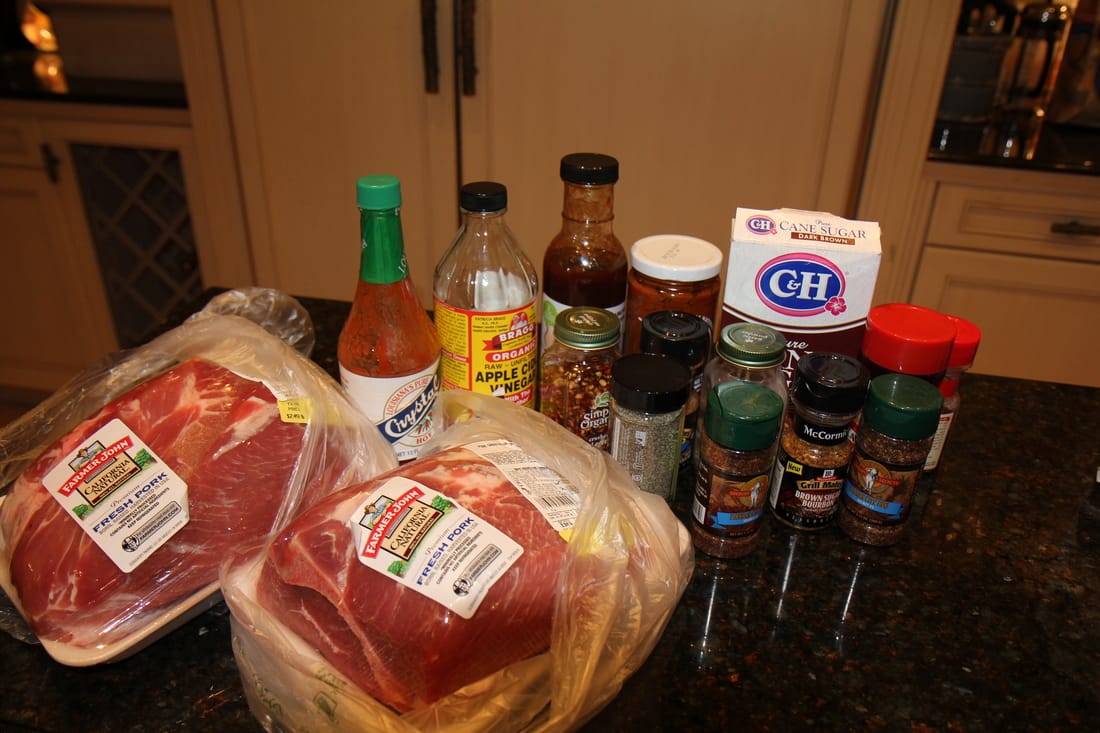 Ingredients for the Slow Cooker BBQ Pulled Pork:
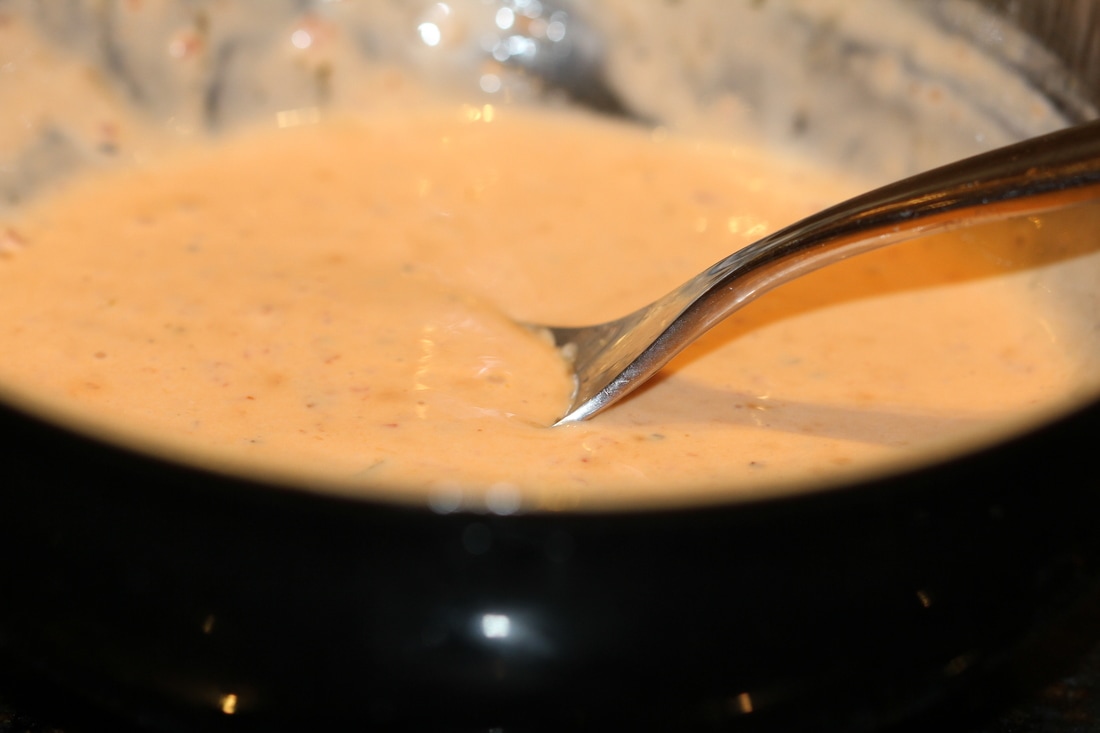
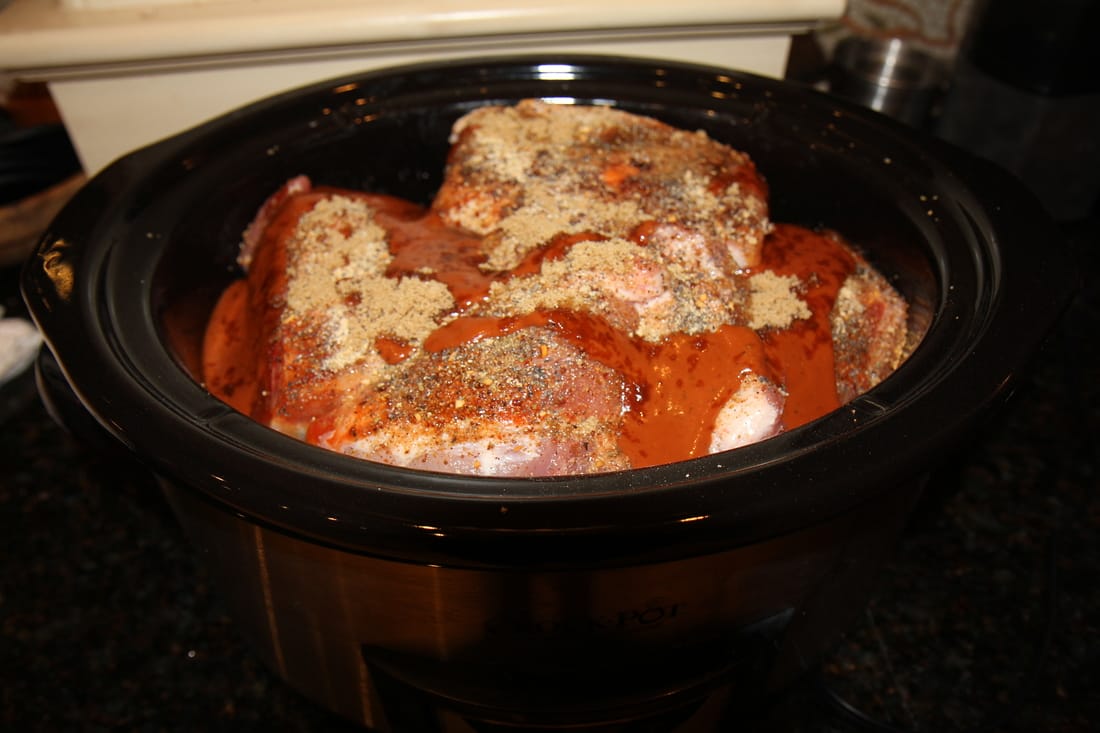 This is what it looked like before the LOW and SLOW cooking time!  And this is what it will look like 15 hours later - such amazing flavor and just falls off the bone. Leave it on your "Keep Warm" setting until you are ready to serve. So what else goes on these pulled pork tacos? And why tacos and not a pulled pork sandwich? You are definitely welcome to do a traditional sandwich with a nice cool and creamy coleslaw on top, but these tacos add a unique flare onto your traditional pulled pork, and are fun for everyone to make! My favorite condiment on them is homemade chipotle sour cream sauce, which could not be easier to make. Ingredients:
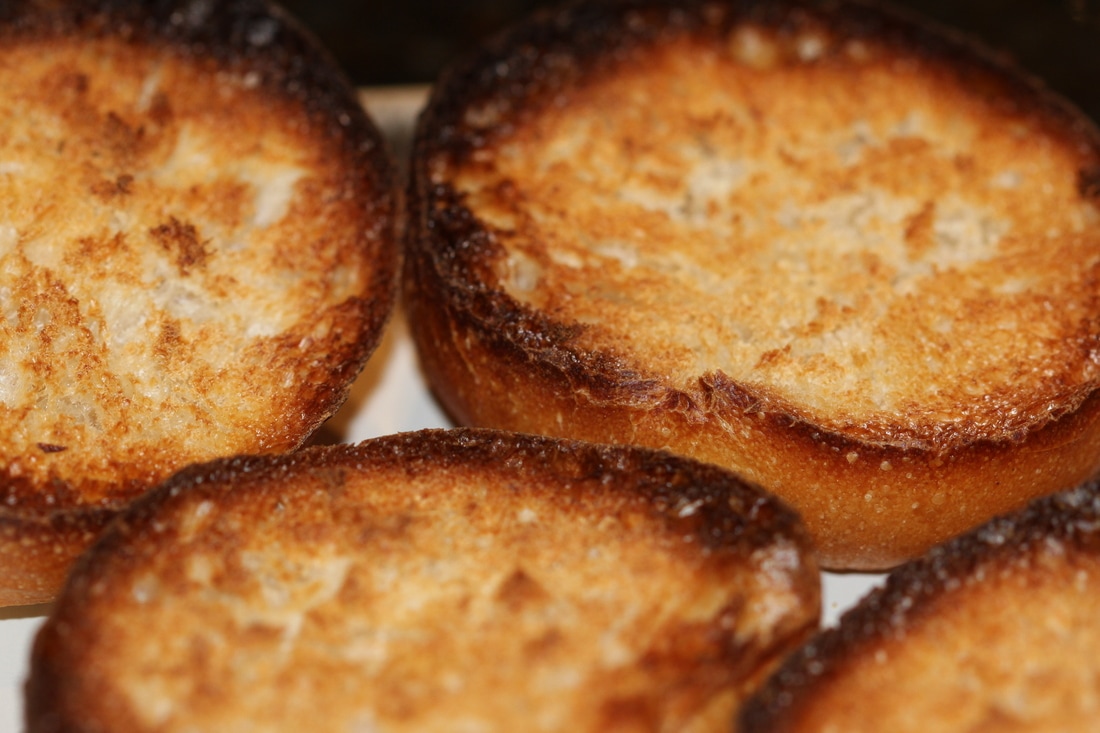
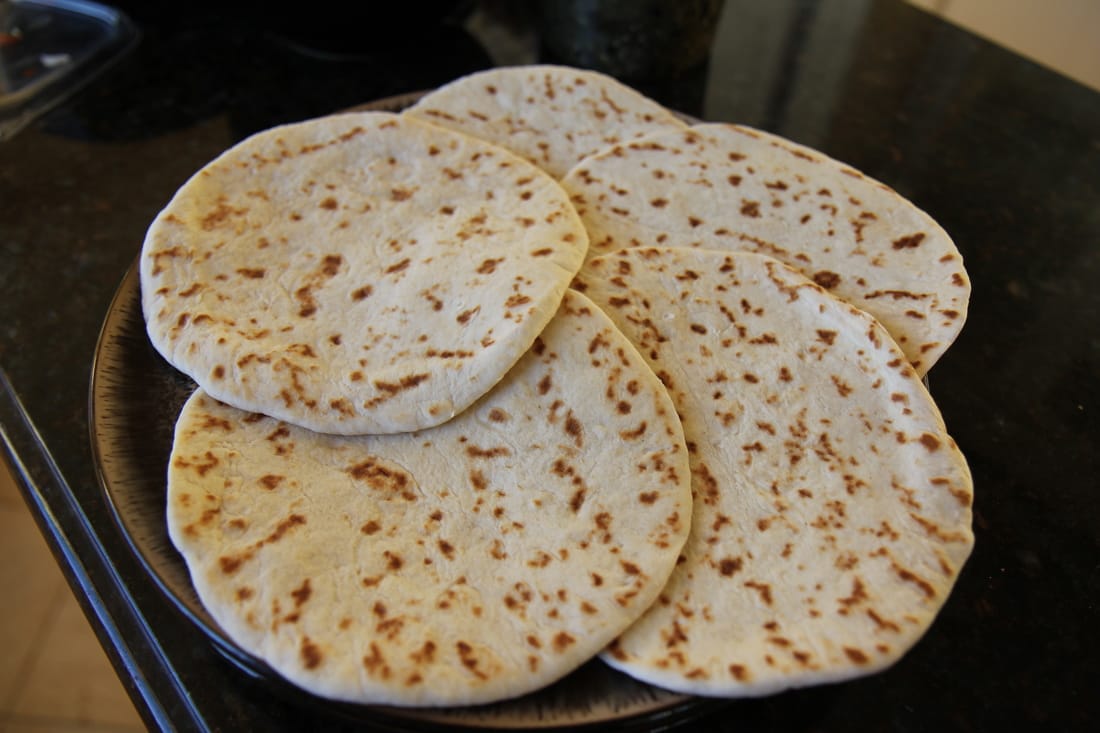
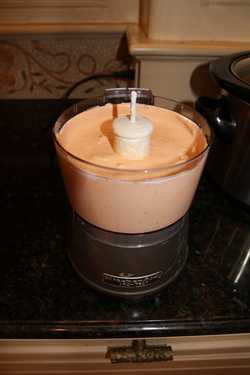 Blend all ingredients together in your food processor. If you like it spicier, feel free to add in more chipotle peppers. I went more simple on this sauce (rather than adding in more spices/herbs) but you are welcome to improvise by adding fresh cilantro, parsely, or other spices. I made a "build your own taco" station with a variety of other toppings to add. Another key player in this dish are the thick flour tortillas. They are thicker but smaller around than your normal flour tortillas, and act more like a bread or Indian Naan for these hearty tacos.
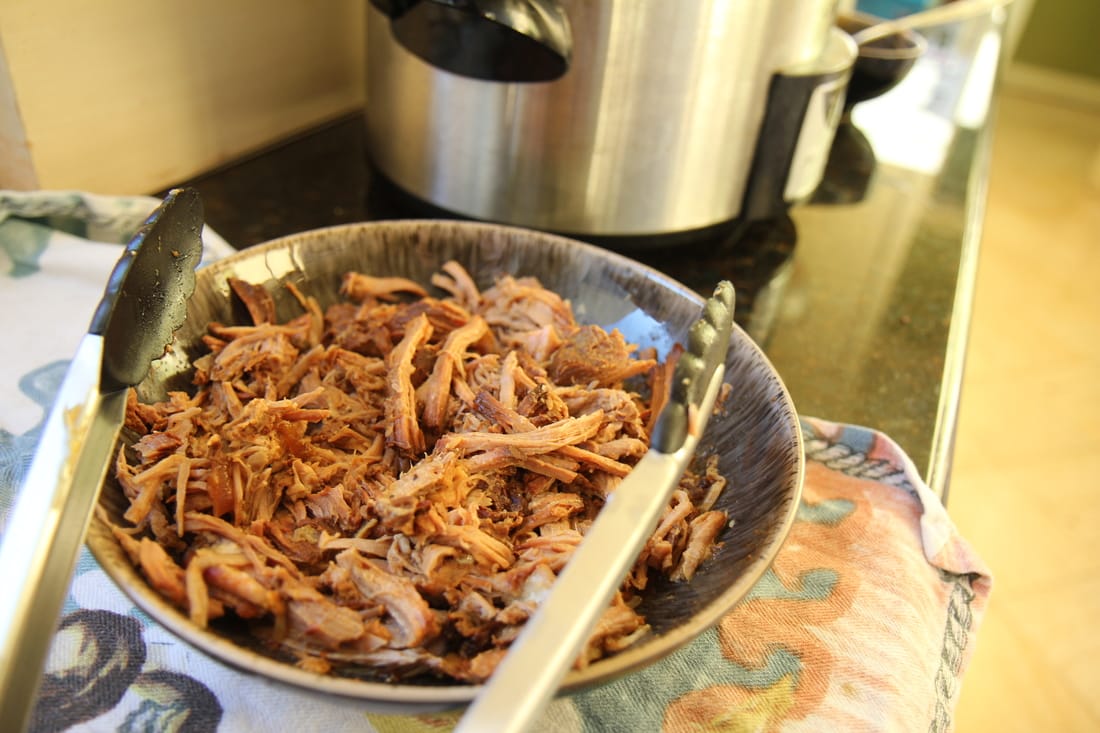 I would "pull" a bit of pork out a bit at a time and place in a bowl for people to add to their tacos. You can add a spoonful of juice on top. I did take some of the fat off of the top once it was done cooking, as it does tend to render quite a bit of fat. Now you can assemble your tacos - I heated up the tortillas in a pan and then gave them to each individual who then assembled their own tacos! 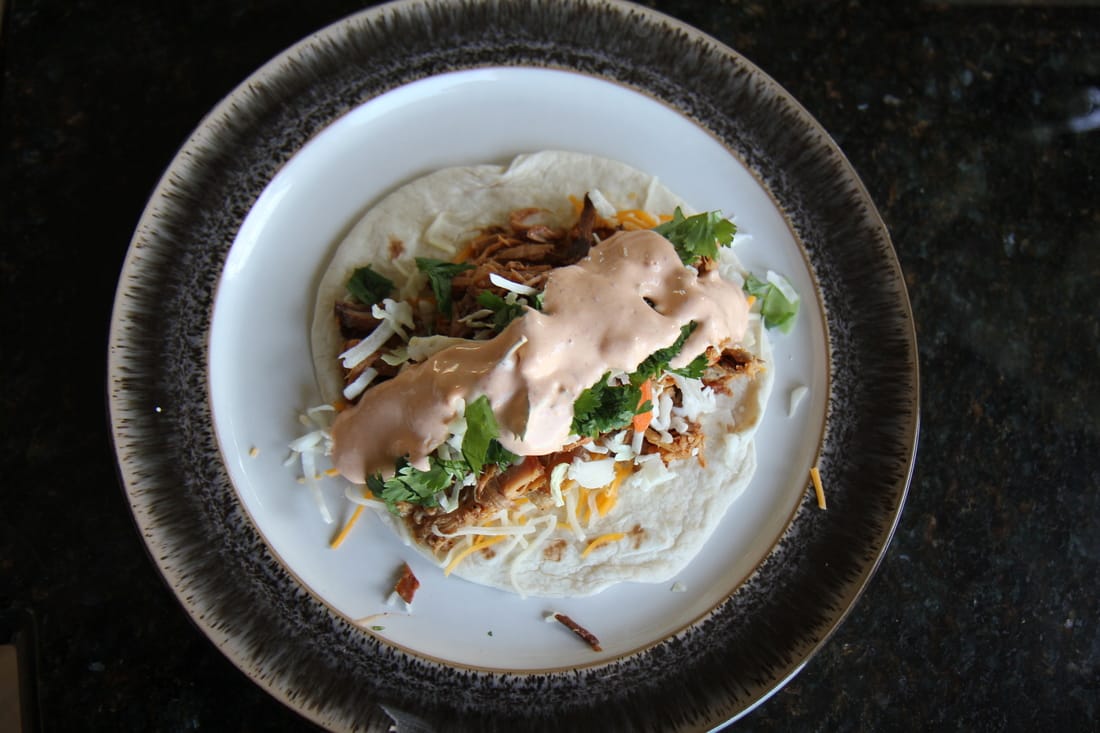 ENJOY!!!
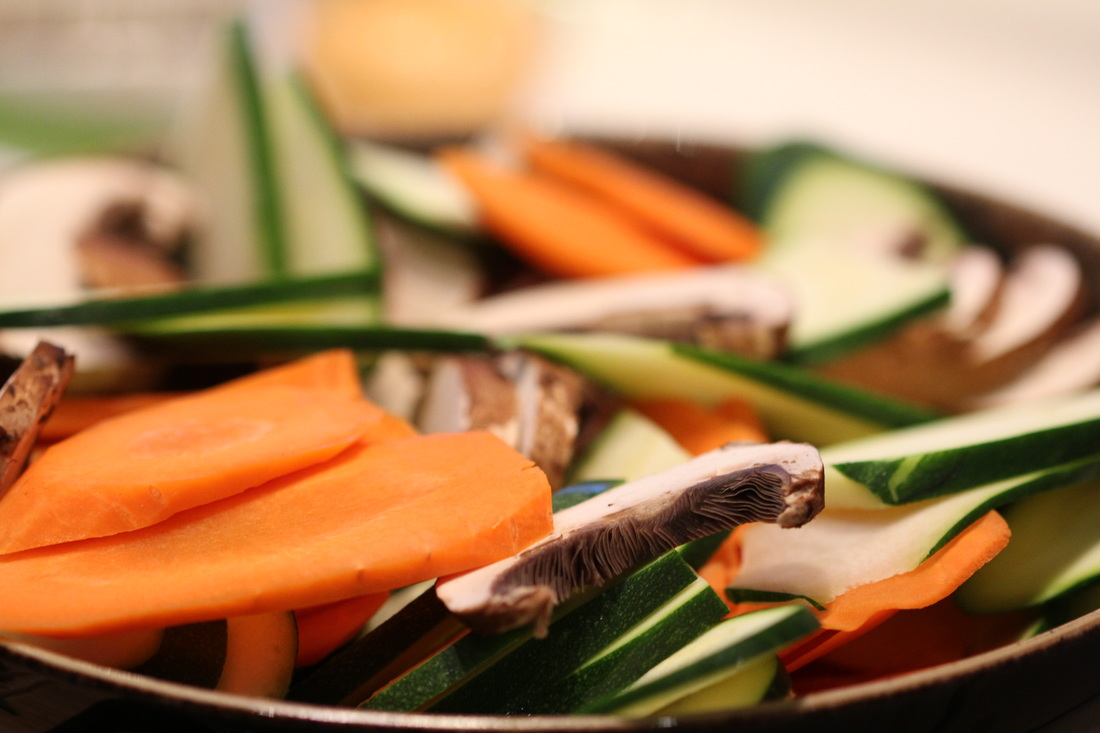
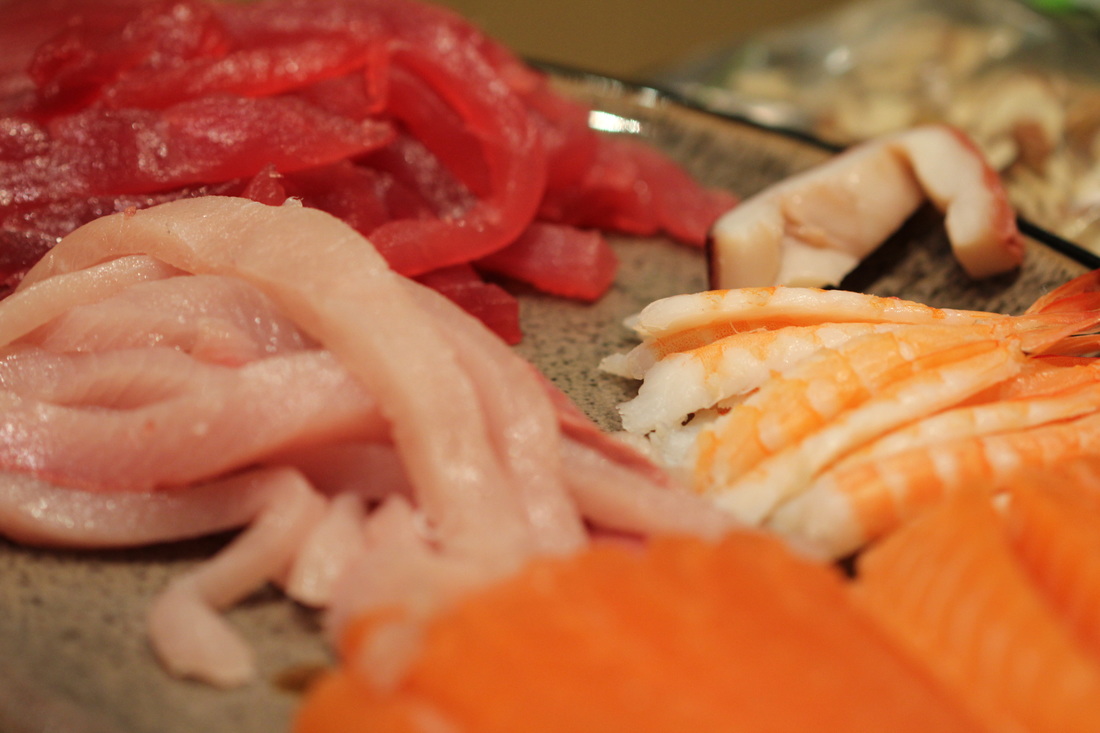
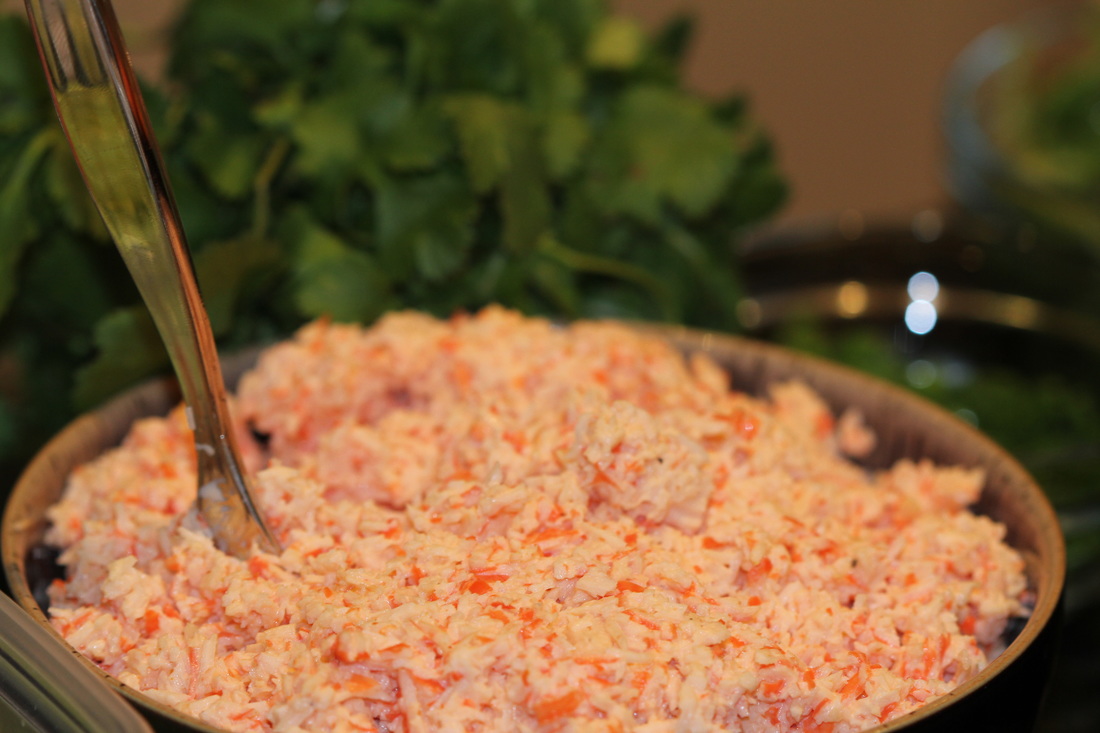
Here's a great idea for a dinner party that will really impress your guests - Shabu-shabu! It is so easy, fun and interactive that everyone will really enjoy. It doesn't take too much prep time, and provides for everyone to be the chef of their own meal. We also started with a sashimi appetizer that tasted like it was from your favorite sushi restaurant, simply by using fresh and local ingredients. Just follow these easy steps! 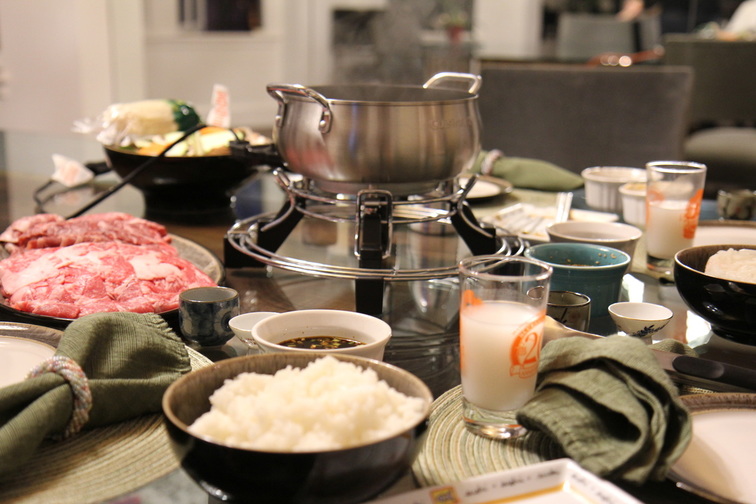 Ingredients:
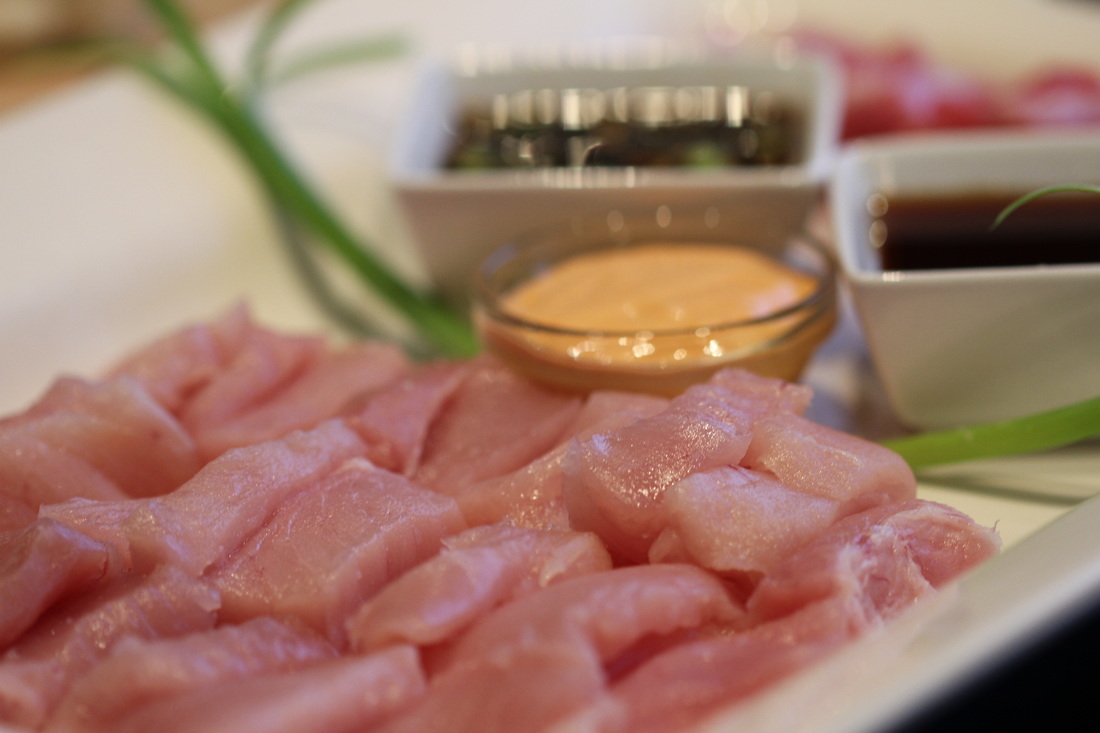 We love this fancy appetizer of sashimi. It is so easy and always impresses. Make sure to use a super sharp knife so you can slice the fish well without tearing. Cut into rectangle bite sized pieces, like you would get at your favorite sushi place. Serve along side soy sauce, wasabi, and spicy mayo and you are set! We garnished with some green onions too - always remember your presentation is the first thing your guests will notice! As mentioned before, it is good to choose sturdy veggies that won't fall apart as they are cooking in your broth. And we got very thinly sliced meat from our local Japanese market - the kobe beef was the best! A little pricier, but definitely worth it. The shrimp turned out really well too. You could also use chicken - just be extra careful to not contaminate anything during the process with the raw chicken - it will cook off in the pot, but you will want to be more careful with chicken. 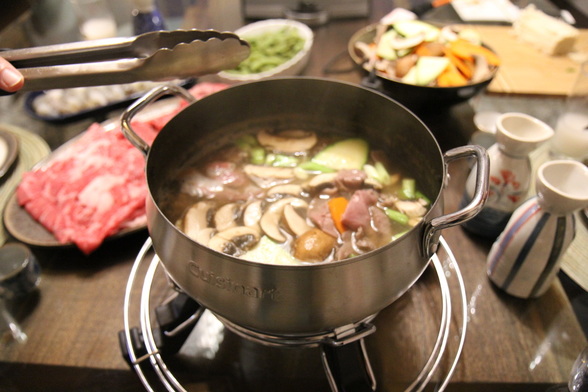 Place your veggies and meat into the simmering broth - the meat will cook very quickly (in 30 seconds to 1 minute) - the veggies (especially carrots) will take a little longer (3 to 4 minutes). Use your best judgement of how firm you want your veggies. We used tongs as they were the easiest to handle but you can also use fondue skewers. This is a progressive meal that can last for as long as you like while everyone cooks their meat and veggies to their liking. Enjoy with a side of rice and your favorite sake - we also steamed some edamame for a side dish - a fun meal for everyone!
It has been a busy summer with lots of travel (Africa, Maine, Tahoe, Fiji, Las Vegas, Santa Barbara) but we are happy to get back to posting! This dinner is going along with our low carb theme and a super easy dish to prepare. Great for the whole family! 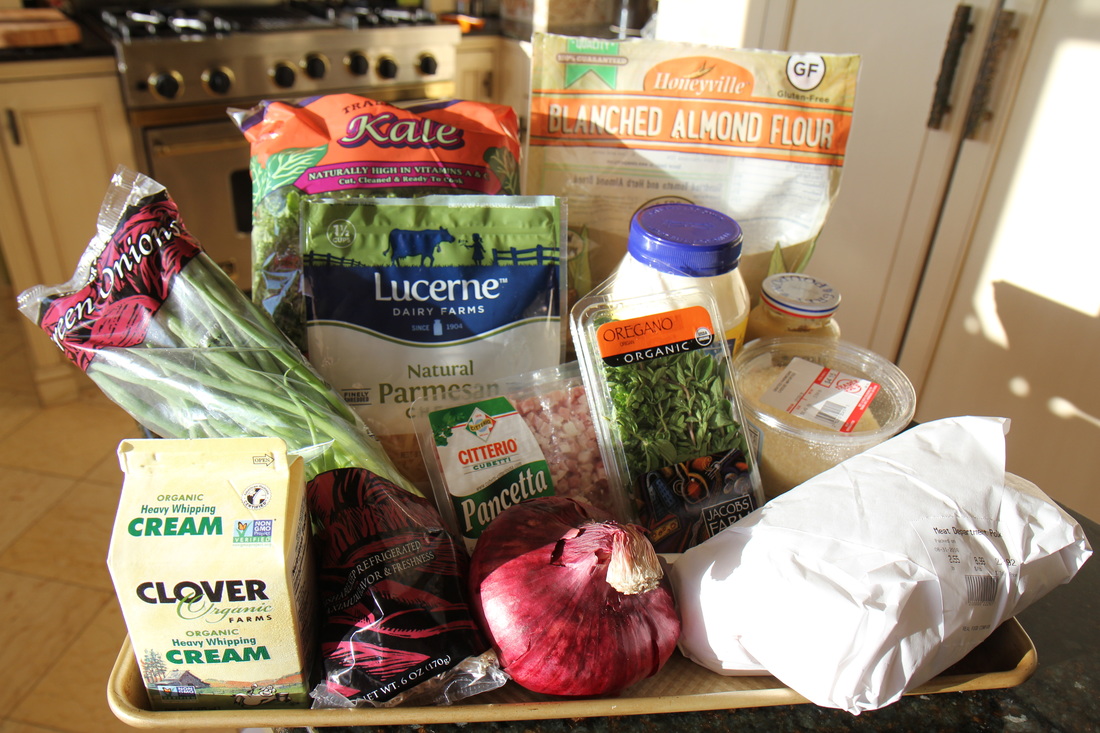 Ingredients: Chicken Fingers:
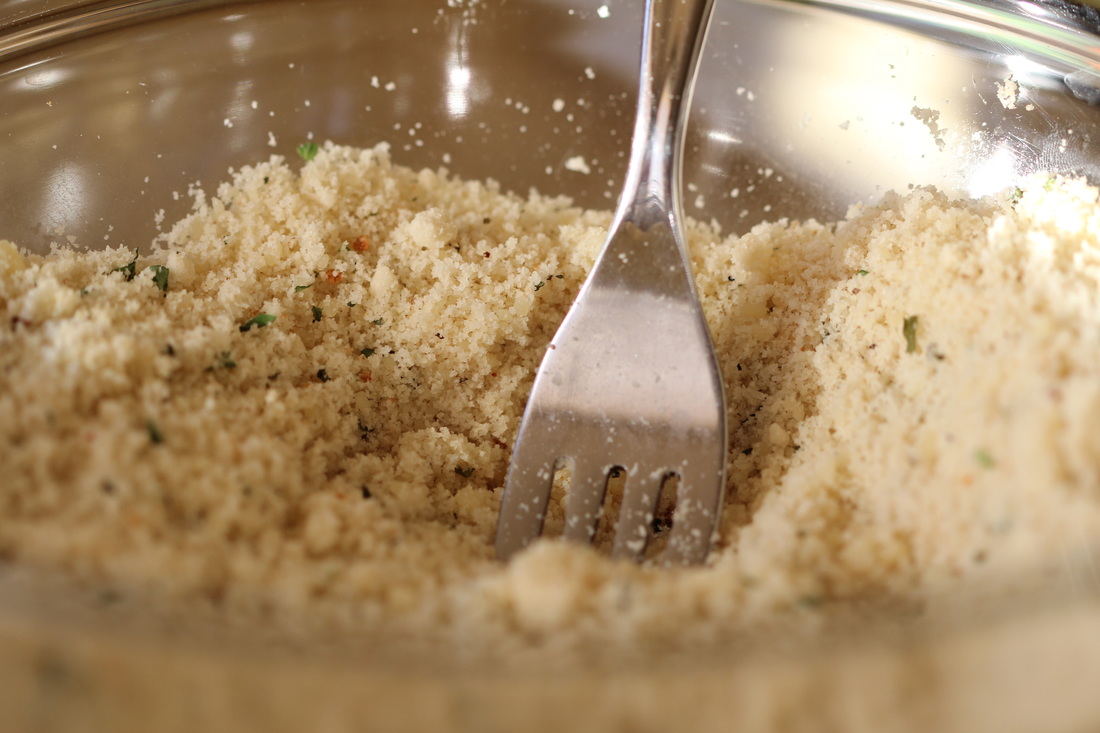
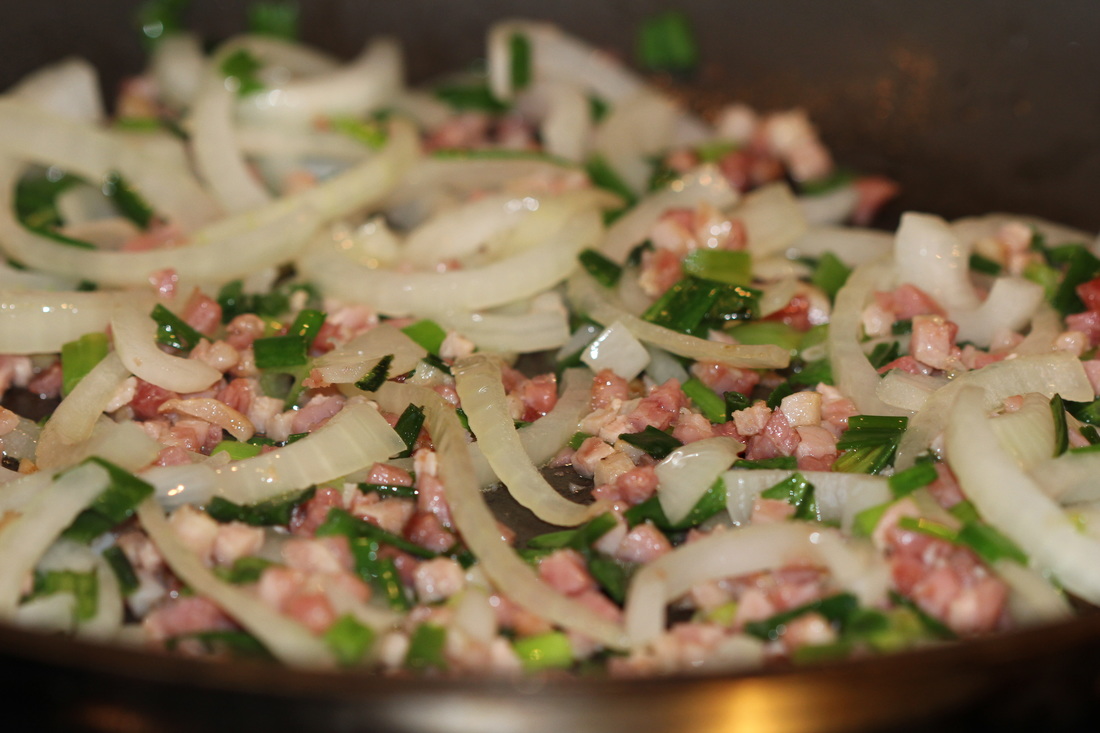
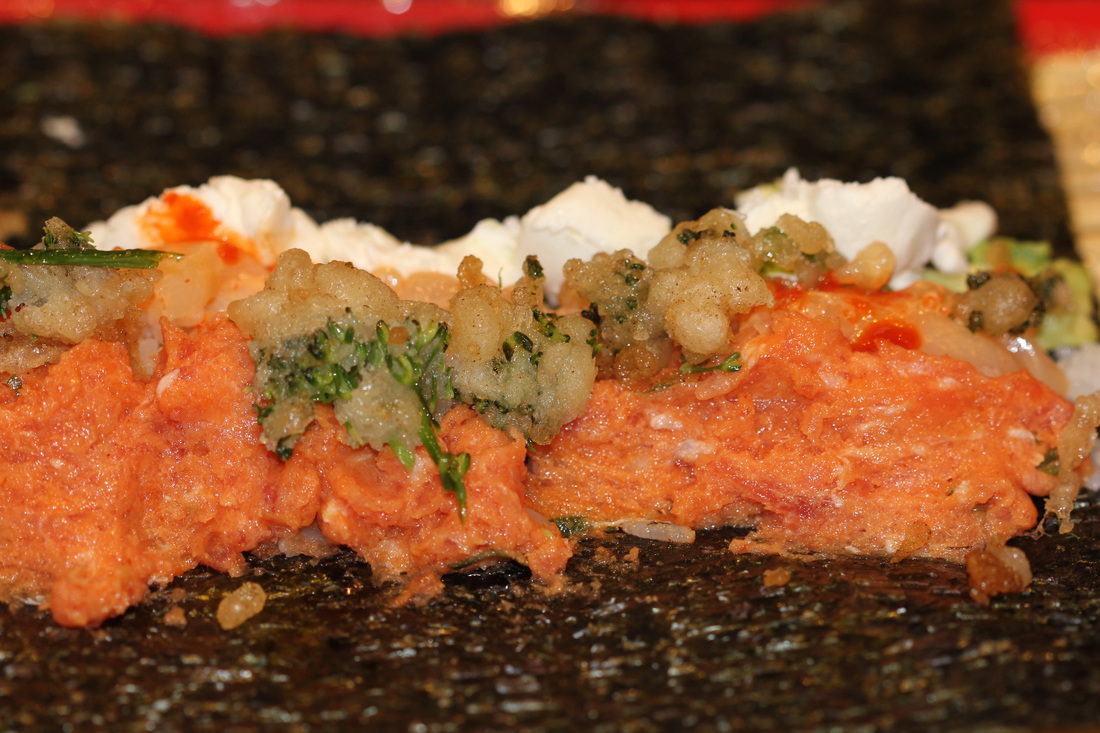
Mix the mayonnaise and mustard in one bowl. We added a little chopped fresh oregano to this mix too. In another bowl, add the almond flour, parmesan cheese, fresh oregano, and herbs. Looks like real breadcrumbs, doesn't it?? The herbs that I used are really my go-to herbs. They can brighten up any dish. I always make sure to buy more garlic powder when I am at the store as I seem to go through that one that most. Cut the chicken into strips and first place in the mayo mixture then dip into the "breadcrumb" mixture. Place on a baking sheet. 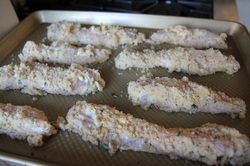 The mayo mixture will act as a binding agent and help the almond flour mixture brown up nicely. And mayo is always a fun secret ingredient to any dish! Bake the chicken at 400 degrees for 23-25 minutes, until golden brown and cooked fully through. 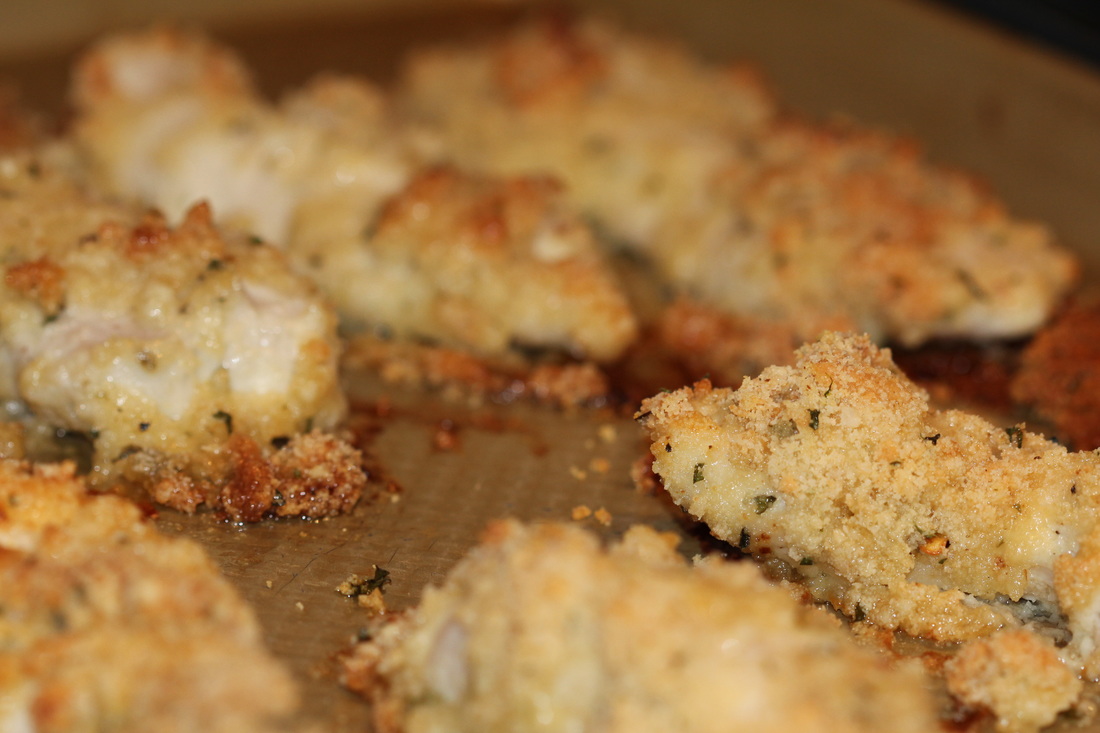 While the chicken is baking in the oven, place pancetta in a large frying pan (no oil needed at this point) and let the pancetta brown. Then add the onions. This is also a great time to get a sip of your wine that you will surely be cooking with. Add handfuls of the kale - keep adding as this will wilt down quickly.  Once the kale has wilted, add 2 Tbsp of cream and grated parmesan cheese to finish. Plate with the chicken fingers. For the chicken fingers, we used Woody's BBQ sauce (low carb BBQ sauce) and ranch. I'm thinking of trying to pan fry the chicken next time to get more crisp on the outside, or even broiling the chicken. Regardless, it is a delicious dish that I think you will really like! Of course we had it with some Chardonnay. Enjoy!!! 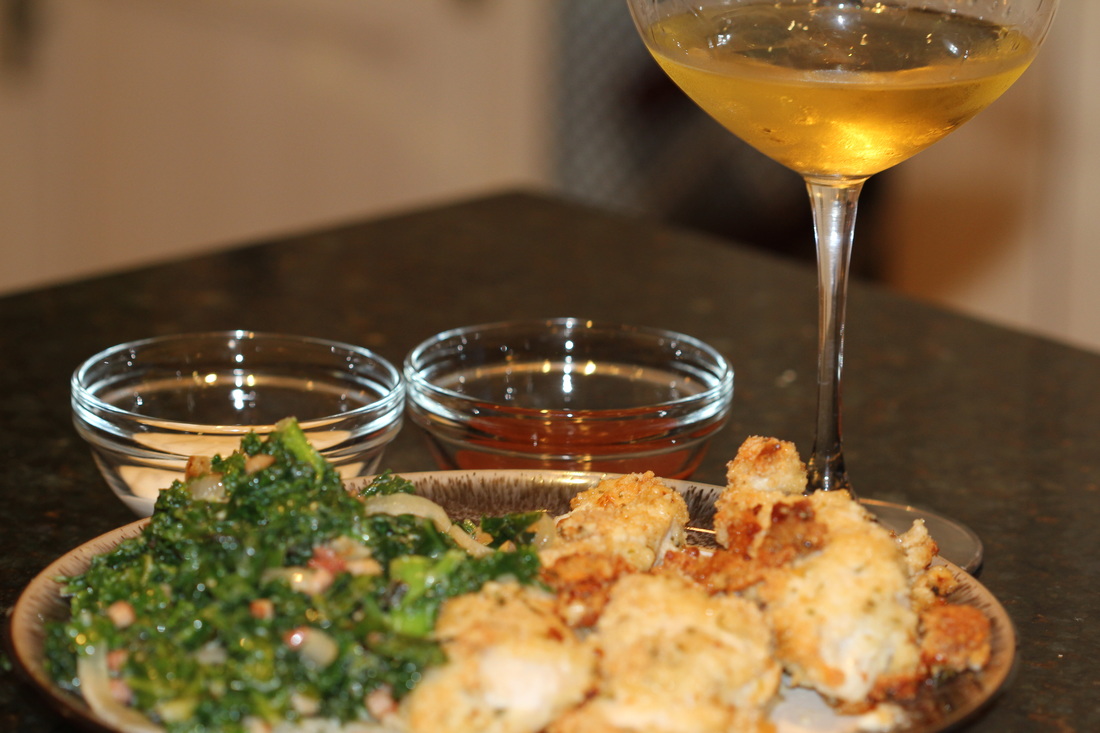 Everyone loves sushi (well, hopefully everyone). Everyone loves parties. What better way to combine the two by having a sushi making party! It is a really fun way to have your guests interact and participate in making the dinner. You also get to see the creative combinations that your friends will come up with as well. I highly recommend setting up your station with all of the ingredients, and have your guests seated. Then each guests goes and makes a roll to share with the table - it is a fun way to let everyone have the spotlight and makes for a fun "progressive style" dinner. 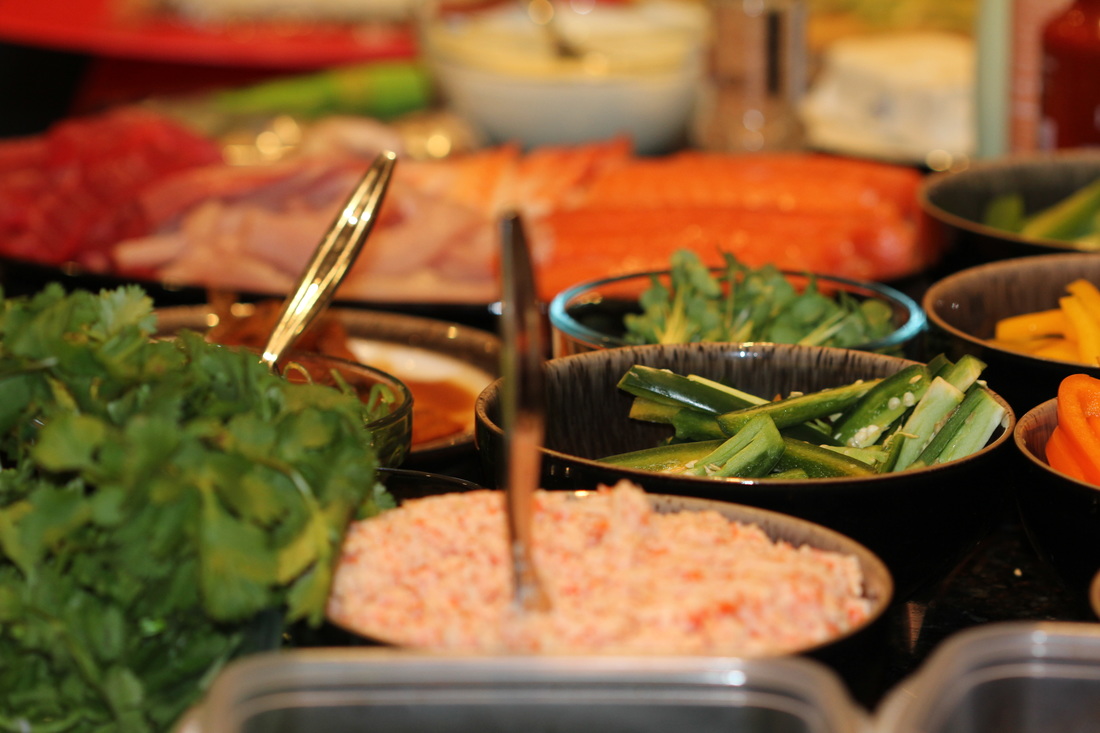 Ingredients:
Get your station set up - starting with the nori / seaweed, sushi rice. I recommend lining your bamboo wrapper with Saran wrap - it makes for easier clean up your roles won't get stuck on the bamboo. Lay out the nori, top with a thin layer of sushi rice (leave an inch free on one side) - in a straight line, layer your ingredients. Begin wrapping by carefully folding over into a roll. Once the roll is formed, you will want to press and gently squeeze the roll with your bamboo roller. Once the roll feels firm, take it out and place on a cutting board. An important step here - make sure you have nice sharp knives, and run the knife under a stream of water - this will make cutting the sushi roll much easier and makes a clean cut. 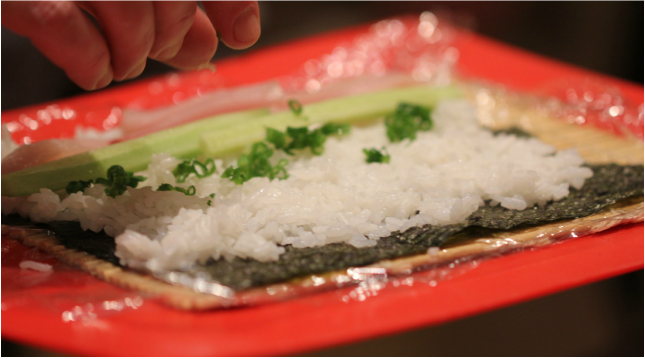 And the fun begins - get creative! Try a combo of a California roll with spicy tuna - add some avocado and Sriracha for some spice. Try a classic Philadelphia roll with salmon and cream cheese, but add some green onions and cucumber. Really, anything goes at this point! And making sure your guests have plenty of Sake and Sapporo keeps the party going! 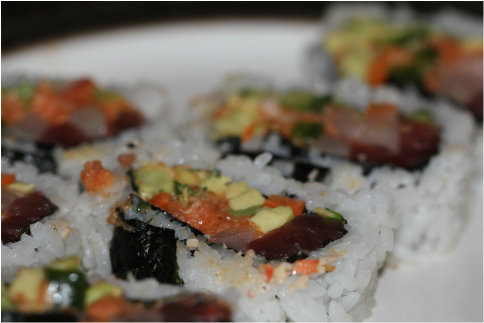  Mattie is looking longingly at the sushi too. I think she would prefer California rolls....arigato! 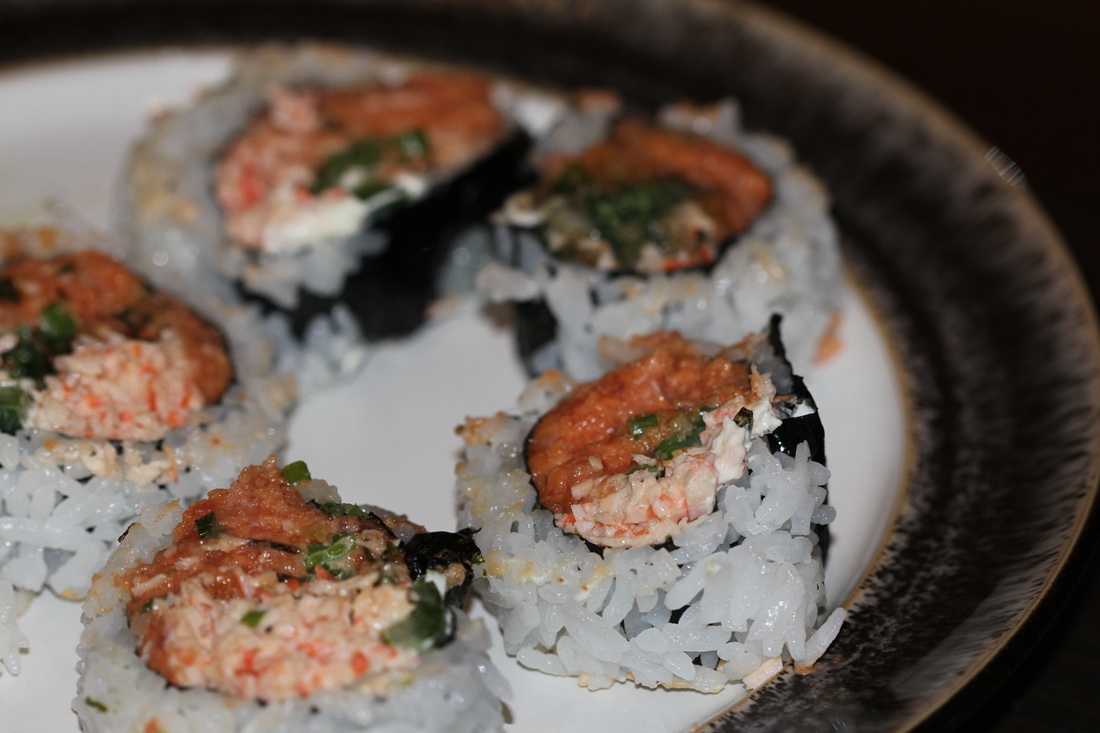 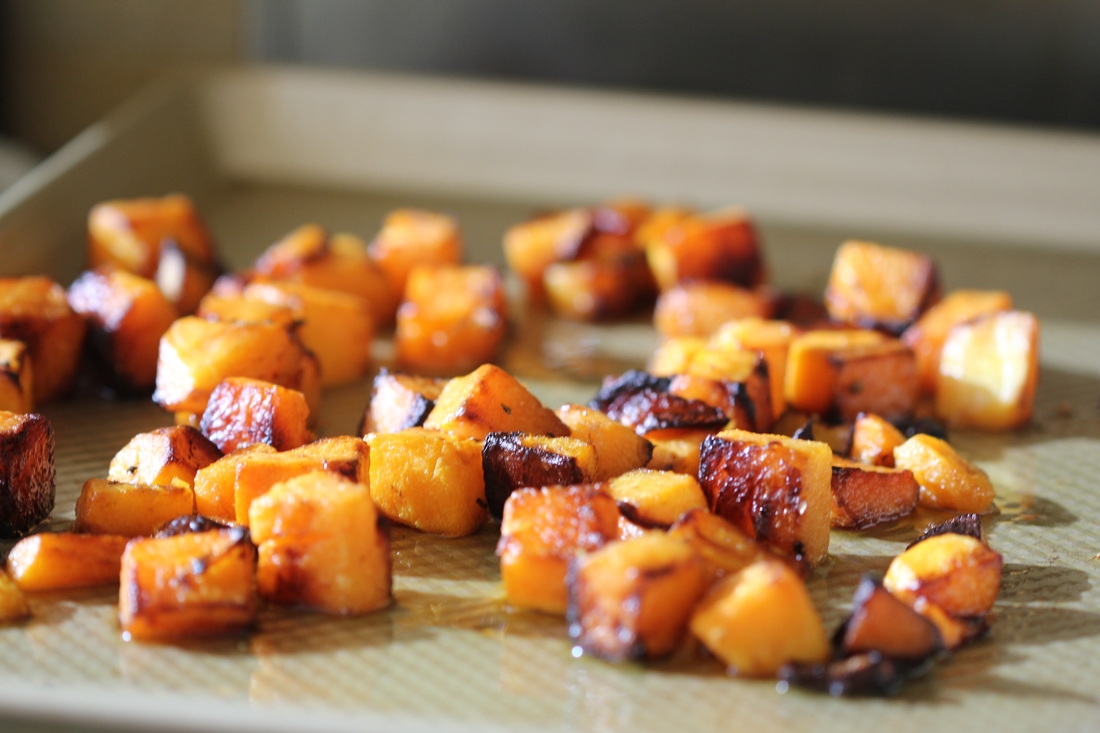 Roasted butternut squash risotto is the perfect dish for the beginning of the fall season! You can usually find pre-cut butternut squash at most supermarkets - which is much easier than cutting your own. Start by roasting it at 400 degrees for about 25 minutes. I like using garlic olive oil for even more flavor! Ingredients:
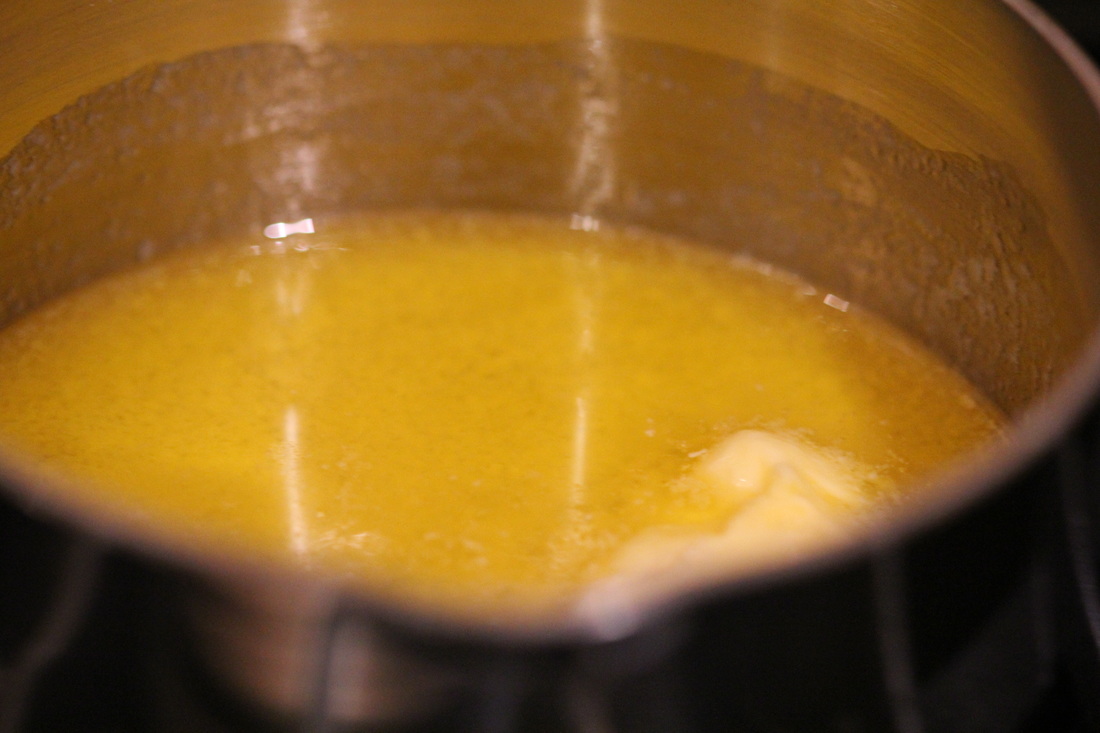
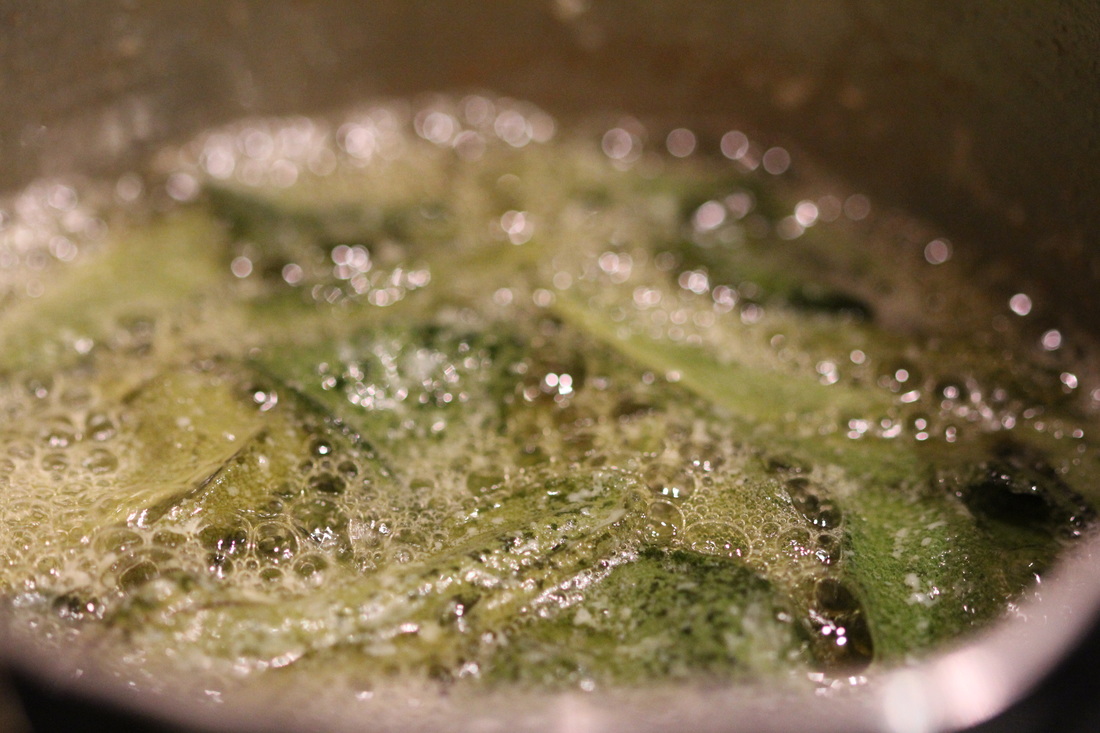
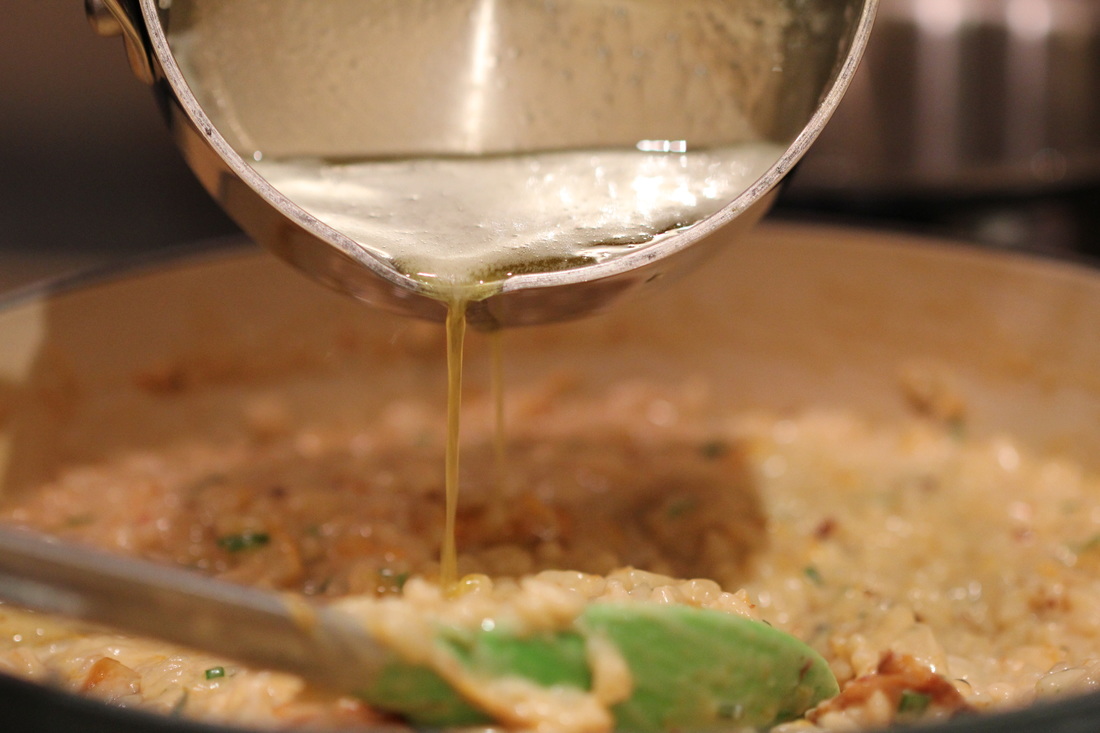
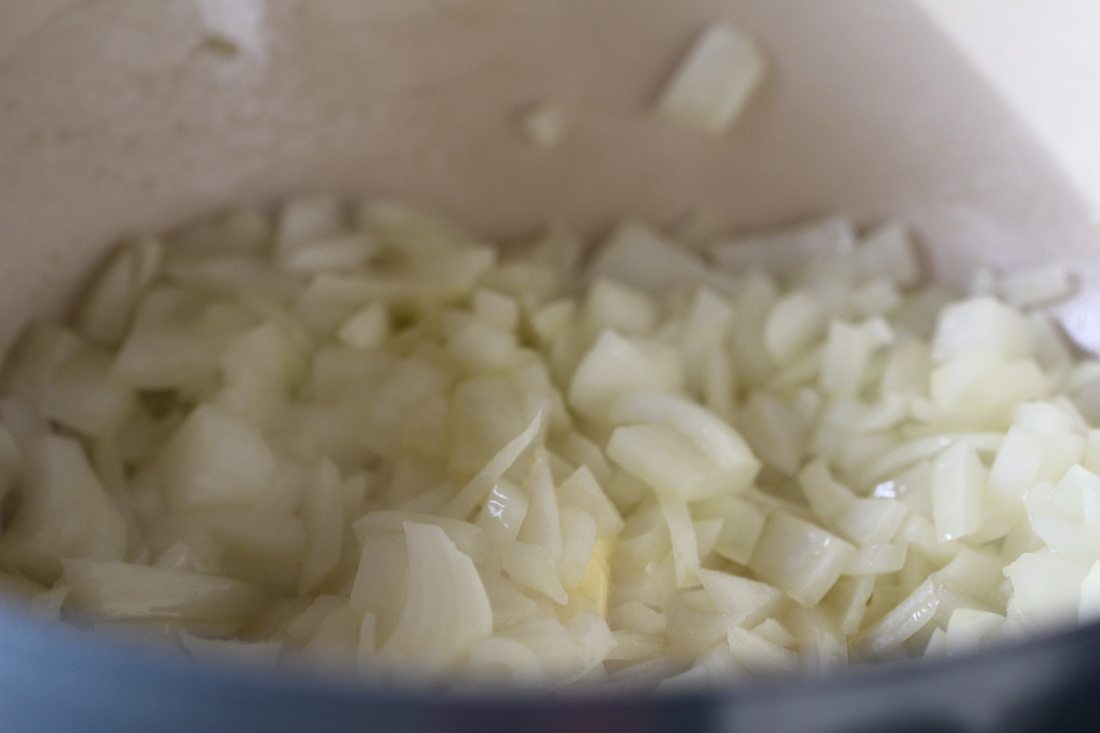 Chop up a white or yellow onion and sauté. Add in garlic once the onions have cooked a bit, as garlic can burn easily. After the onions and garlic cook, add the arborio rice (the risotto). Cook that with the onions and garlic until the rice is translucent. Then add about a cup of your favorite cooking white wine and reduce that down while stirring constantly. Heat up chicken broth in a separate pot and bring that to a simmer. 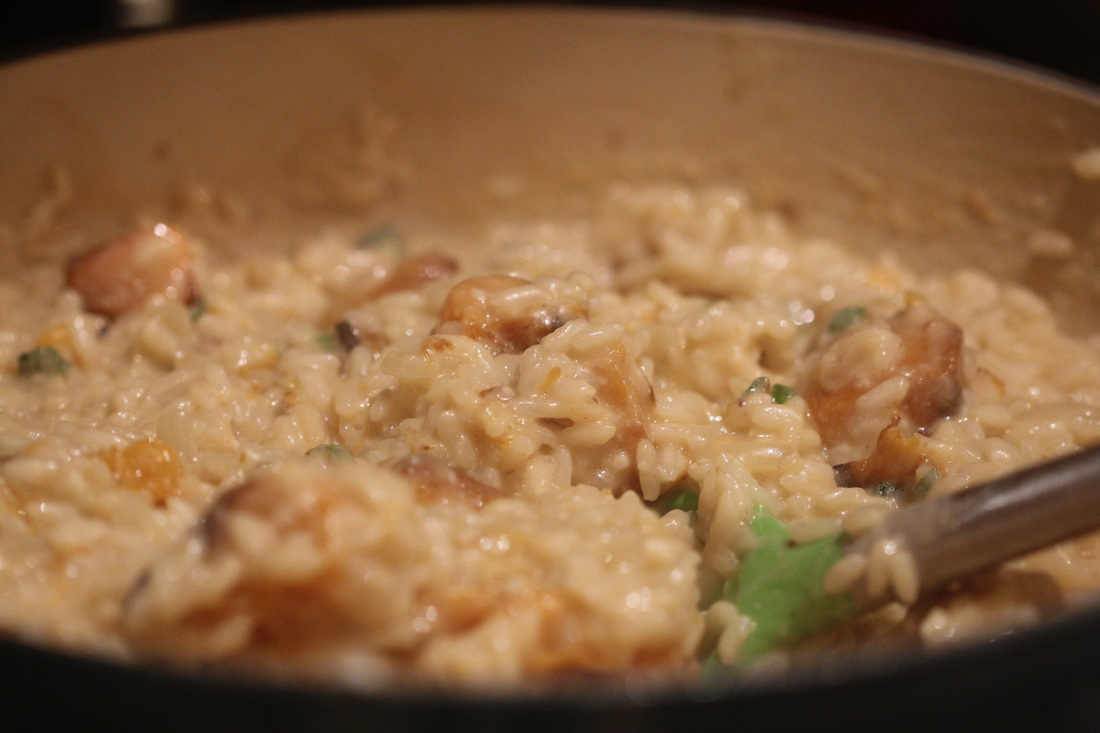 Keep adding a ladle full of broth to the arborio rice and stir until it absorbs completely. Stir the whole time while adding the broth. The good news here is that you can drink wine with one hand while stirring with the other! That's my favorite part! Once all of the broth is absorbed, taste it to make sure it's not too al dente. Then add the roasted butternut squash. Now for the brown butter & sage portion of this risotto. In a separate pan, heat up butter and then add sage. Keep it at a simmer while you fry the sage leaves. This infuses the sage flavor into the butter, while creating a fantastic garnish with the fried sage leaves. Keep an eye on the butter to make sure that it browns, but doesn't burn. Take out the fried sage leaves and add the brown butter to the risotto. 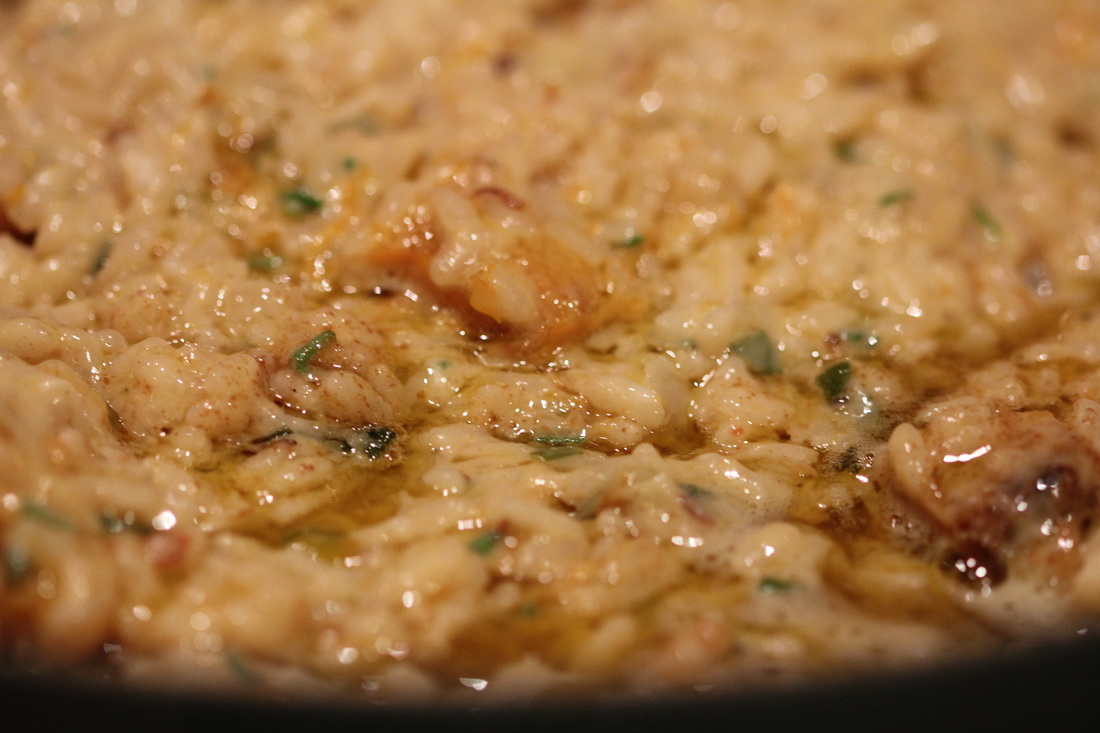 Chop up the sage you didn't use in the butter and some parsley and add to the risotto. Stir in a cup of parmesan cheese and you're all set! 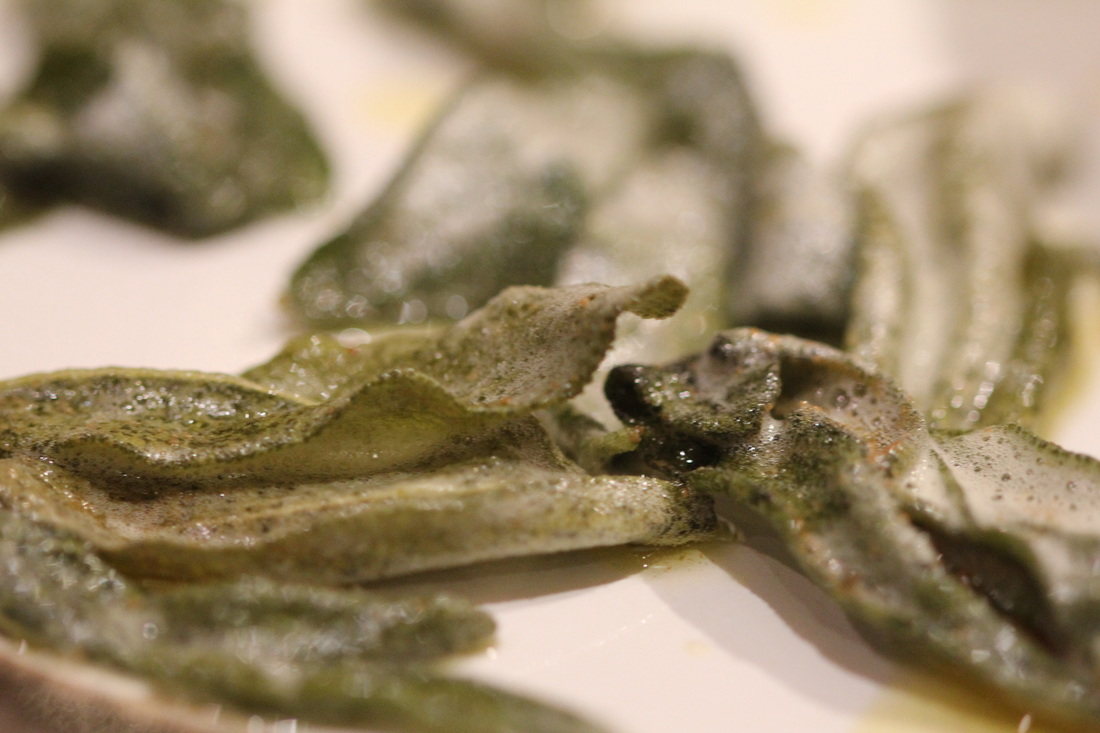 Add a fried sage leaf to the top of each bowl of risotto. The leaves have amazing flavor and a fantastic crispy texture that makes this dish extra special. Serve with a glass of chardonnay and enjoy!!!
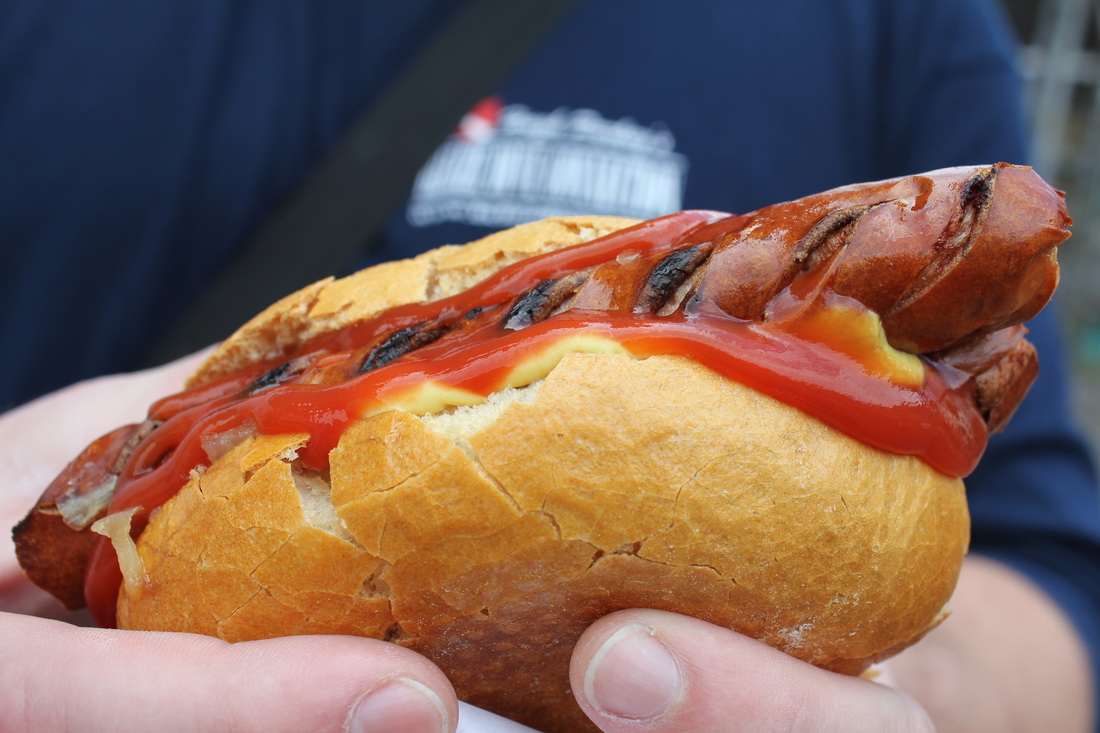
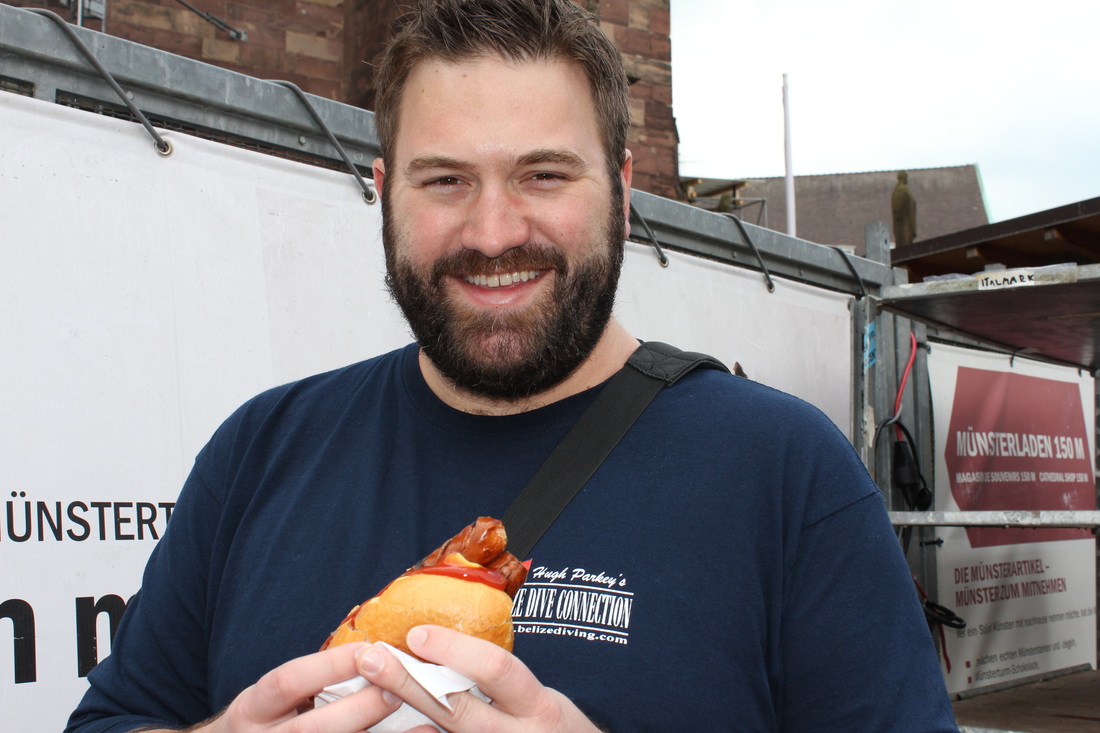
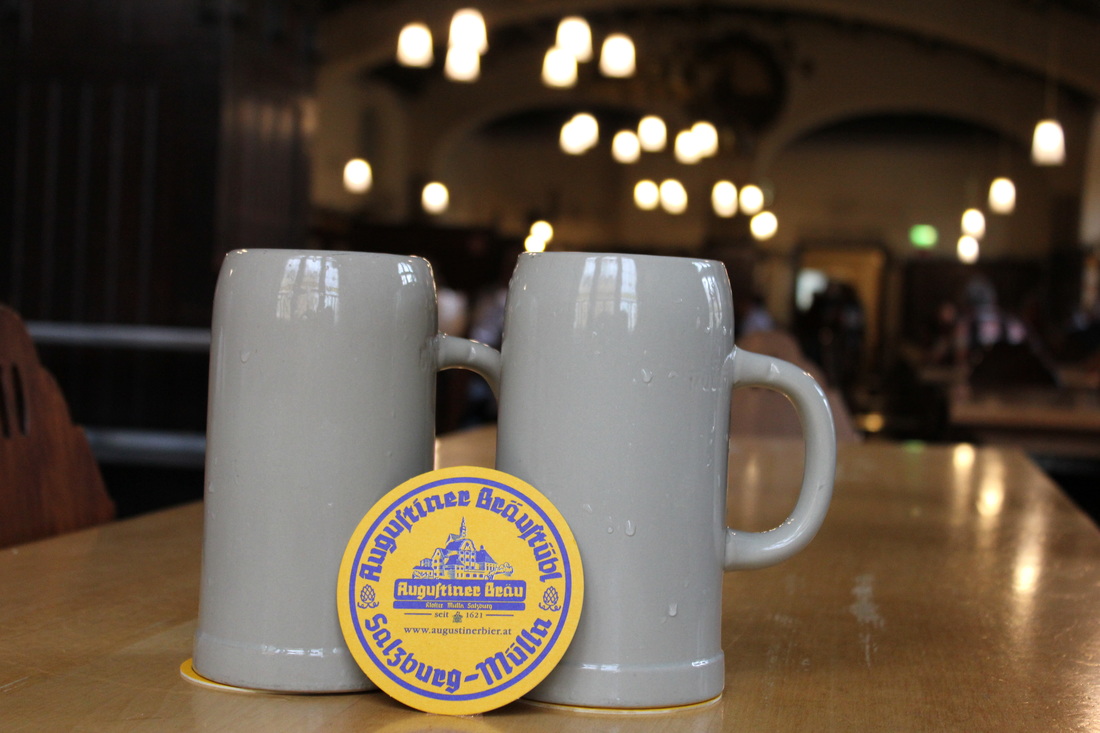
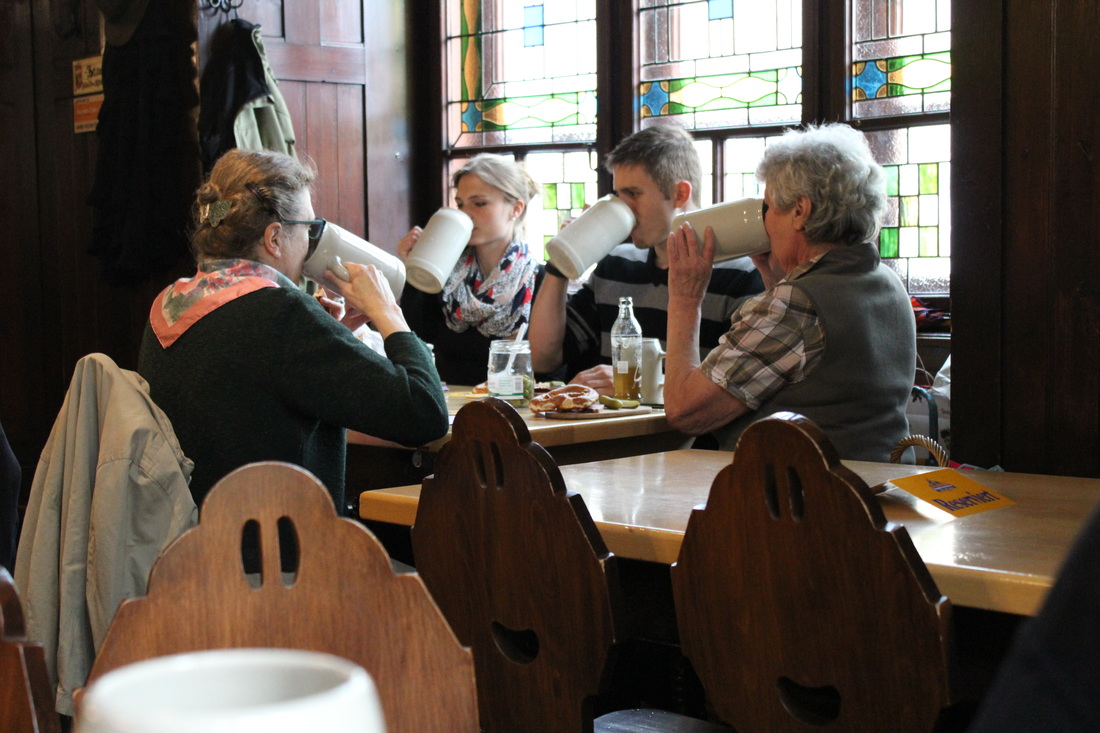
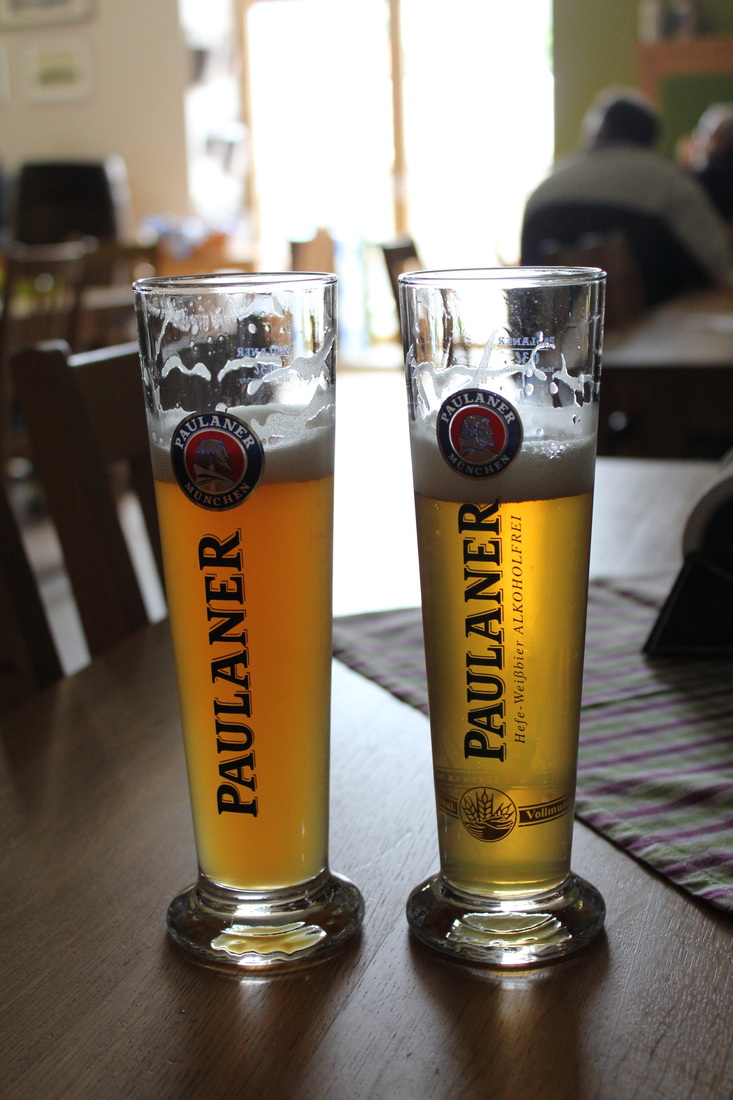
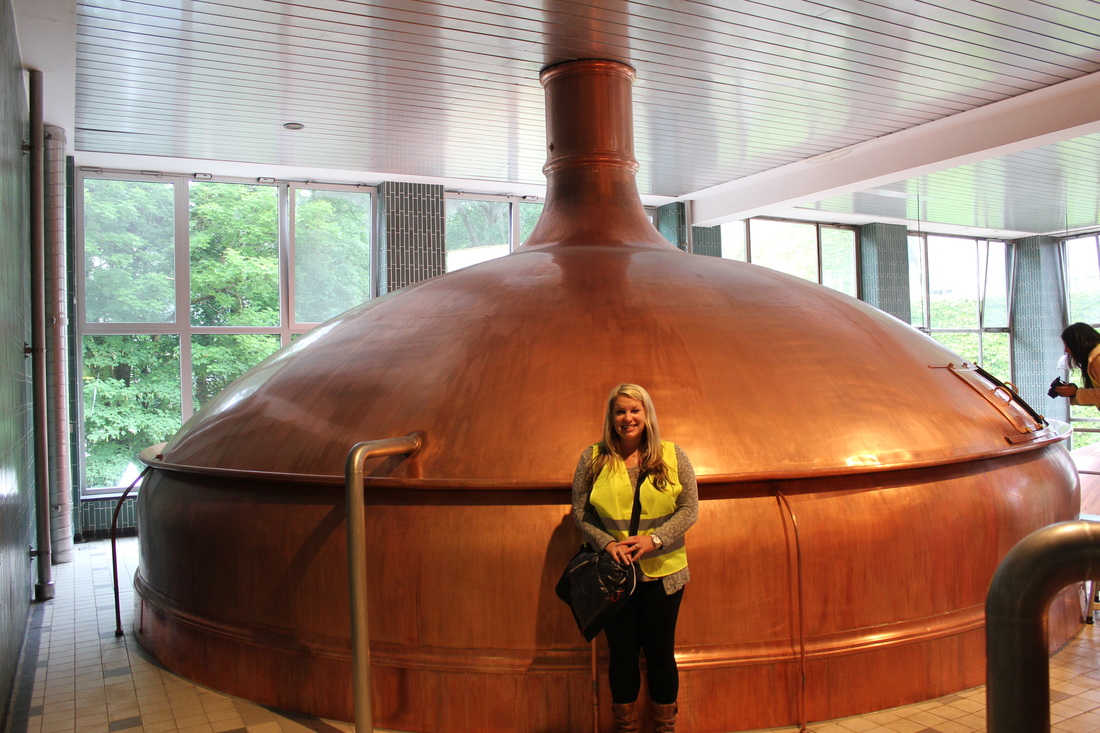
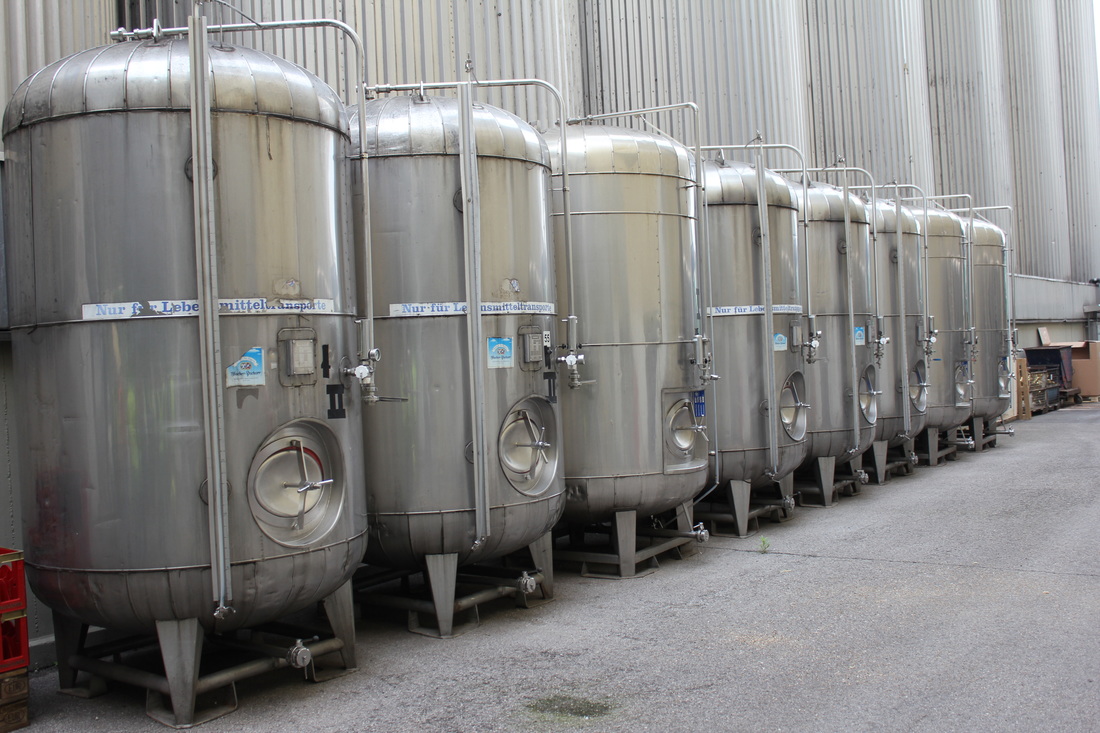
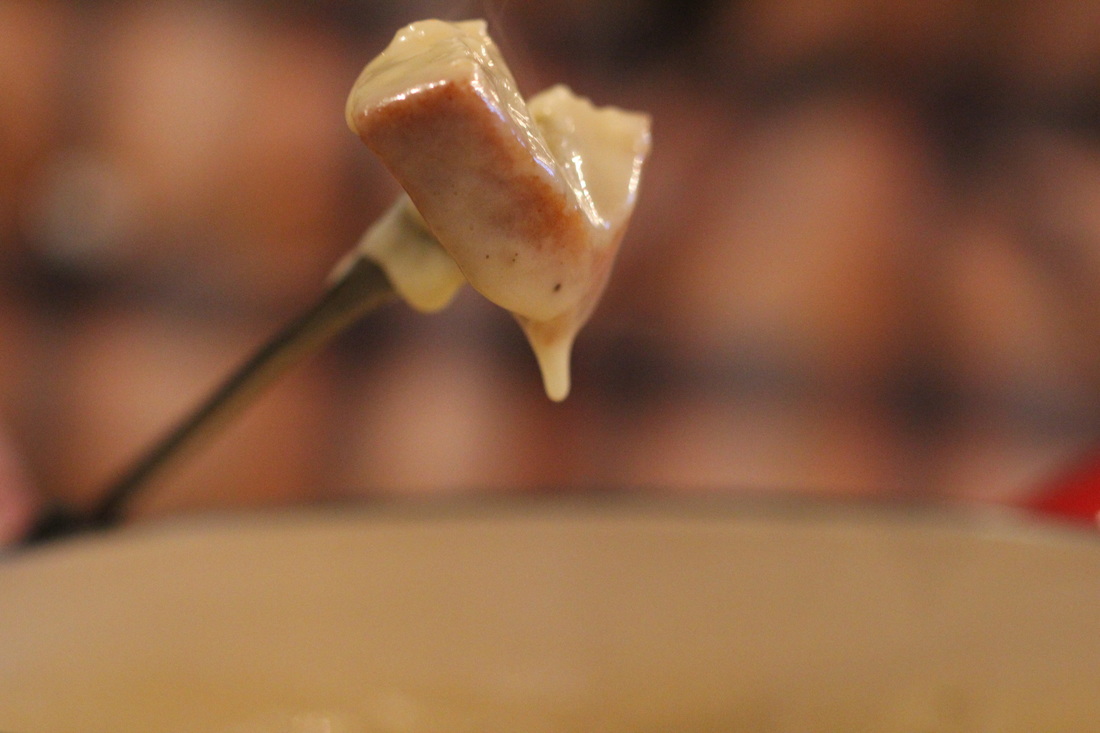
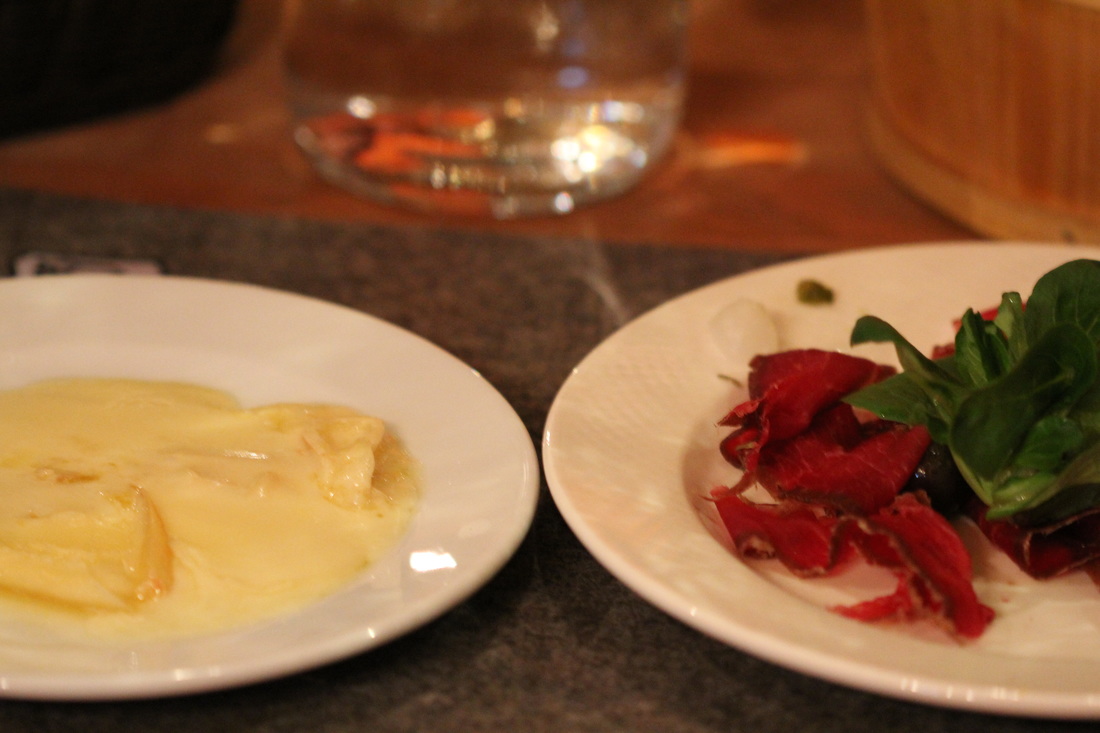
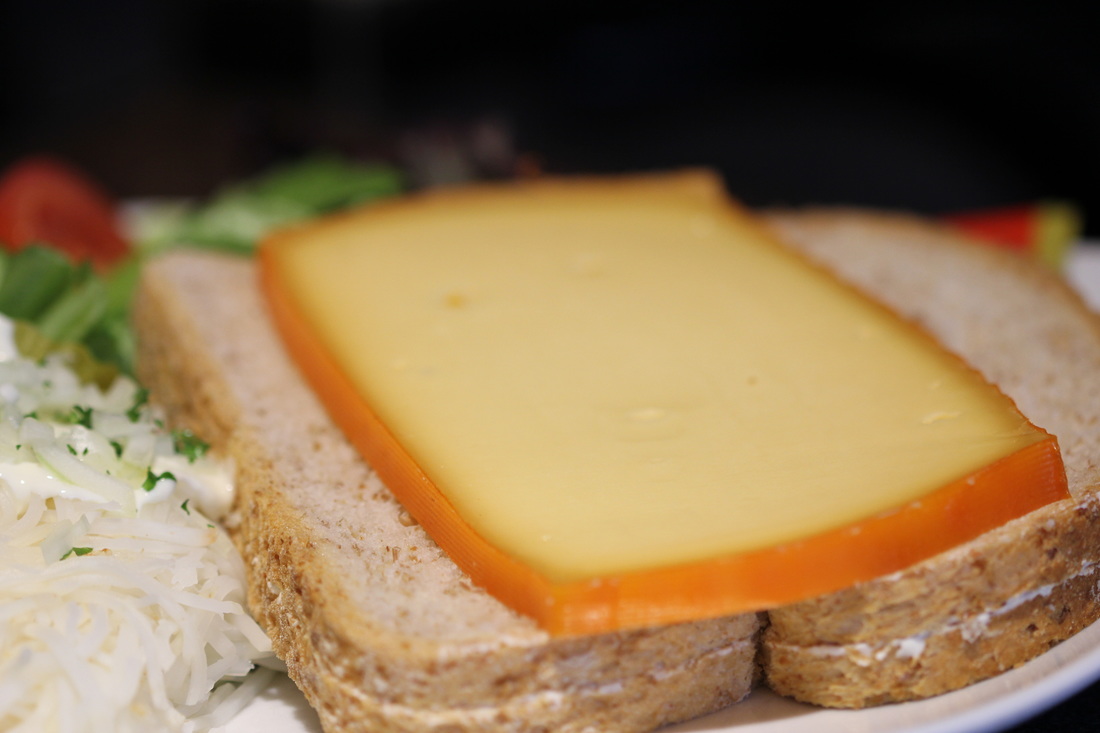
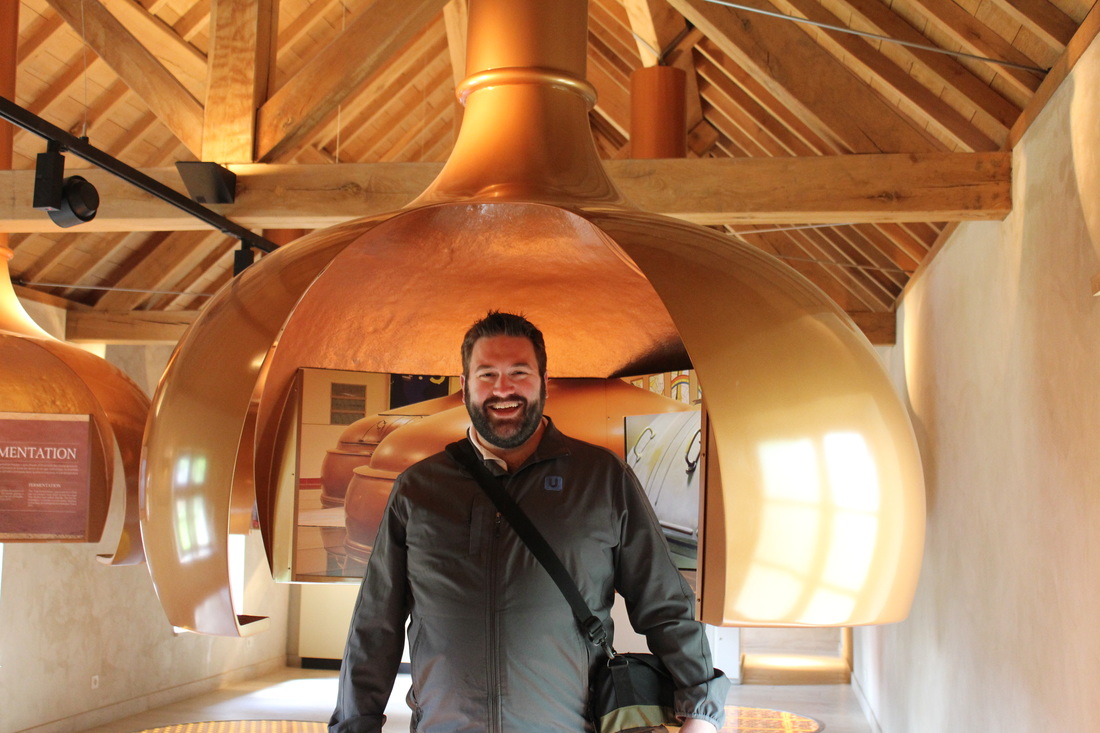
We had such an amazing time in Belgium (and the Belgium beers remain our favorite!) but it was time to head on to the other countries we were visiting, starting with Germany. Our first stop in Germany was in Freiburg - a university town where Holly and I studied abroad in college. We stayed at a hotel that was right on the square where they hold daily farmer's markets. 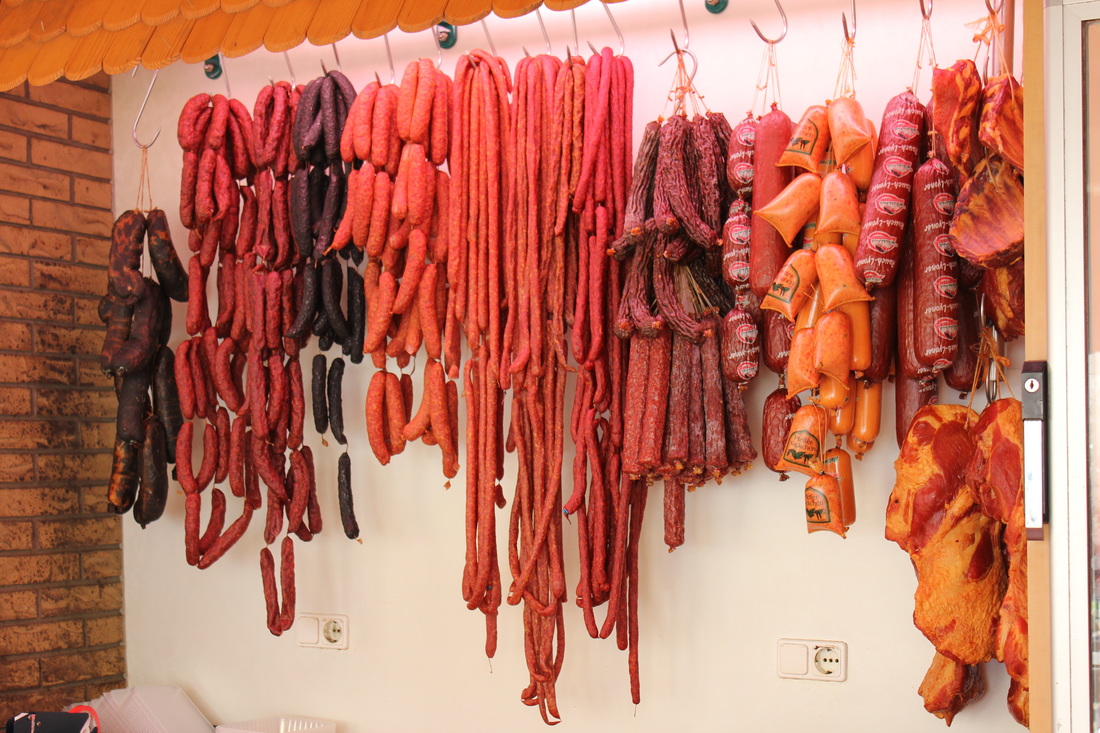 Of course one of the main attractions in Germany is the bratwurst - and we were not disappointed! 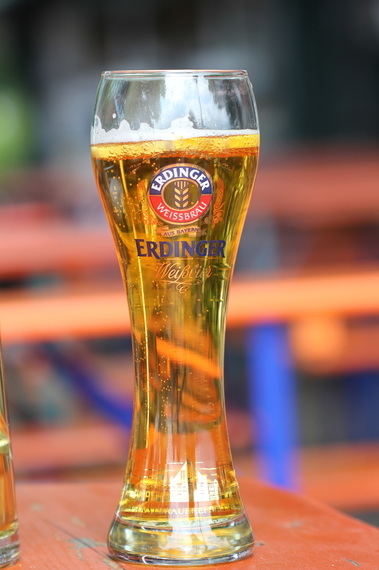 No better way to wash down a bratwurst than with a beer at a beer garden overlooking Freiburg. This Weisbier was light and refreshing with a hint of citrus. Our next stop was Austria and the Stiegl Brauerei in Salzburg. This was one of our favorite (and most modern) breweries with a great self guided tour. Of course we loved the tasting at the end too!  David was thrilled to get his ceramic liter beer stein. And I loved this Stiegl-Herbst-Gold beer, it had a fantastic herbal flavor to it and was so refreshing. 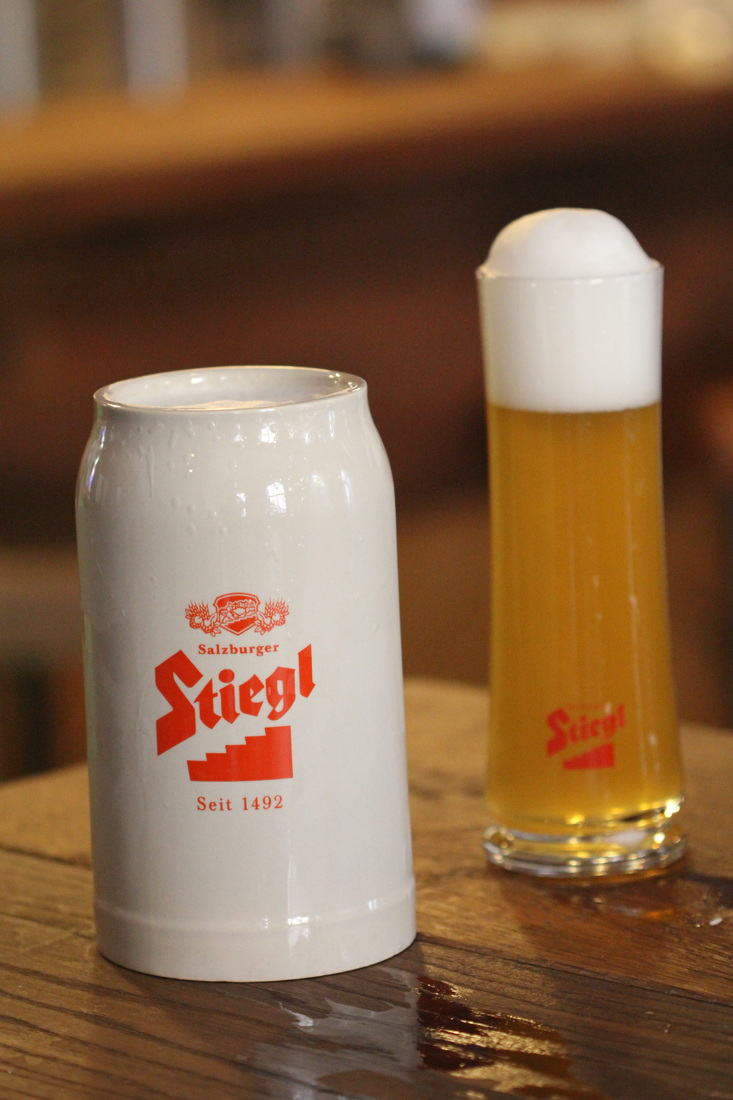 Our next stop that day was at the Augustiner Beer Hall in Salzburg. Such an authentic beer hall. One of our favorite memory was seeing a German grandmother's birthday with her whole family there drinking liters of beer - including the grandmother! I love this culture. After Salzburg we were back to Germany for a stop in Munich and went to the Paulaner Brewery - great tour that started out with a 45 minute "all you can drink" tasting. Yes please! Below are the tasting glasses, one of their copper brew kettles, and the "portable kegs" that they bring to the tents in Oktoberfest. And of course we had to do the Hofbrau Haus...  Our last stop in Germany was in a cute town, Mittenwald - they have the highest elevation brewery in Europe, and some of my favorite beers! We couldn't understand the whole tour because it was all in German, but the beer was delicious. And what a quintessential town, complete with cute streets, sidewalk cafes, and beautiful mountains surrounding us.  We then took the train to Chur, Switzerland where we stayed the night and then caught the gorgeous Glacier Express train to Zermatt, Switzerland. It was such a gorgeous train ride, and we were lucky enough for nice weather and to go through some amazing elevations - almost thought you were in a different world! 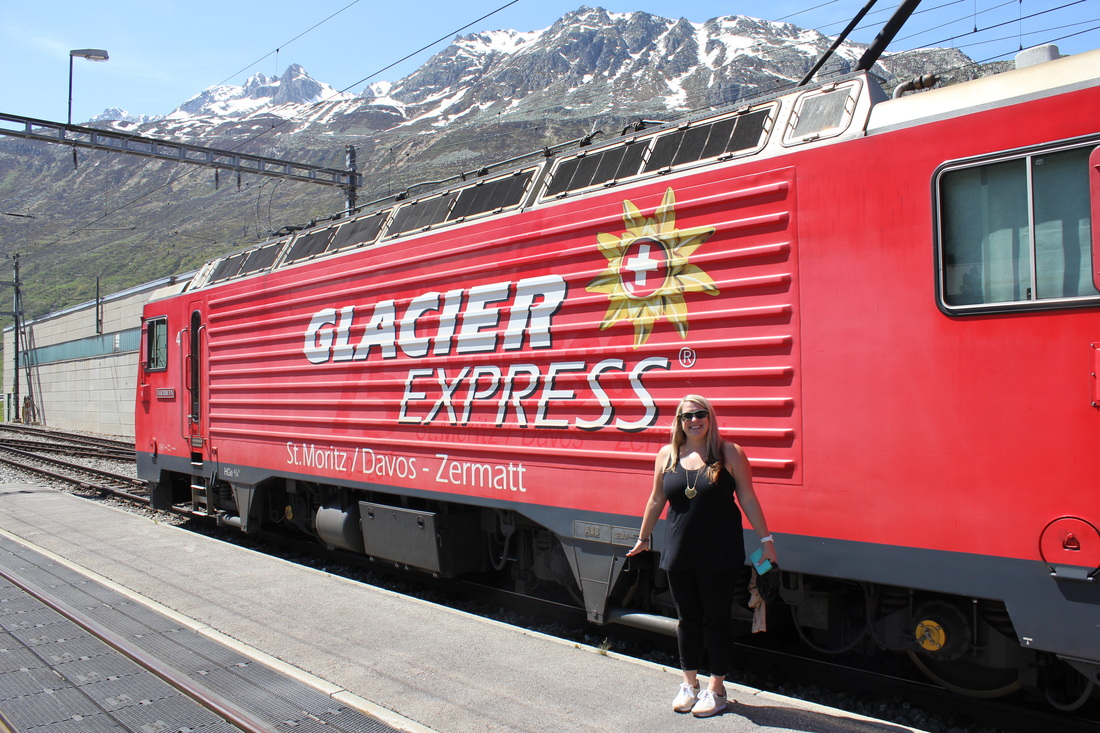 And now for the final leg of our amazing Europe trip - Zermatt Switzerland - some of the best hikes (Matterhorn!) and food (fondue!) of the trip... Oh our hike down, we stopped in a tiny "town" that had a restaurant and had some of the best pasta of the trip - a "lemon and prawn" pasta which I plan to re-create on a blog post very soon here - stay tuned! 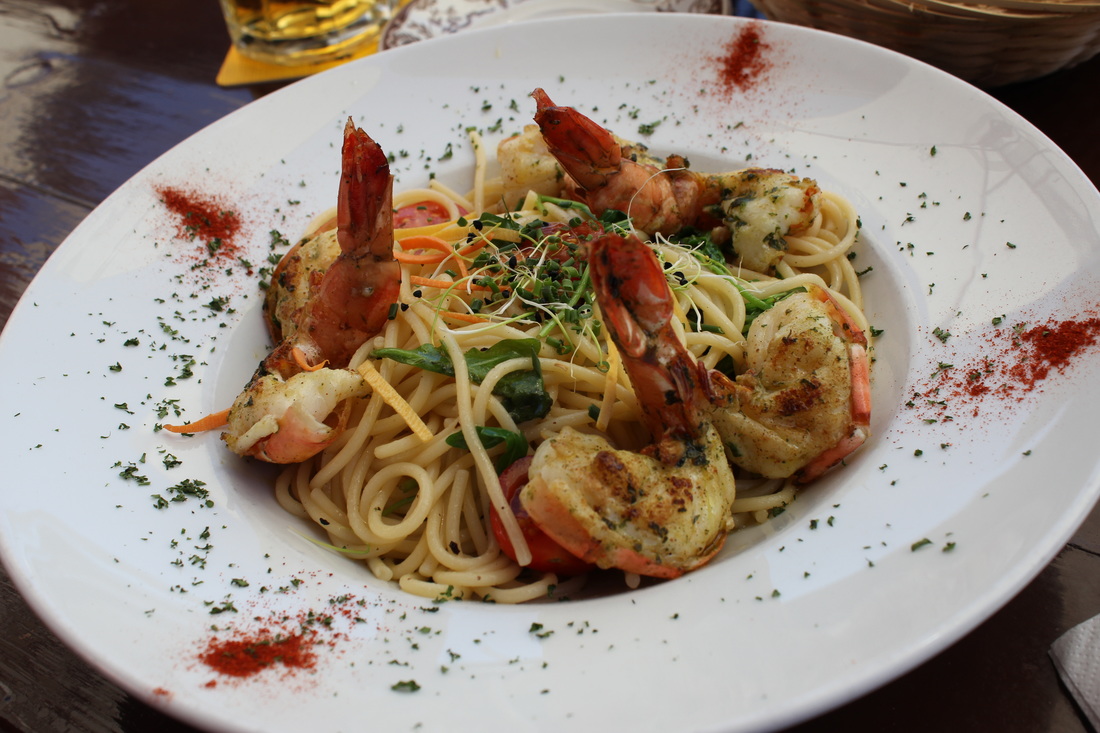 We enjoyed both fondue (melted cheese with bread dipped into it) as well as Raqulette (cheese that is melted under a broiler then shaved off onto your plate) served with bread, pickles and lamb carpaccio. Absolute perfection - I was in heaven. In all, it was the most amazing culinary / beer tour experience that I could ever ask for. My appreciation for beer (and food of course) has only risen with this trip and I am so thankful for the experience. I will definitely be re-creating recipes and referring back to this trip - I appreciate you all reading this and experiencing it with me!   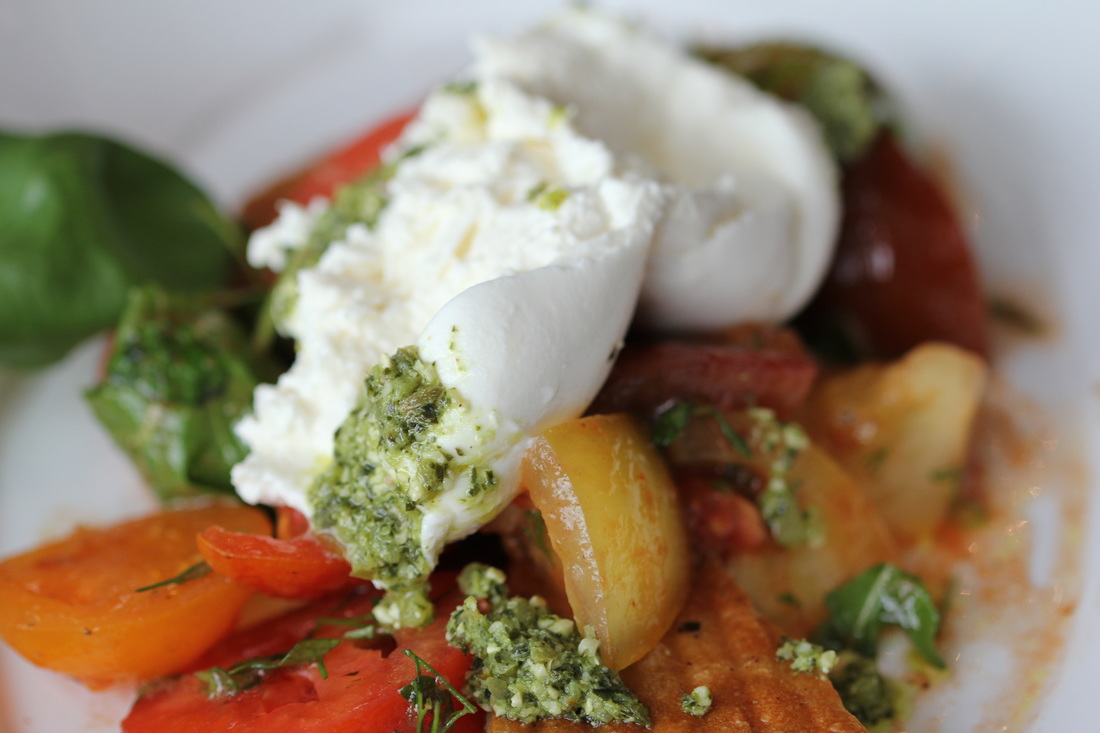
David and I spent an absolutely amazing 16 days traveling throughout Belgium, Germany, Austria and Switzerland - in which the main focus was around one of David's favorite things - BEER. David did an amazing job researching breweries in each of the cities we were visiting, and the experience was one that made memories to last a life time - some maybe a little hazier than others, depending on how strong the beer was that day. :)
I would like you all to know, the first thing I ordered in the Frankfurt airport during our layover to Brussels was burrata - and it was delicious with a nice pesto over heirloom tomatoes.

We hired a car to drive us around Belgium, which was great to get us out to the countryside so we could visit the Abbeys where the monks make the beer. To be considered a trappist beer:
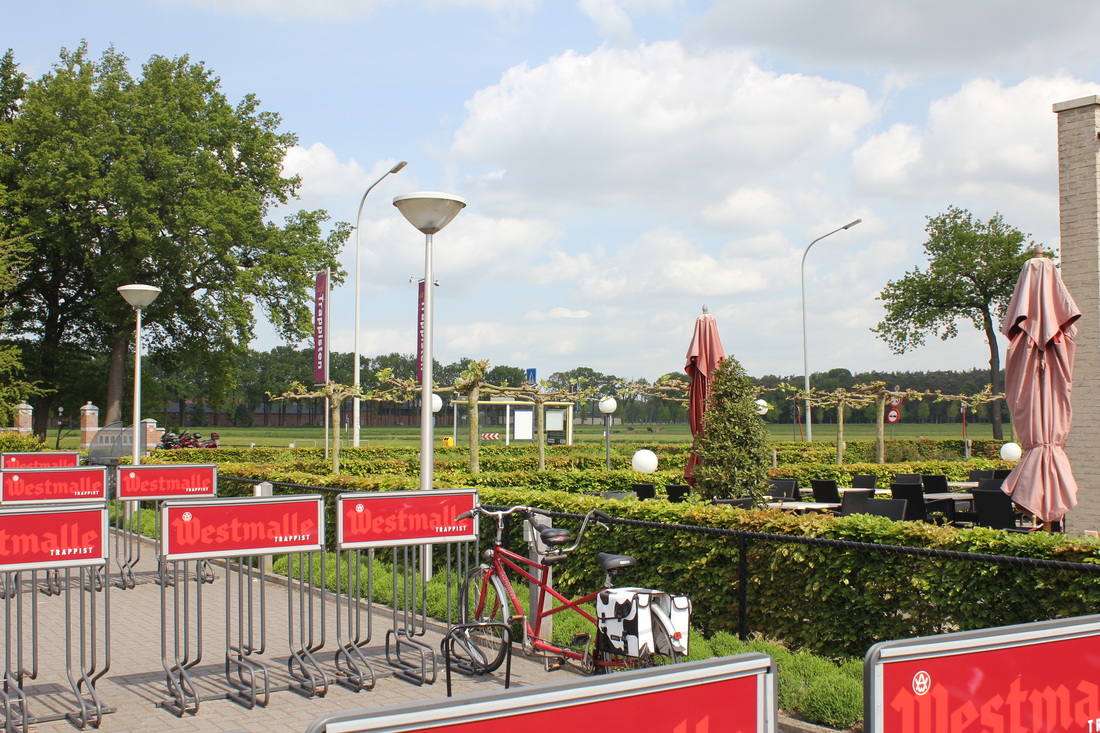
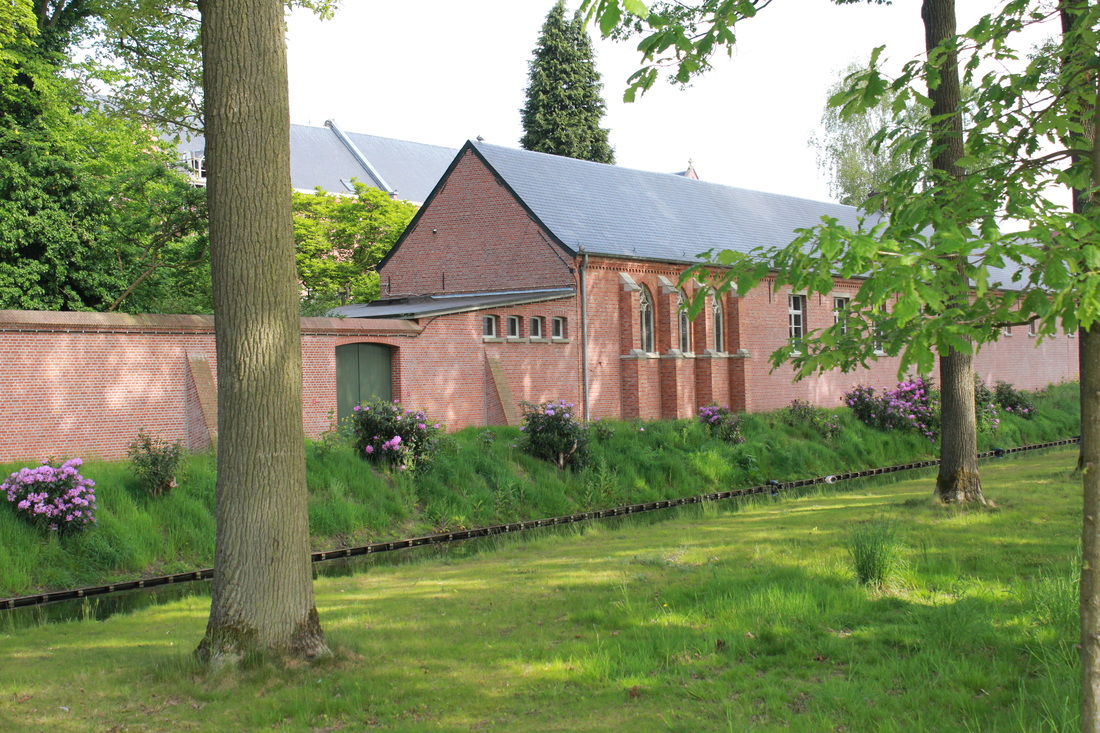
The first abbey visit was to Westmalle. We could only walk around the abbey exterior, but they do have a cafe right next to the abbey where you can get their beers. They taste so fresh right next to the source! 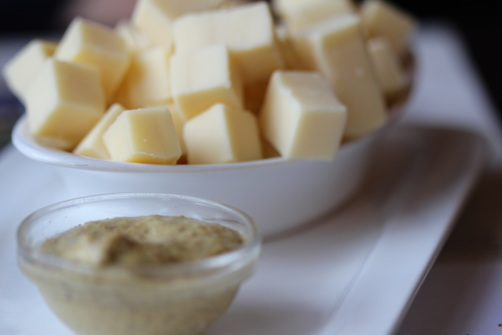
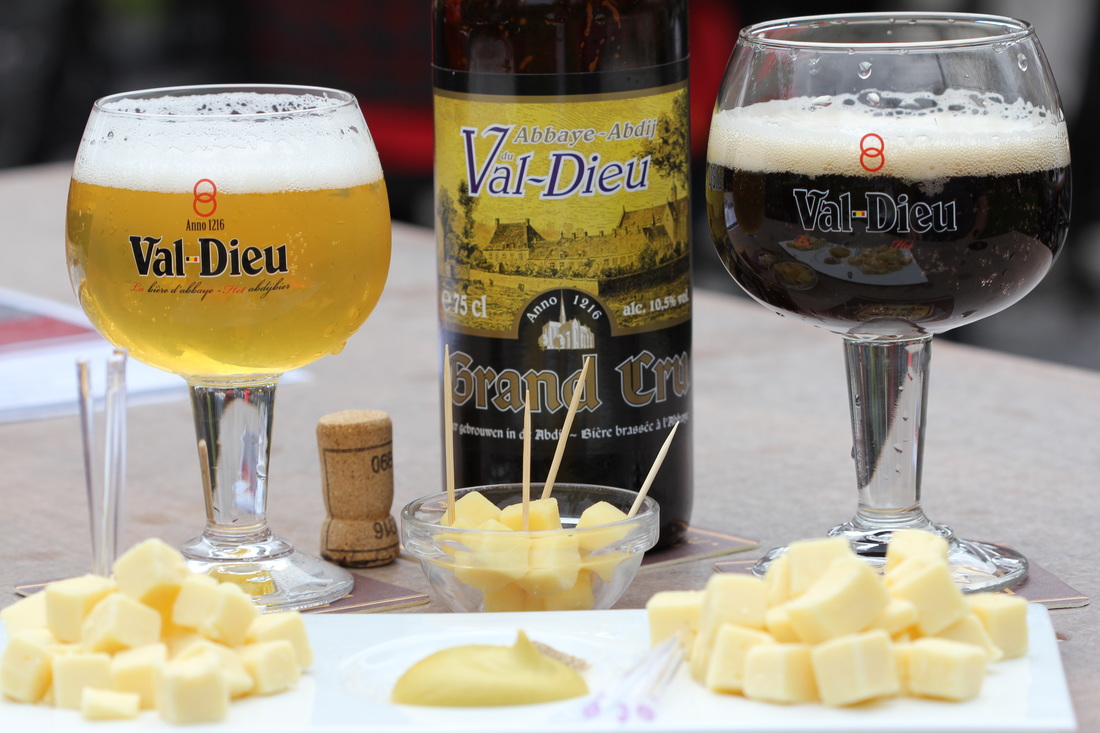
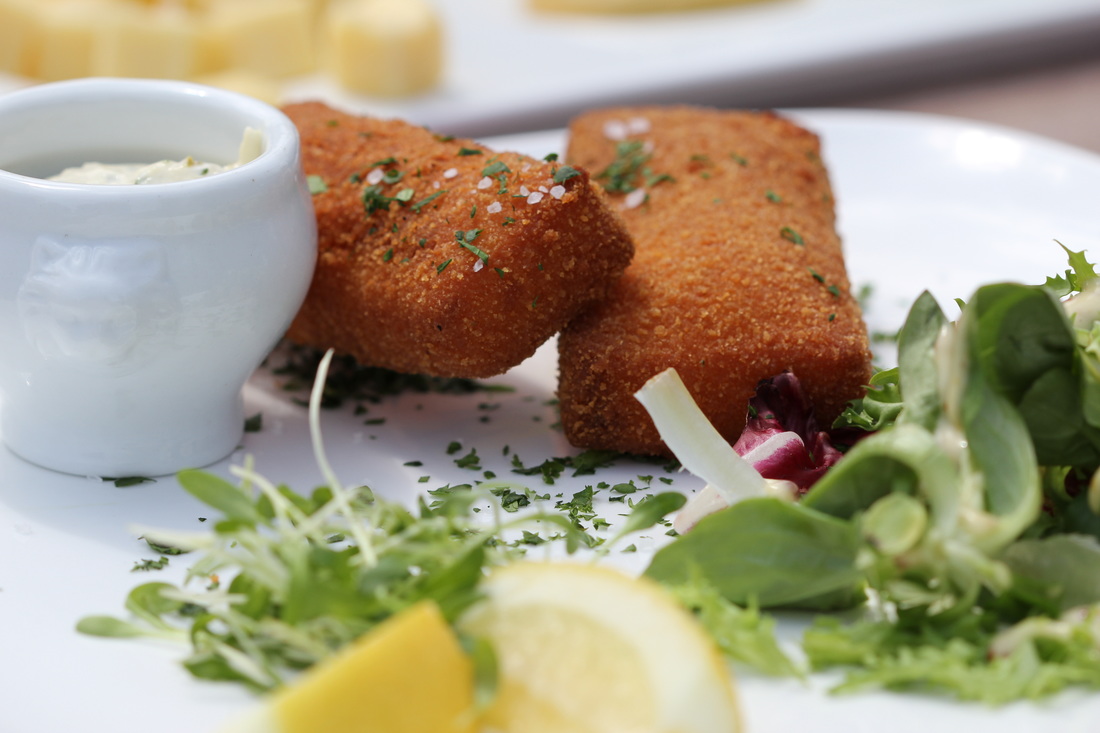
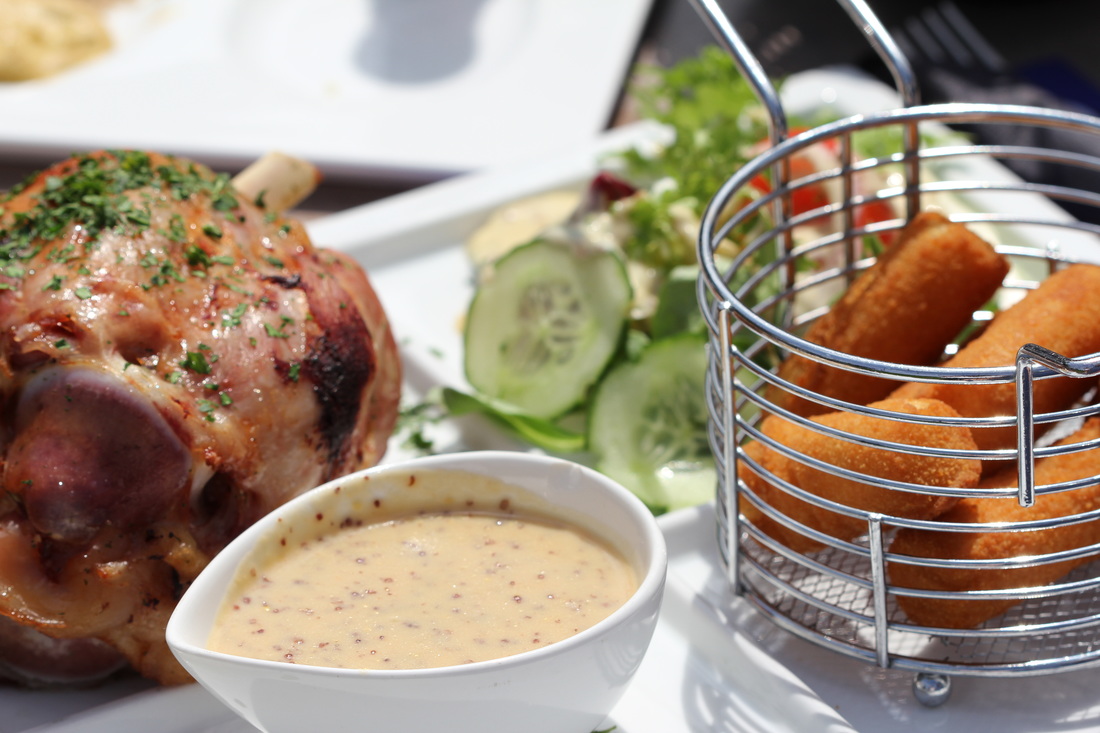
Val Dieu was an amazing abbey and had some of our favorite beers that we tasted. We also loved the outdoor courtyard that we had some beers, cheese, more delicious potato croquettes and an amazing piece of ham on the bone called "Le jambonneau cuit au four" with a mustard cream sauce.
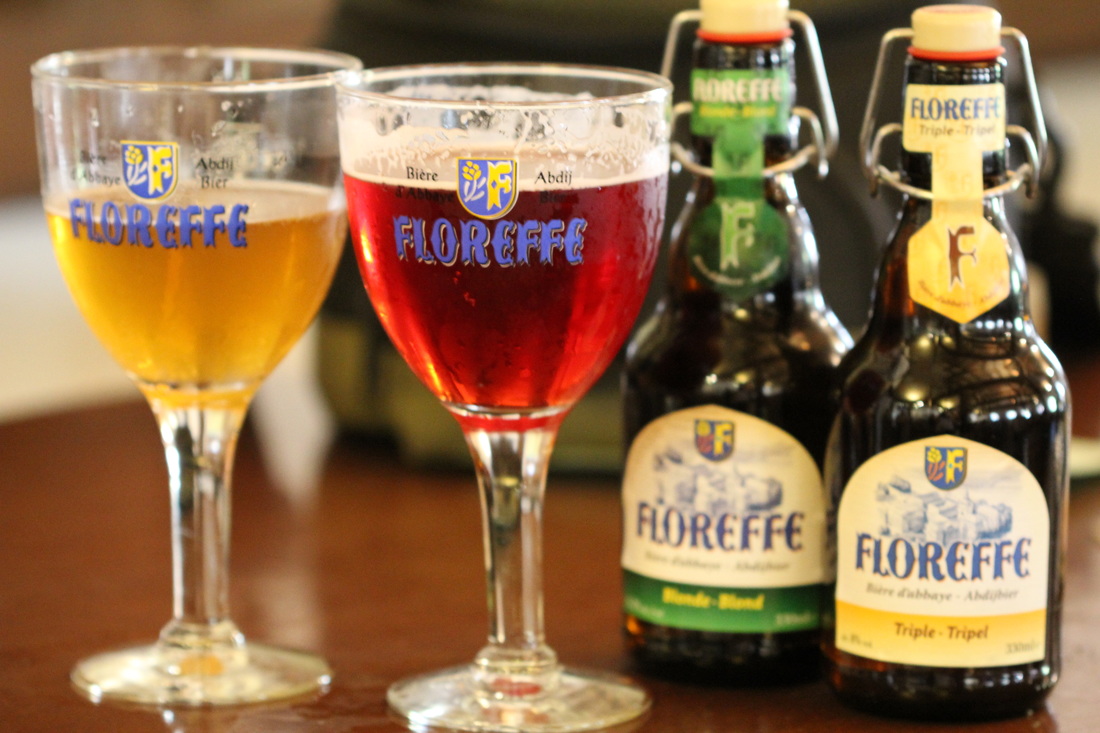
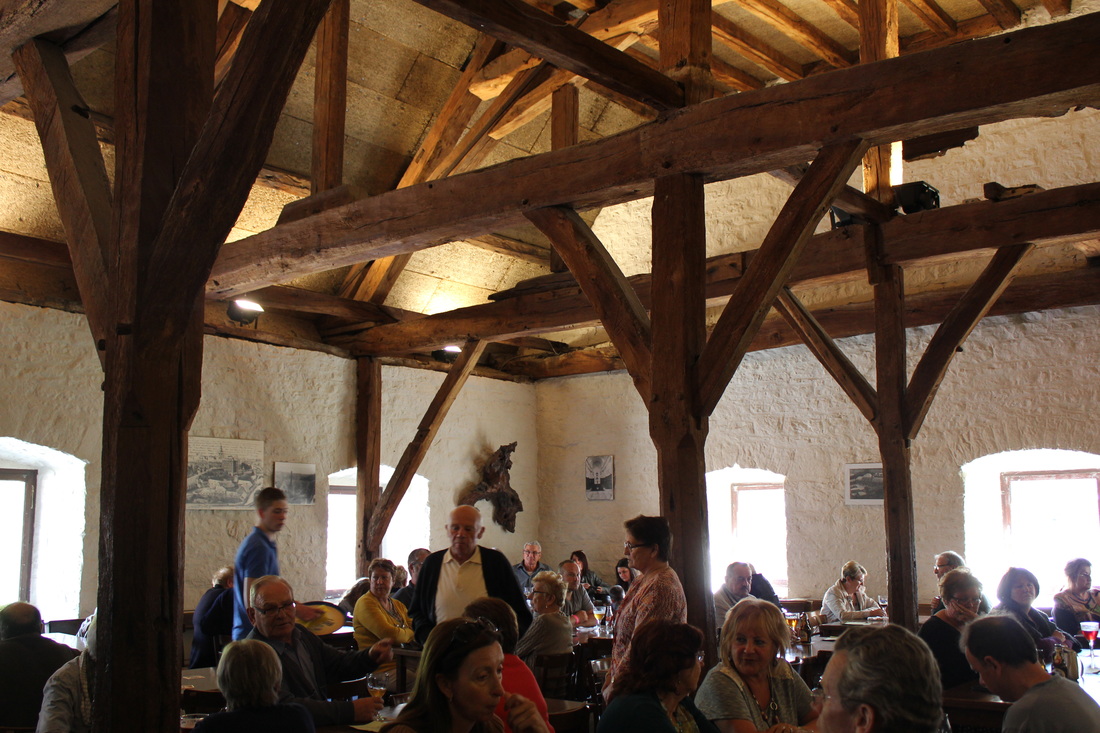
Our third Belgian brewery of the day was Floreffe - this was such a neat small local place - and the beers were cheap! They had a gorgeous outdoor sitting area, but the true treat was the traditional beer hall in which everyone was enjoying their beers. The bartenders couldn't have been over age 13 or 14, and spoke no English, so I had to try out my German skills in order to get us the beers! The beers were pretty good - David made a mistake and ordered a fruity red beer, which I knew he would not be a fan of - and needless to say, he was not. Out of the three breweries we went to that day, I would say it was the least favorite beer-wise. But we still loved the experience!
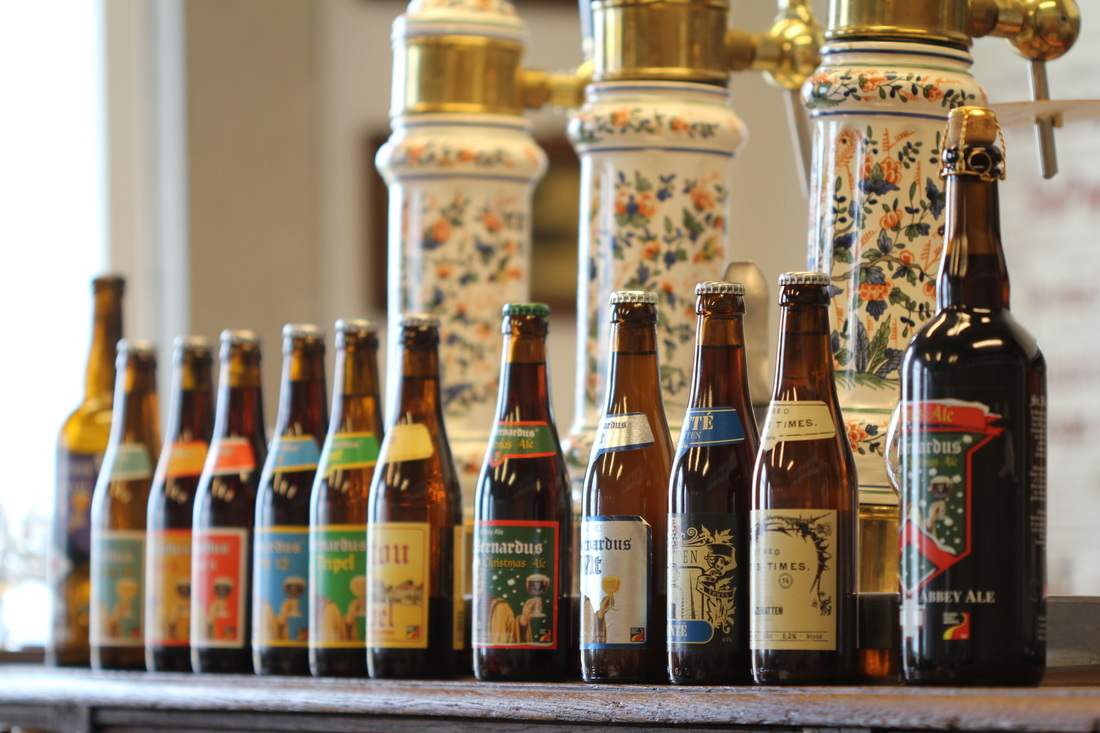
The next day we went to one of David's very favorite beer's brewery - St. Bernadus. His very favorite beer is the ABT 12 - a wonderful Belgian beer that has that amber color and a smooth finish. We even got to see a choir from Estonia sing a beautiful hymn in the tasting room - they make the trip to St. Bernadus once every three years, and it happened to be our tour that they were on - what an experience.
Below is video of the Estonian choir that David uploaded - just beautiful.

David pouring the ABT 12! Note: you can get this in the US!
We journeyed on to the abbey Westvleteren where we got to try the #1 rated beer in the world. It was good (although we didn't feel like it quite lived up to it's #1 in the world title). I did love the cheese and paté that they made!
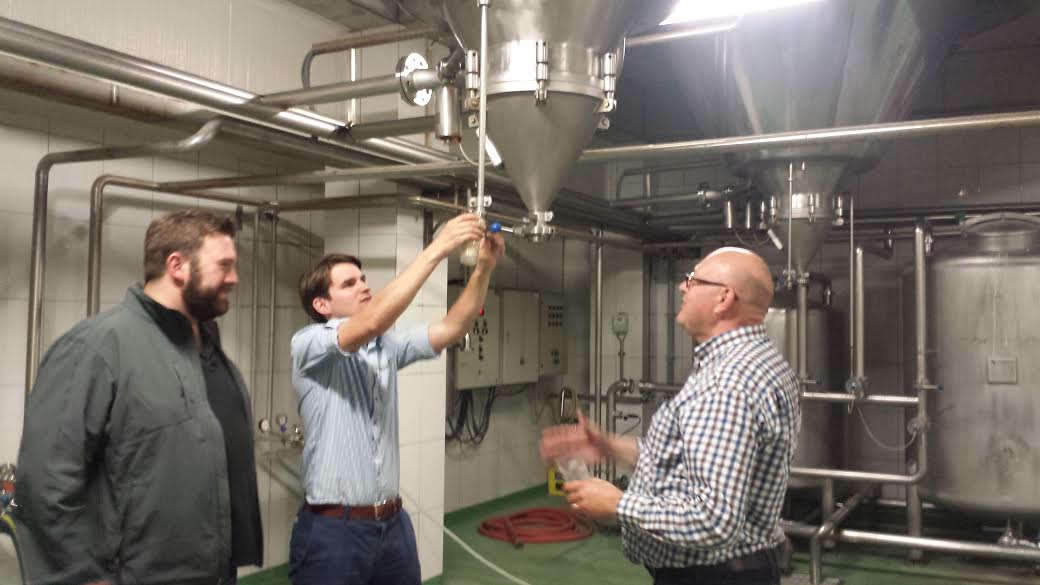
Our last brewery of the day was one of the most unique and memorable experiences that we had on our trip - Het Sas - a small brewery with an 8th generation brew master. They were so welcoming and took us on a private tour, complete with tasting an unfiltered Pilsner right from the source (the brewmaster is pouring it for us)!
Our last day in Belgium we visited abbey Orval - you can get this in the US and it is delicious!

More to come on the European Beer adventure - next stop, Germany!!!
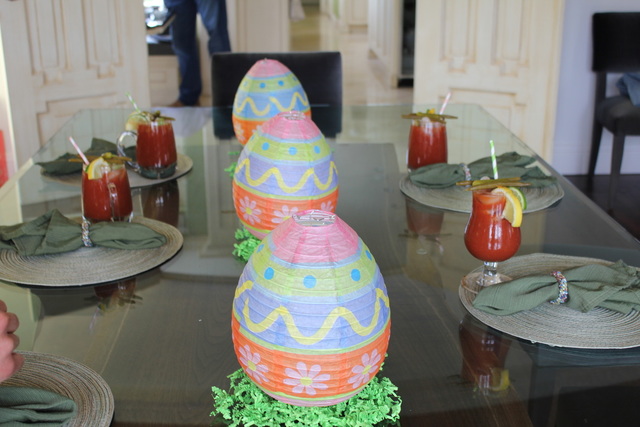
Wanted to share our fun little Easter brunch party, complete with Bloody Marys. We had ours for Easter, but this brunch spread is perfect for any occasion! 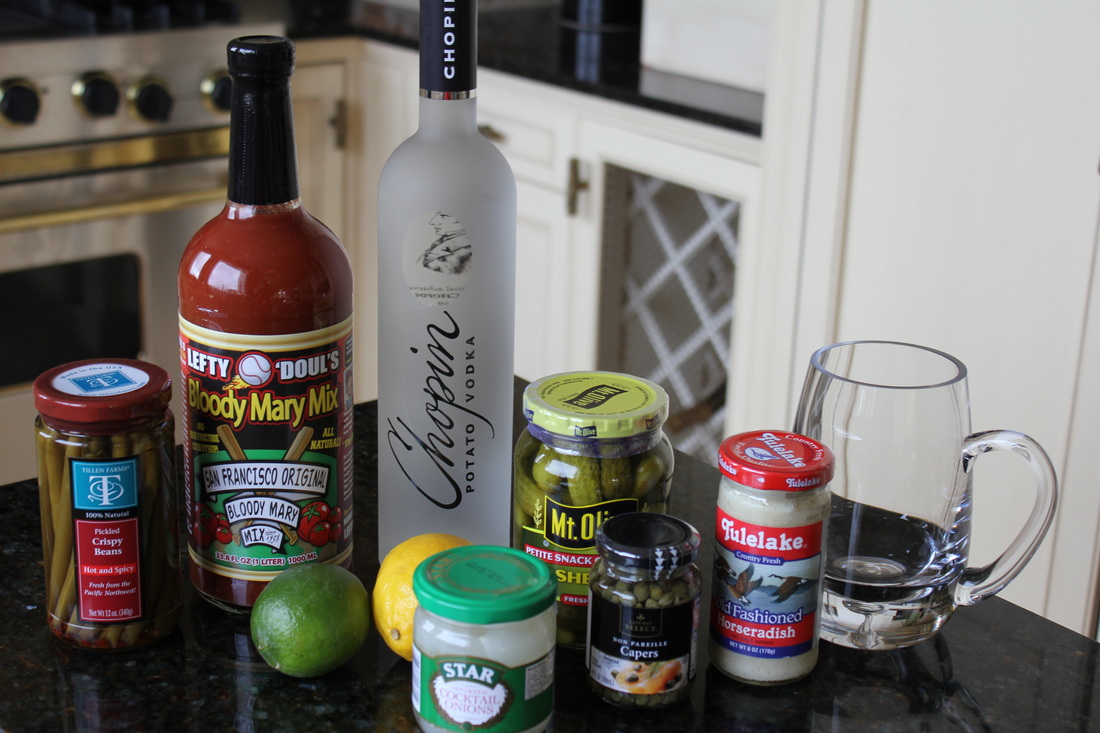 Ingredients:
The fun part of these is you can make them as fancy as you like! 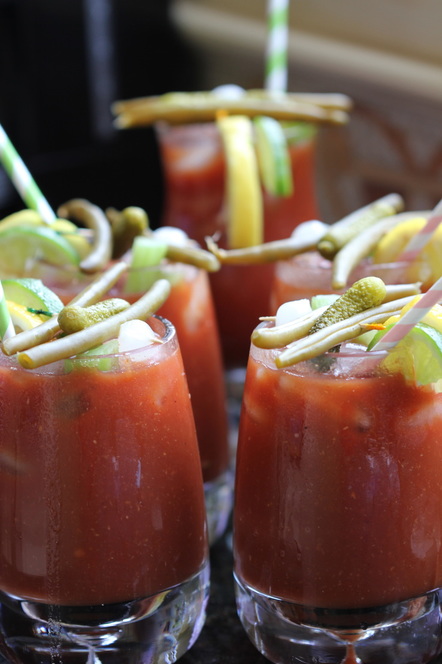 We made some other nice apps to have out as our guests arrived, including burrata of course (yes, works great for brunches too!). I was at Safeway so went for the Belgioioso brand, which did well in my burrata comparison experiment. Top it with a drizzle of EVOO and sea salt and you have a never fail app! 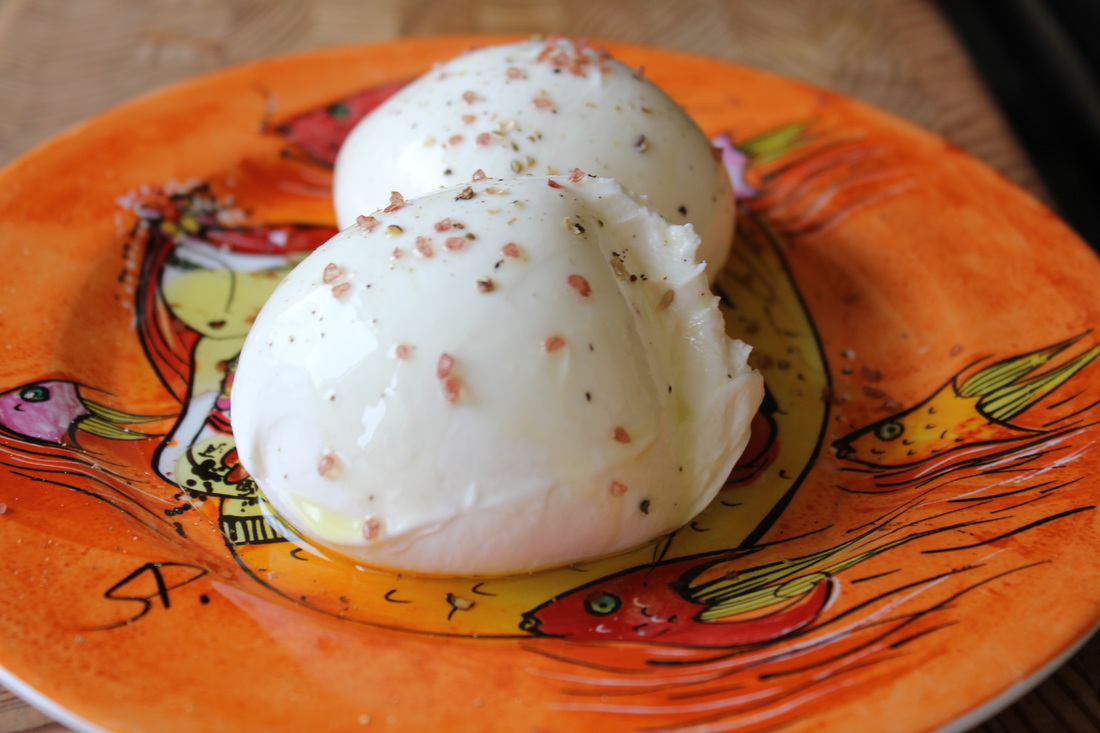 
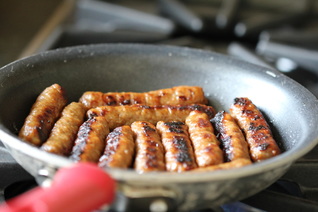
I went with three different meats for brunch. Bacon, breakfast maple sausage links, and crumbled breakfast sausage. Nice to have a variety, and everyone loves some breakfast meats!
 Enjoy your brunch party!!! My twin sister, Holly, and I made some delicious turkey burgers tonight with a pea-basil-parsley pesto. This was a super easy recipe that you have to try! It is a low carb healthy turkey burger and pesto - keep it low carb or serve it on a toasted ciabatta role, and you have a perfect dinner! 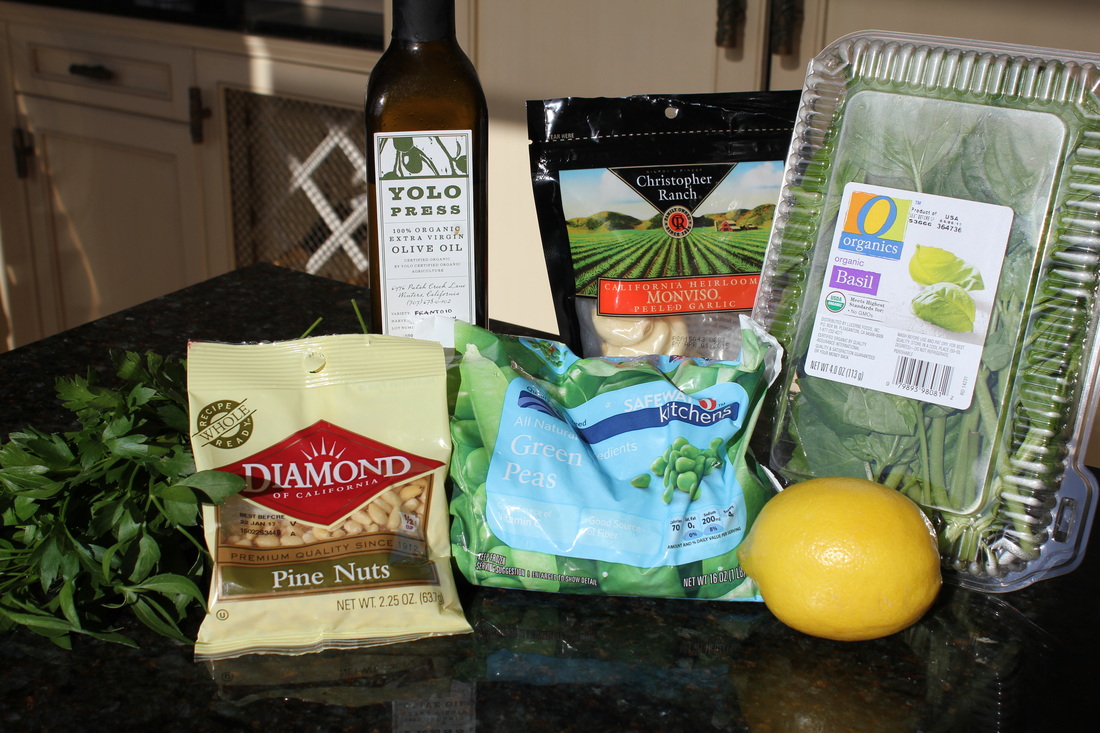  Pea pesto Ingredients:
Take 1 cup of frozen peas and run them under hot water to thaw them. 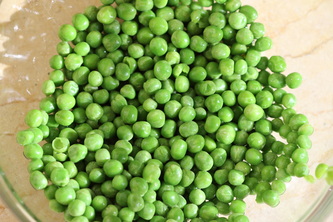 Add the peas, garlic, pine nuts, parsley, basil, grated parmesan cheese, lemon juice, olive oil and salt and pepper to your Cuisinart. Make sure to taste it just in case you need more salt and olive oil - that could be the answer to make sure it tastes OK! 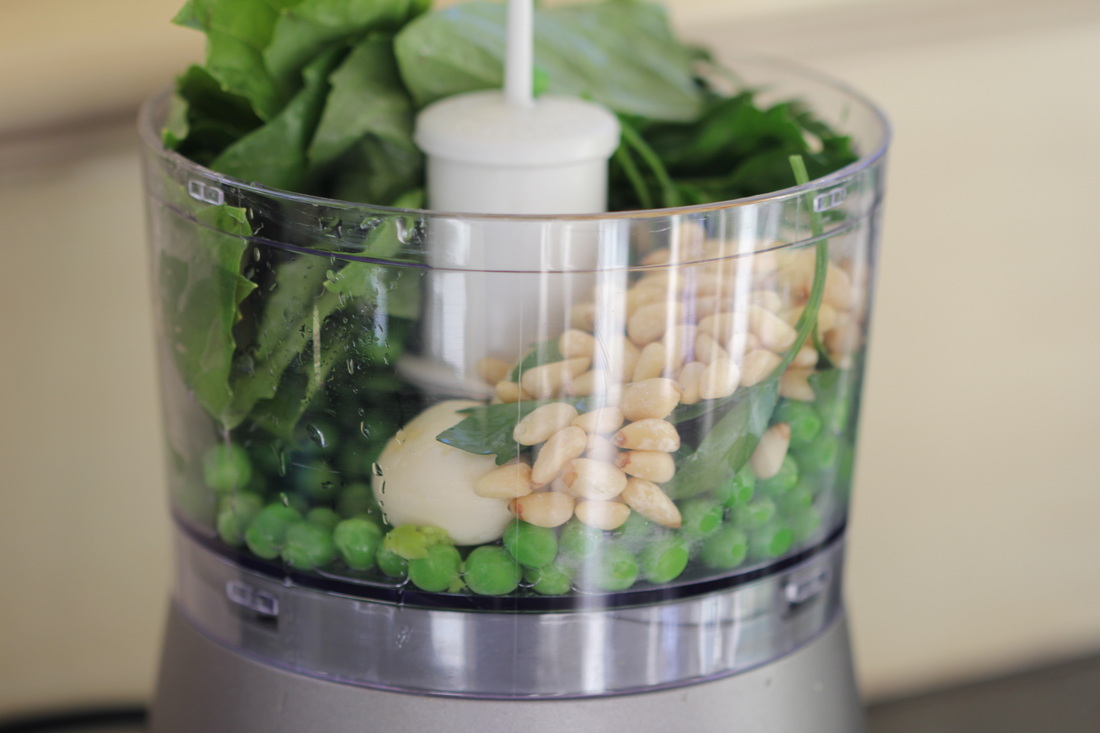 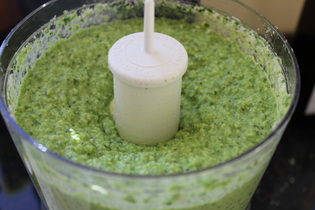 Delicious pea pesto! Put aside for when you are ready to use. The lemon juice should help to keep it's green vibrant color. How easy and beautiful! The pesto reminded us of a combination of pesto and a chimi-churi sauce. I posted about a chimi-churi sauce David and I made in a different article on this blog. The pesto we made tonight has a great garlicy flavor and adds something to any dish - you could put this on crostinis for a great appetizer, maybe with a dollop of fresh ricotta cheese (I see a future post!), or on a grilled chicken breast or grilled steak. 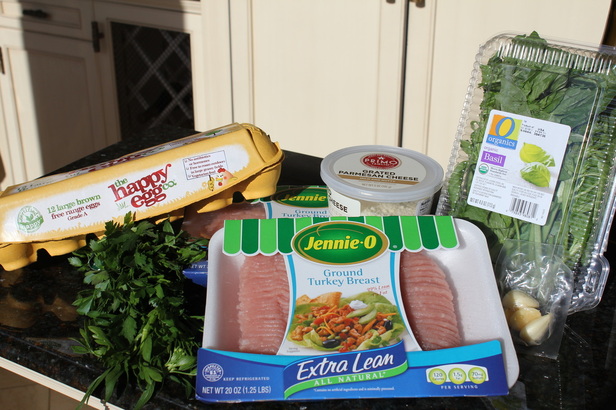 Now for the turkey burgers! Ingredients:
Mix ingredients together - hands are the best tools for this - (make sure not to over mix, as this makes the meat tough!) Get a hot pan sizzling hot ready with some olive oil so that you can sear the patties. Be sure to place them on the hot pan, and don't move them for as long as possible, so they get that nice brown crust on them!
 The finished product! Melt your favorite cheese over the burgers, after searing them for 3-4 minutes on each side. It is best to cover with a lid so the cheese can melt with the steam. We used colby jack cheese - a nice mellow cheese that won't hide too much flavor of the burger but provide that cheesy goodness that we all crave on a burger. I served on a toasted ciabatta bun - put a bit of mayonnaise (I always use the real thing), add the pea pesto, sliced heirloom tomato and red onion. Enjoy!!! 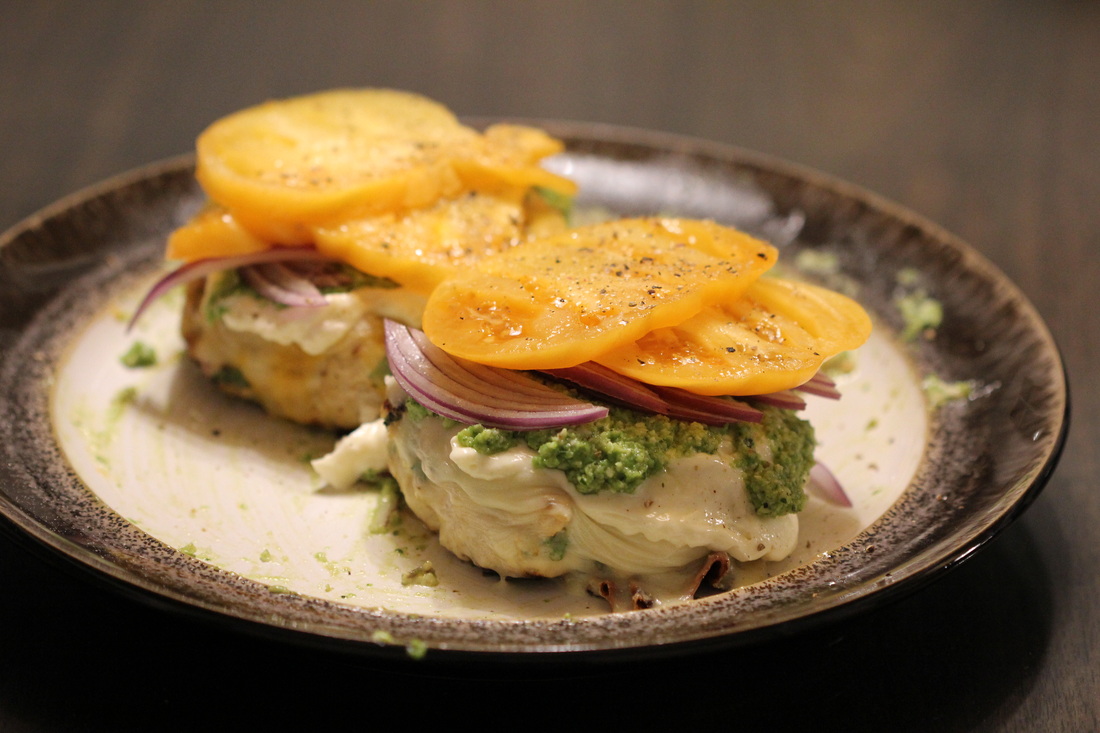 David chose the low carb option without the bun - just as delicious!  David and I are absolutely loving cooking in our new kitchen - not a bad view to look at while doing the dishes! Tonight I decided to try making the elusive cauliflower crust pizza. I have seen so many recipes and posts about this, so I decided to give it a try myself. And to my great joy (and slight surprise), it turned out wonderful! 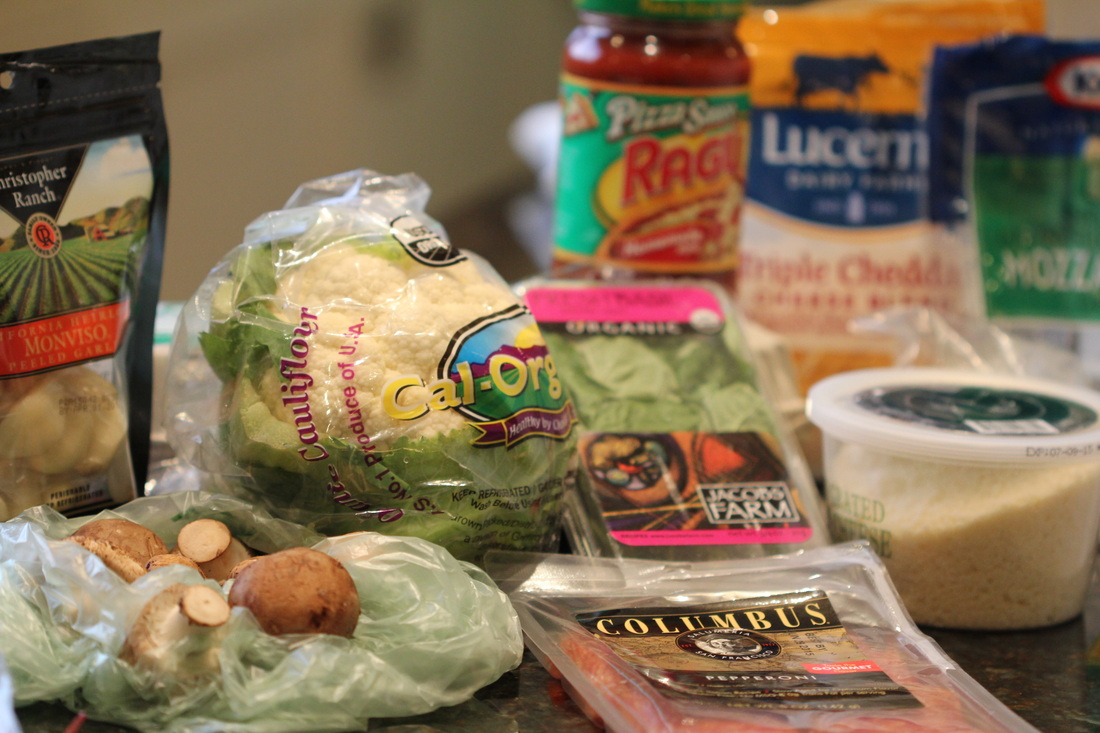 Ingredients Crust:
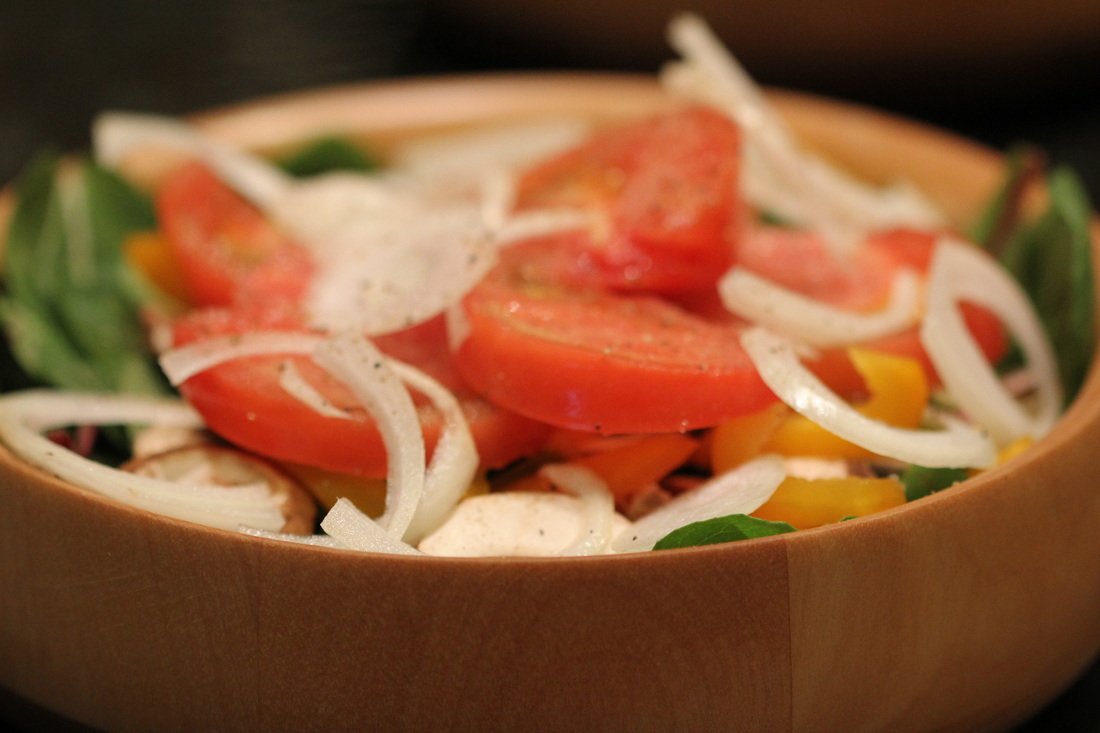
 For the crust, clean and cut the cauliflower into chunks, then blend in your Cuisinart. Once all blended, put in a microwave safe bowl and microwave for 4-5 minutes. Take out (and make sure to let it cool for a while), place grated cauliflower in a towel and squeeze as much of the water out as you can! Keep squeezing! Then combine with one cup of the grated parmesan, 2 eggs, and the seasonings and mix together. 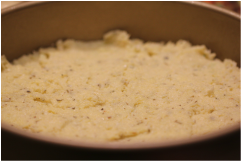 Press down onto a cooking sheet or in a round pan - make sure to spray with non-stick cooking spray to prevent any sticking. Cook in the oven at 425 degrees for about 20 minutes. One of the keys to this pizza is to be patient - let 'er cook! While the crust is getting nice and brown around the edges, I browned some Italian mild sausage (removed from the casing) along with 5-6 whole garlic cloves. David loves garlic on his pizza, so it is a good way to soften the garlic before it cooks in the oven. Even easier to keep whole, for those who don't care for that much garlic, they can easily pick it off (while maintaining the great flavor it provides). 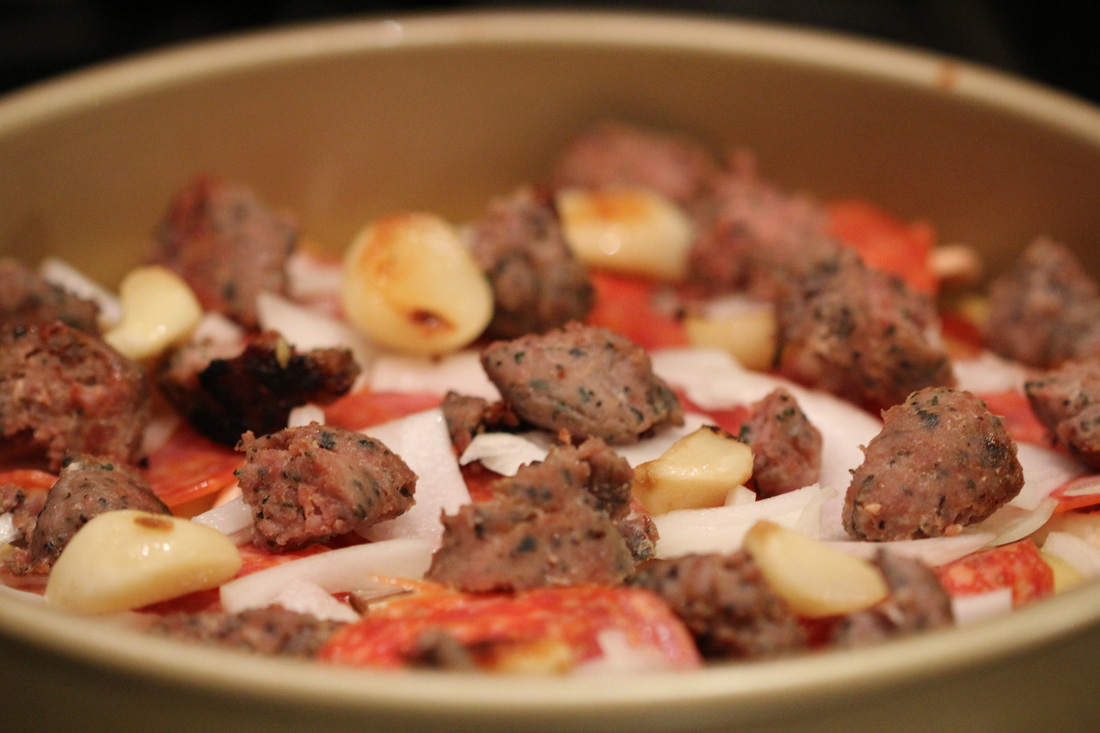 Assemble your pizza! Add the tomato/pizza sauce directly onto the crust (I would recommend being generous with the amount of sauce), layer on the slices of mozzarella and provolone, then add on the pepperoni, mushrooms, onions, Italian sausage and garlic cloves. I of course topped it with a bit of extra cheese. :) Bake at 375 degrees for 20-25 minutes until the cheese is nice and melted and begins to brown on the top. Sprinkle with fresh basil. 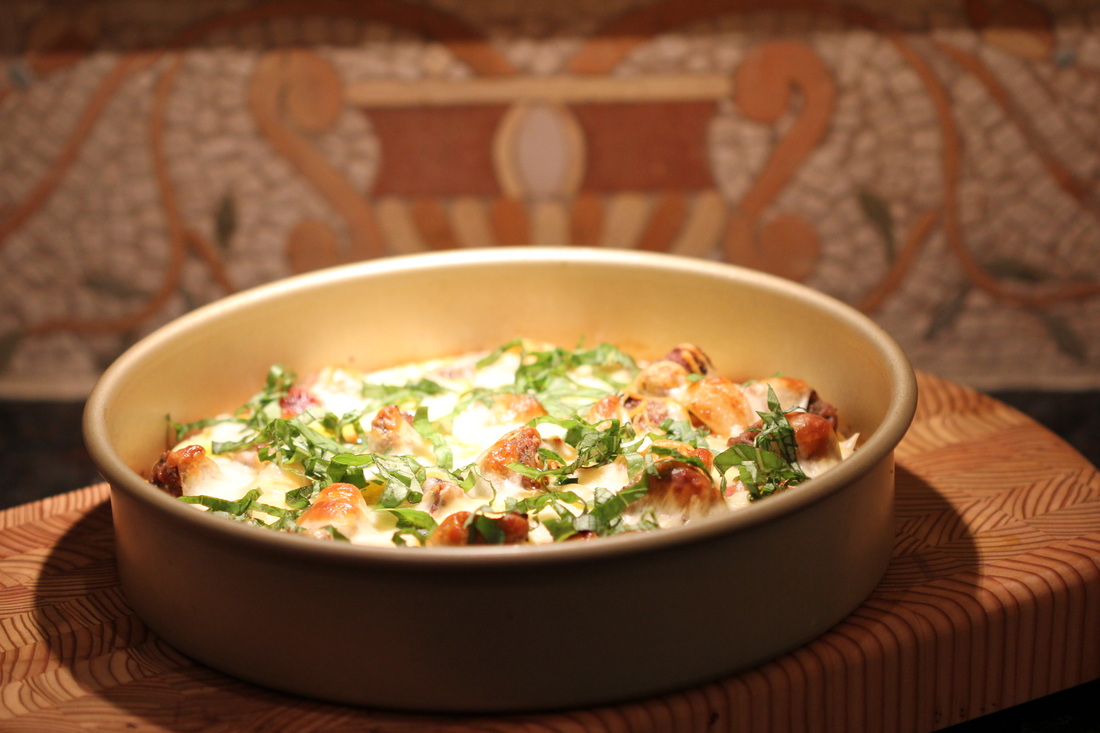 Let cool for a couple minutes to have the pizza set, cut into slices and enjoy with a classic pizza house salad - large cut tomatoes, onions, mushrooms, peppers, lettuce, and ranch dressing. Cheers to low carb pizza that tastes great!!
Happy New Year! For my first post of 2015, I am sharing a wonderful recipe for my favorite soup to make - Butternut Squash soup. And David made his delicious Chimichuri sauce that he pours over skirt steak. He is really mastering cooking steak. :) There is no real reason why I made the two of these together, so you can just make each one separately for a delicious meal on it's own. David also got me a a macro lens for my birthday, so get ready for some close up shots! 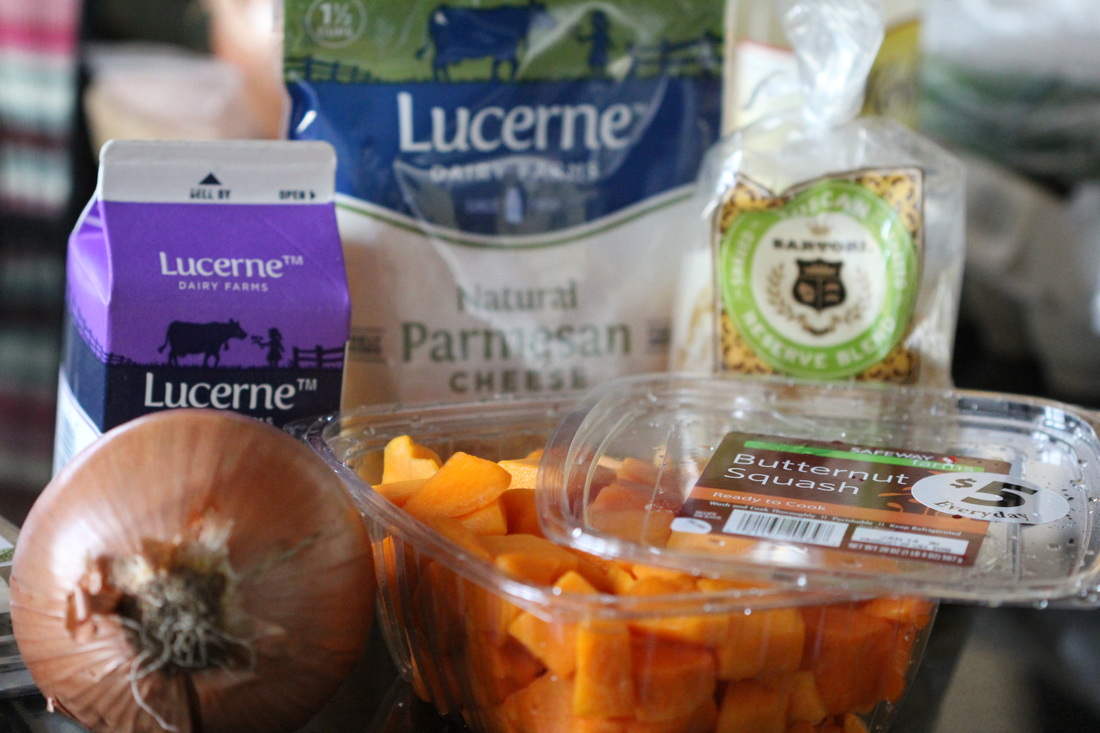 Ingredients for the Butternut Squash Soup:
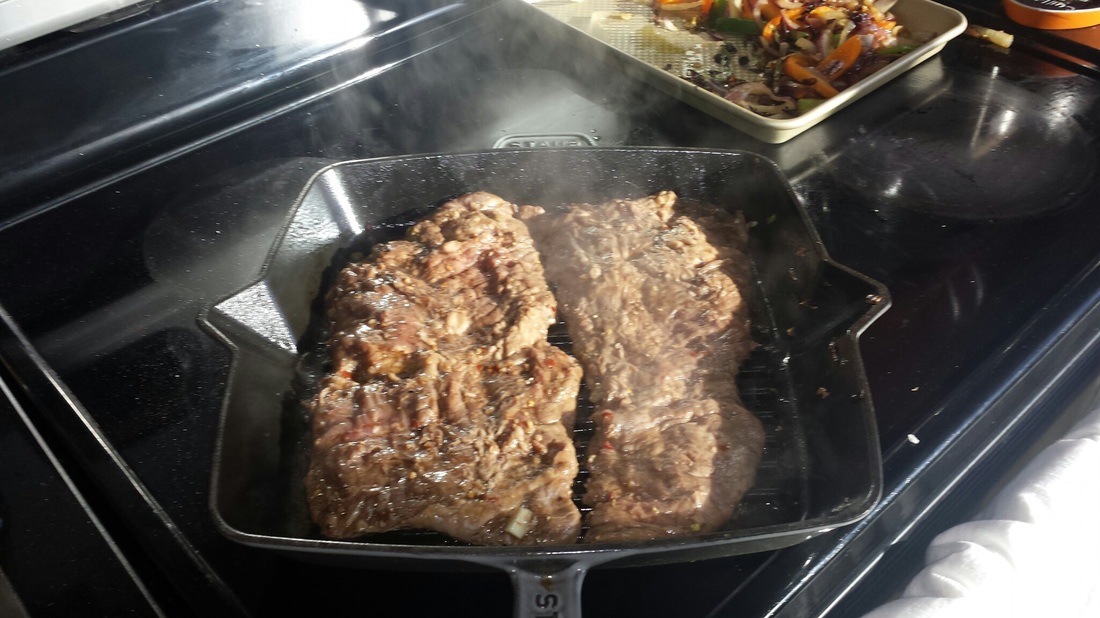
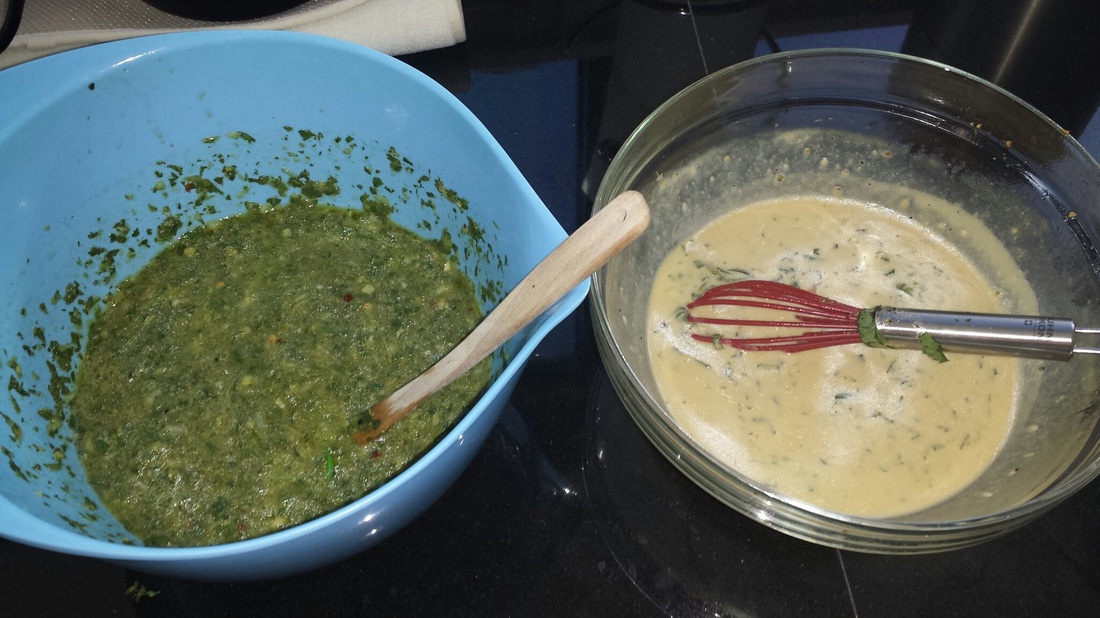
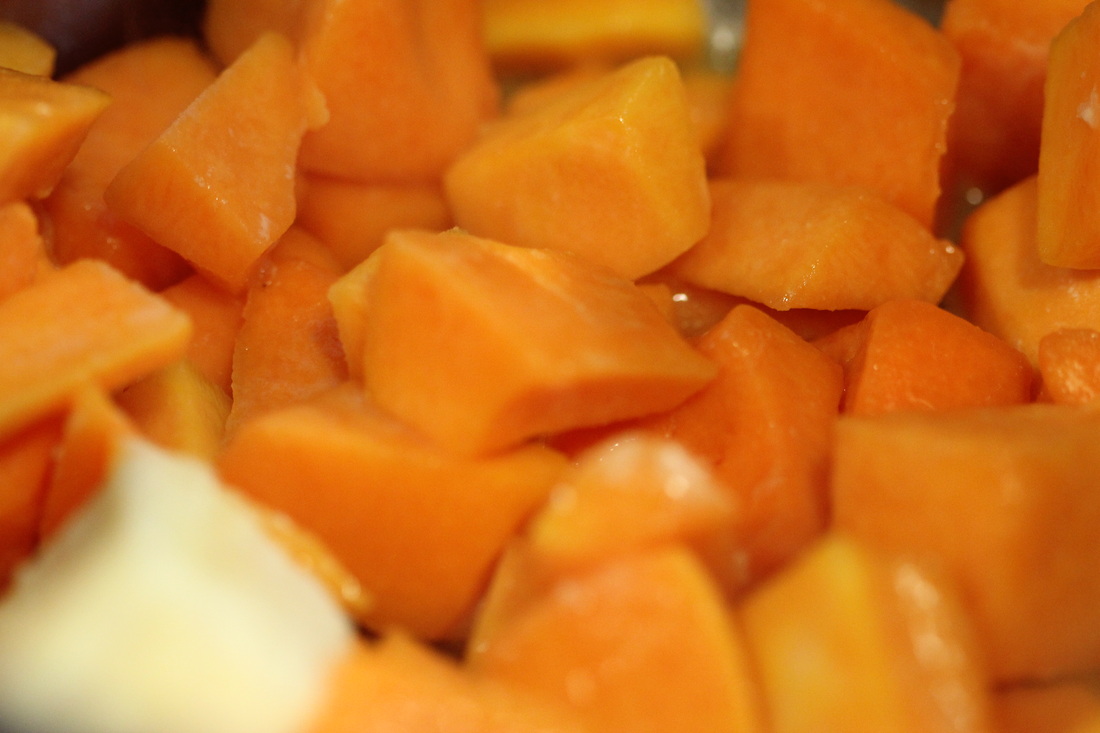 Heat up a couple tablespoons of olive oil and butter in your pot, and saute the butternut squash and onions until they are nice and soft. Add the herbs and stir. Then add in the quart of chicken stock and let simmer for about 20 minutes. Using an immersion blender, blend everything together until smooth. Then add in the Half & Half (or cream) and shredded parmesan cheese (about a half cup). Add more of each as needed. Let simmer for another 10 minutes. 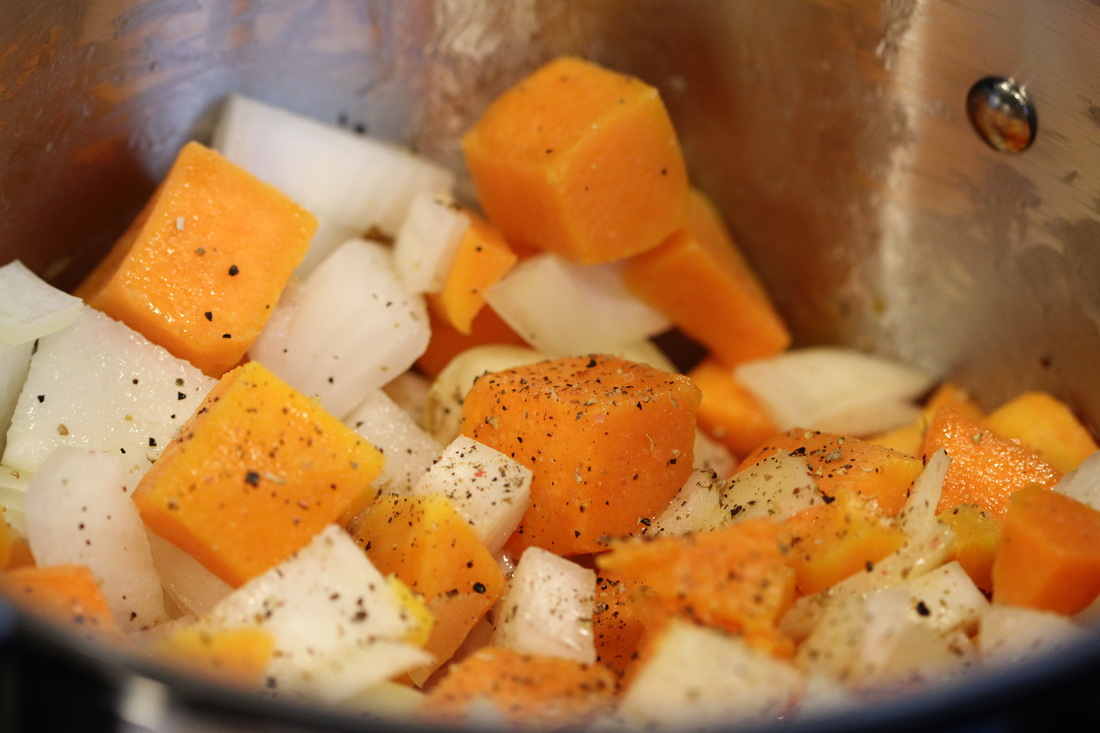 Now for the fun part - the toppings! I fried about 10-15 leaves of fresh sage in about 2 tablespoons of butter. Heat the butter (make sure not to burn it) and throw the sage leaves in there, turning a couple times until crisp. Let dry on a paper towel. This was my first time frying sage, and it turned out to add a whole new element of flavor and texture to the soup. Chop the green onions. Add a layer of shredded parmesan cheese to each bowl. Add the chopped green onions and sage. Then add a dollop of sour cream to the center of the bowl, and finish with a drizzle of truffle oil - ahhhhh-mazing! 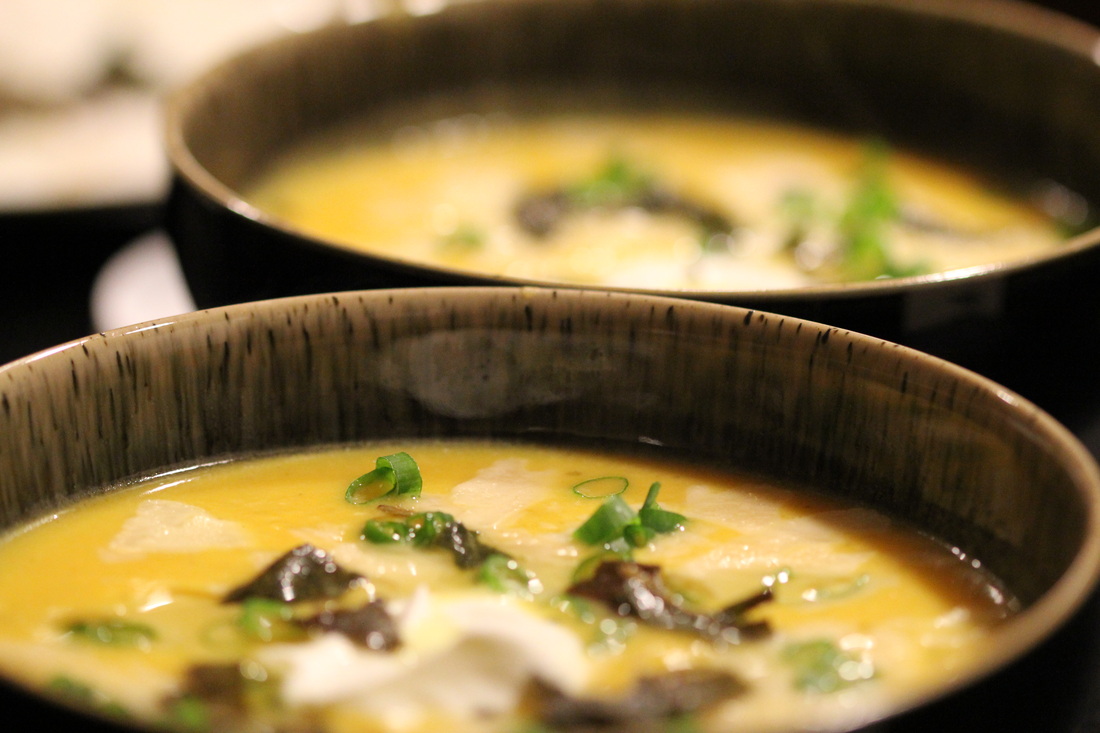 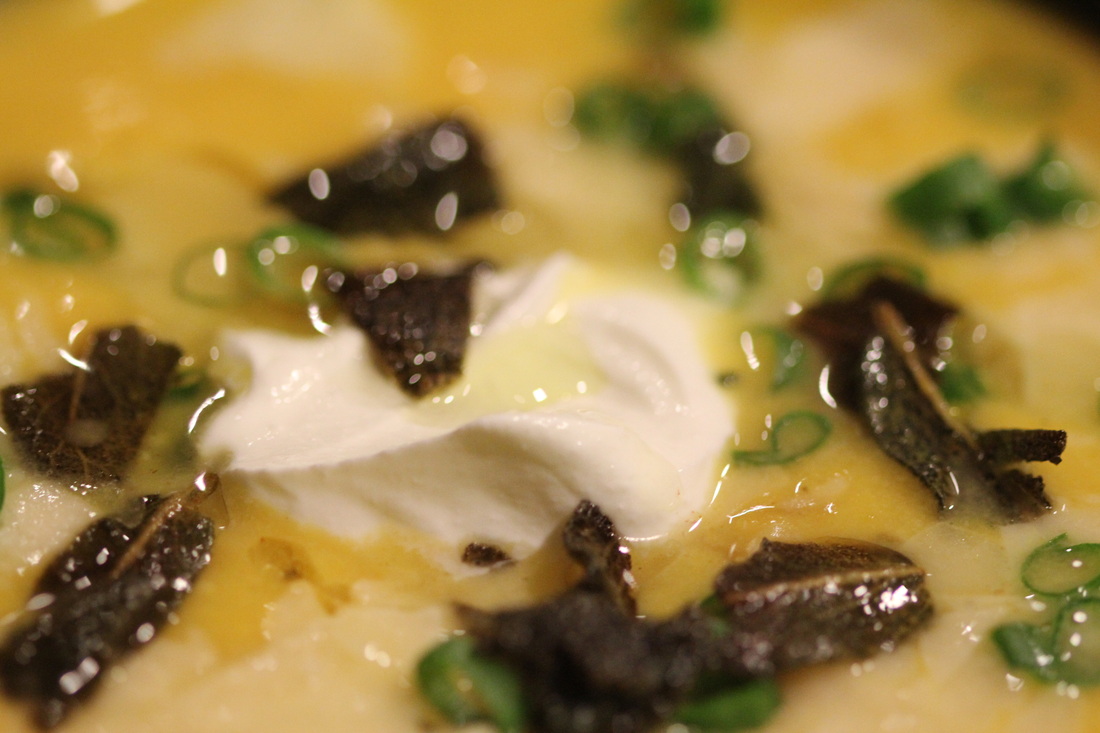 David's Skirt Steak with Chimichuri SauceDavid makes a delicious chimichuri sauce in our Cuisinart. Ingredients:
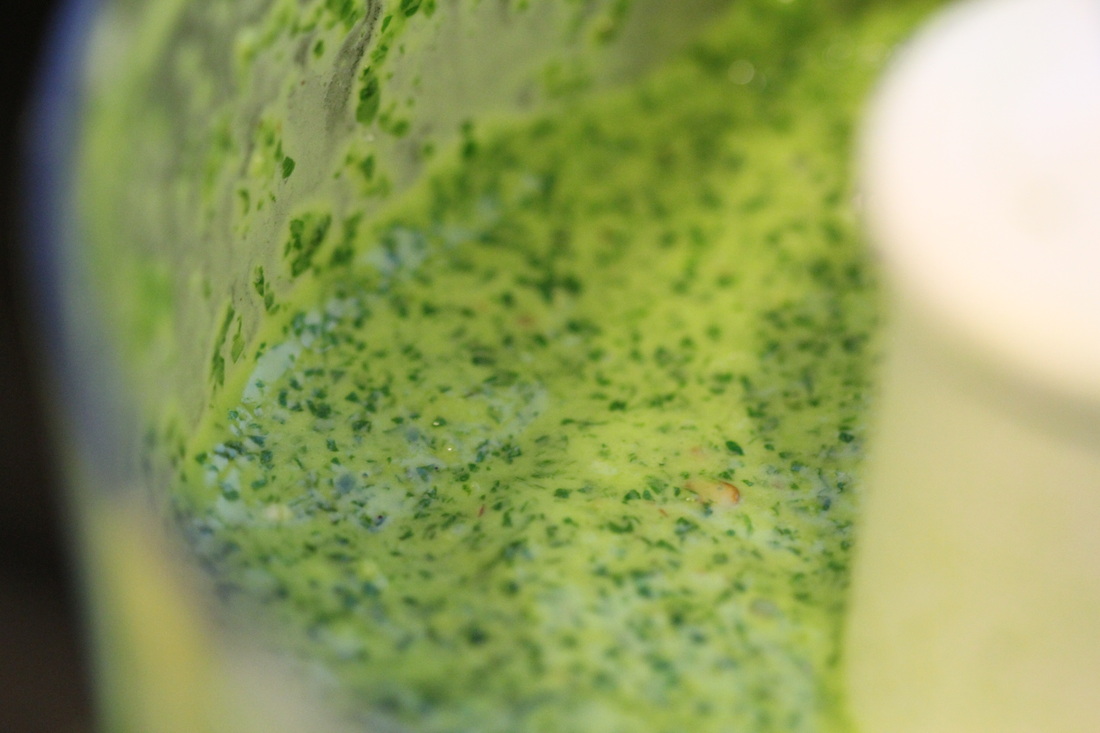 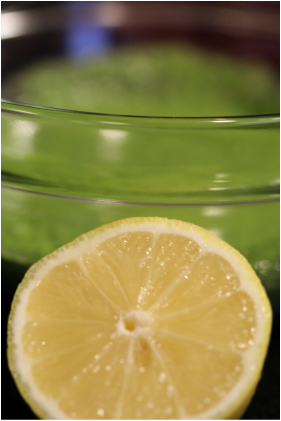 In the Cuisinart, blend the garlic (about 10 cloves depending on how much garlic you like!), parsley, cilantro, lemon juice, white wine vinegar, and salt & pepper. Once blended, start drizzling in the olive oil, until you have a nice smooth sauce. 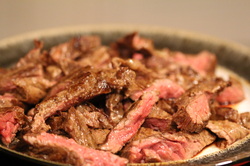 David decided to go with skirt steak. On a recent trip down to the Ranch, we tested out skirt steak vs. flank steak side by side. My sister, Holly, and I preferred the flank steak as it was a bit leaner, but David and Marc preferred the skirt steak - it has a bit more fat (which means more flavor!). Both are great, and it is really fun to do side by side comparisons. David gets a saute pan super hot, adds a bit of butter then immediately puts the steak in the pan so that it gets a great sear on it. Make sure not to over cook the meat - it should only take about 3 minutes per side. Take out of the pan and let the meat rest for a few minutes so that the juices can circulate inside. Slice against the grain and pour chimichuri sauce over the meat and serve! 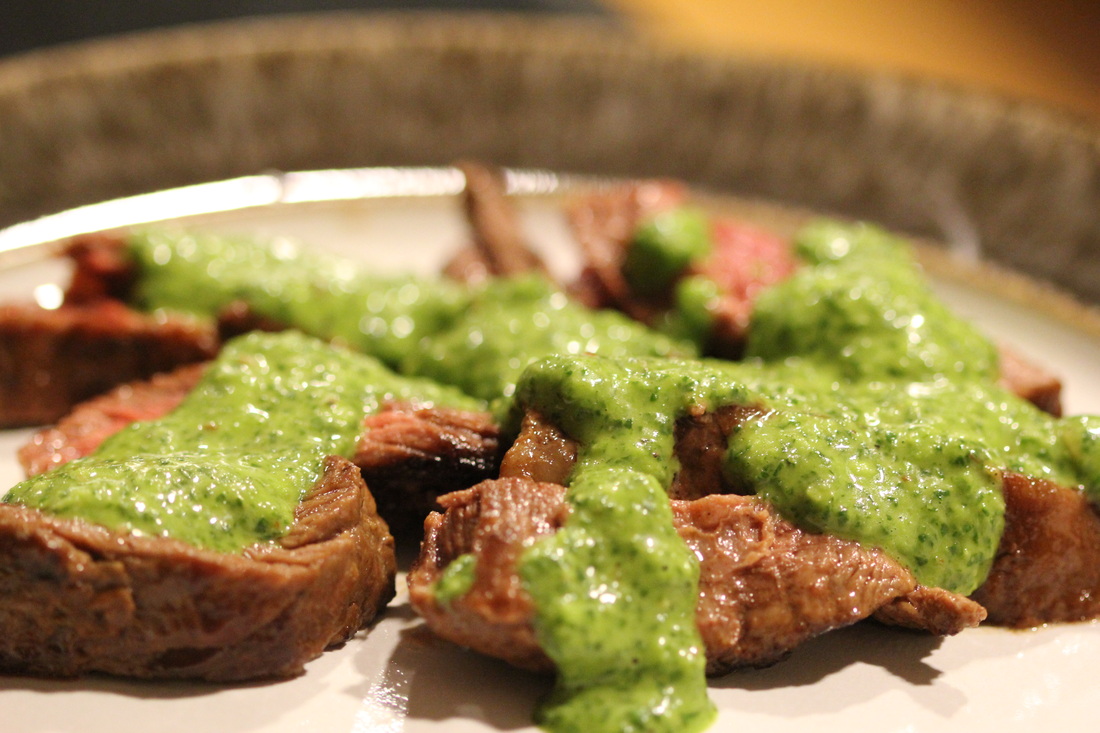 This skirt steak was super tender, perfectly medium rare (the best way to eat a steak) and went beautifully with the chimichuri sauce. And you eat with your eyes first - look at the color of that sauce!
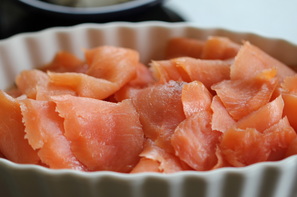
Enjoy!!! 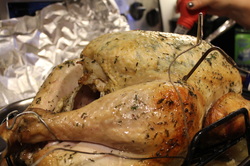 We had two Thanksgivings this year, which was such a treat. We had a wonderful Thanksgiving down at the Ranch with David's family, then we hosted 15 of our friends that weekend for a Friendsgiving. This turkey (which the picture was taken before it browned!) was delicious. My twin sister, Holly, picked up a local turkey from Bel Campo - I made an herb butter which consists of European butter (that you get in the large slab), fresh sage, thyme, rosemary, parsley, salt & pepper. I prepared it a day in advance to let the herbs really marinate in there, and it is also key to leave out of the fridge the night before, so it is at room temperature. Then the fun begins when you get your hands in there and massage the herb butter into the turkey. It provides amazing flavor while keeping the turkey nice and moist. Holly also gave us the tip to let the turkey rest upside down (with the breast side on the bottom) to let the juices really run down into the breast. Delicious! Oh, and that is David's iGrill that is sticking out of the turkey. An amazing invention that really lets you track the temperature of any meat! 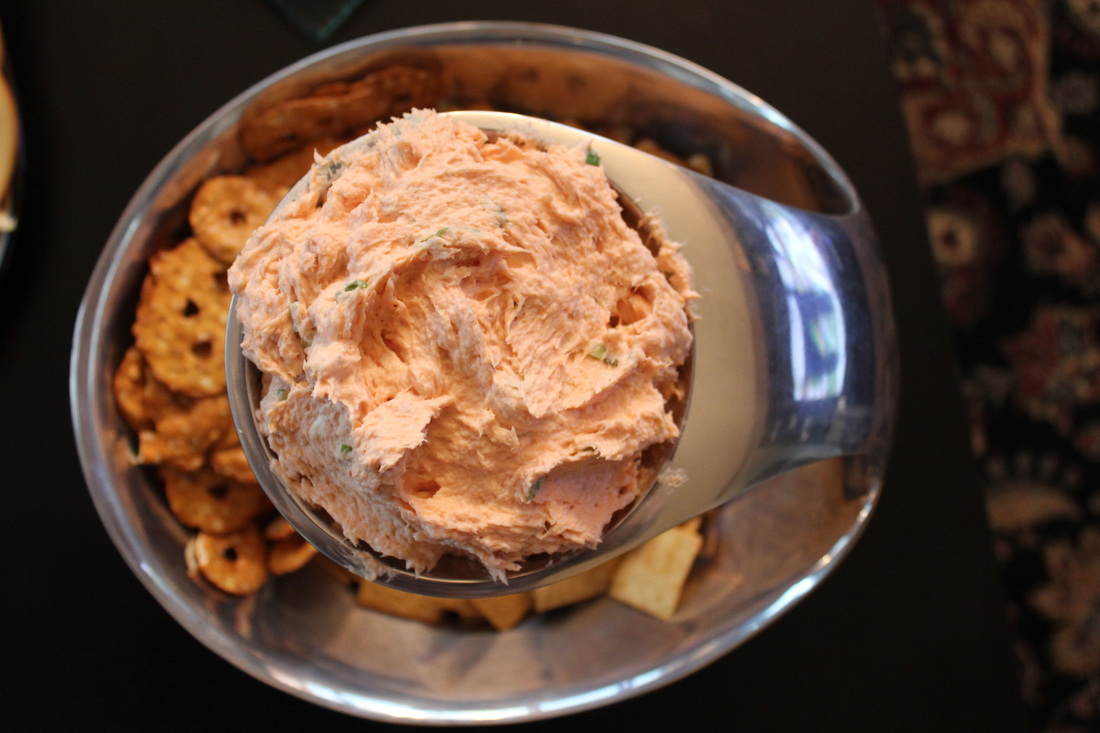 This was a smoked salmon dip appetizer that I made with smoked salmon from Seattle. It isn't lox, as I don't think it would work as well, but flakey smoked salmon. Ingredients:
I blended the salmon and cream cheese in my handy Cuisinart, then mixed in the chopped chives. Super easy and simple, and such a hit! I served with crackers and pretzel chips. Yum! 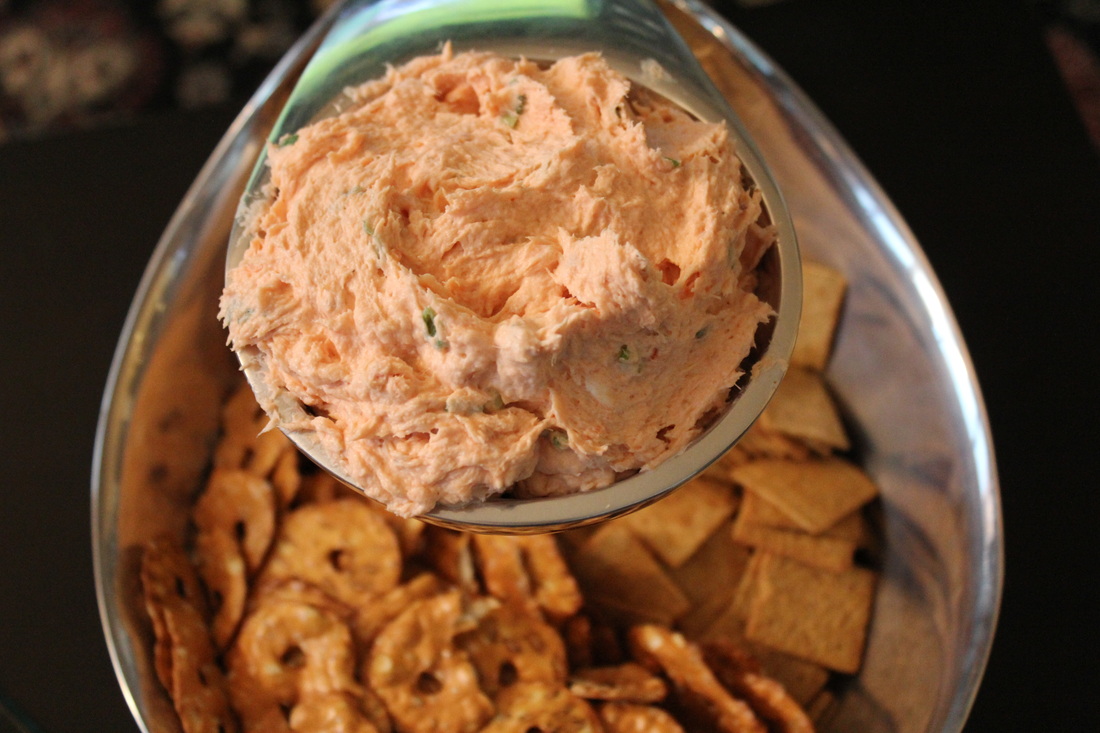 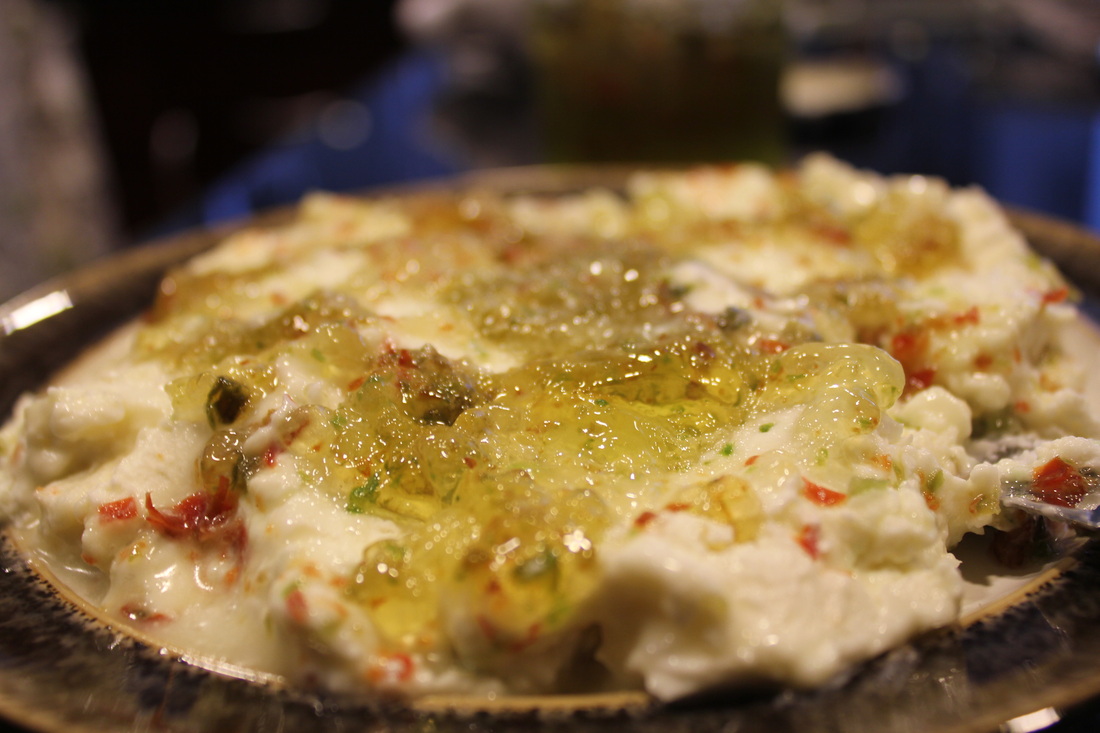 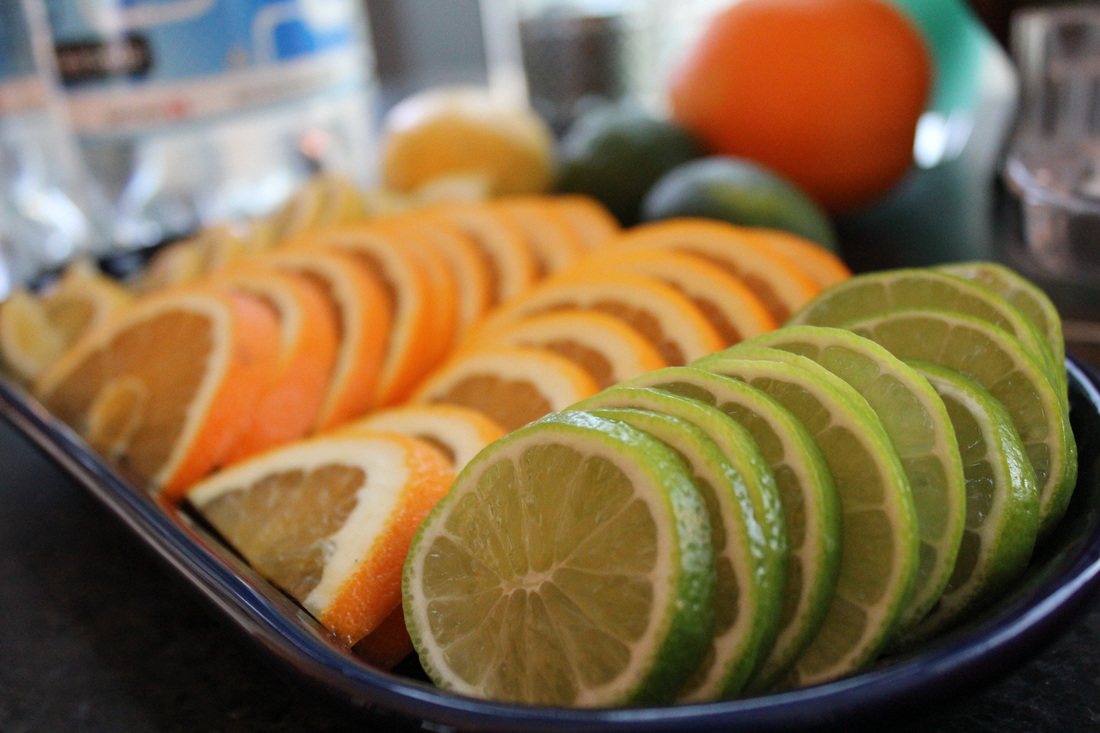 Holly set up a great bar for the Friendsgiving, where the signature drink was an Aperol spritzer - Aperol, champagne, seltzer water and lime! Sliced fruit can always dress up a bar and act as a great decoration too! This is always a hit appetizer - cream cheese & pepper jelly! I actually mixed cream cheese with goat cheese, then you just top with pepper jelly. David's family always has a picnic the day after Thanksgiving, so I wanted an easy app that we could transport easily (since we drive jeeps to the picnic spot!). Everyone loved this one. Ingredients:
The soppressata was sliced pretty thinly, so I used 2-3 slices per roll up. You then spread the whipped cream cheese onto the soppressata, then layer on 2-3 pepperoncinis and a sprig of chive. Roll up and top with a green olive and secure with the toothpick. Also a great idea for a low carb app! 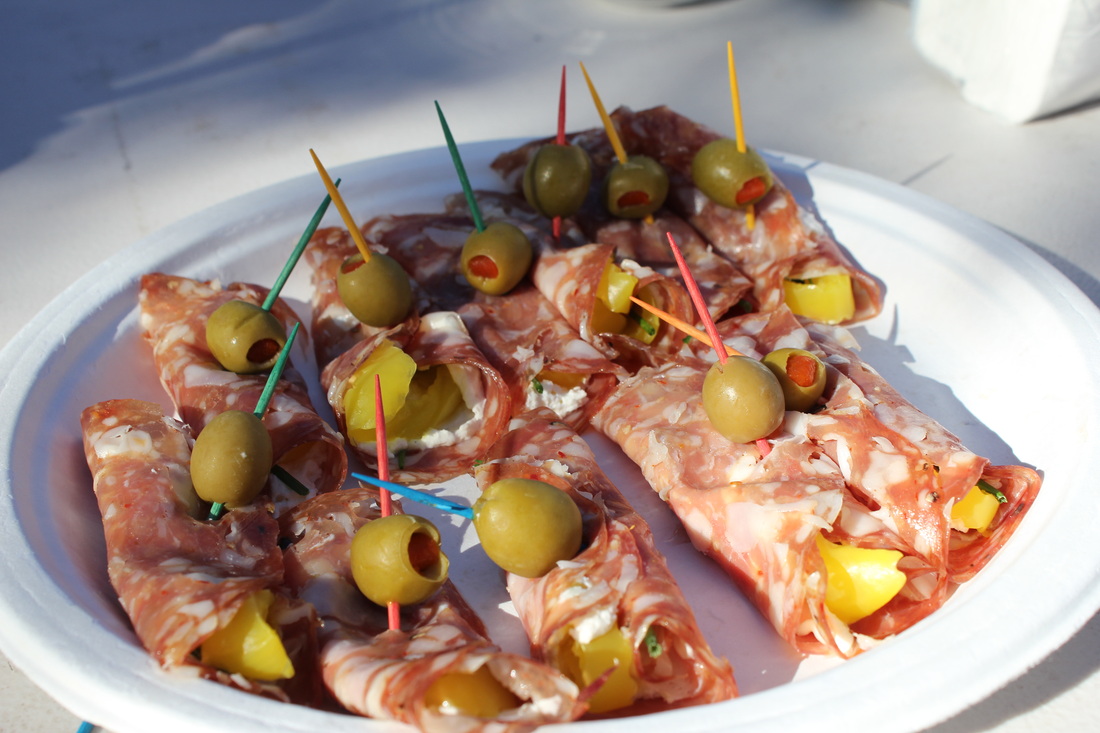 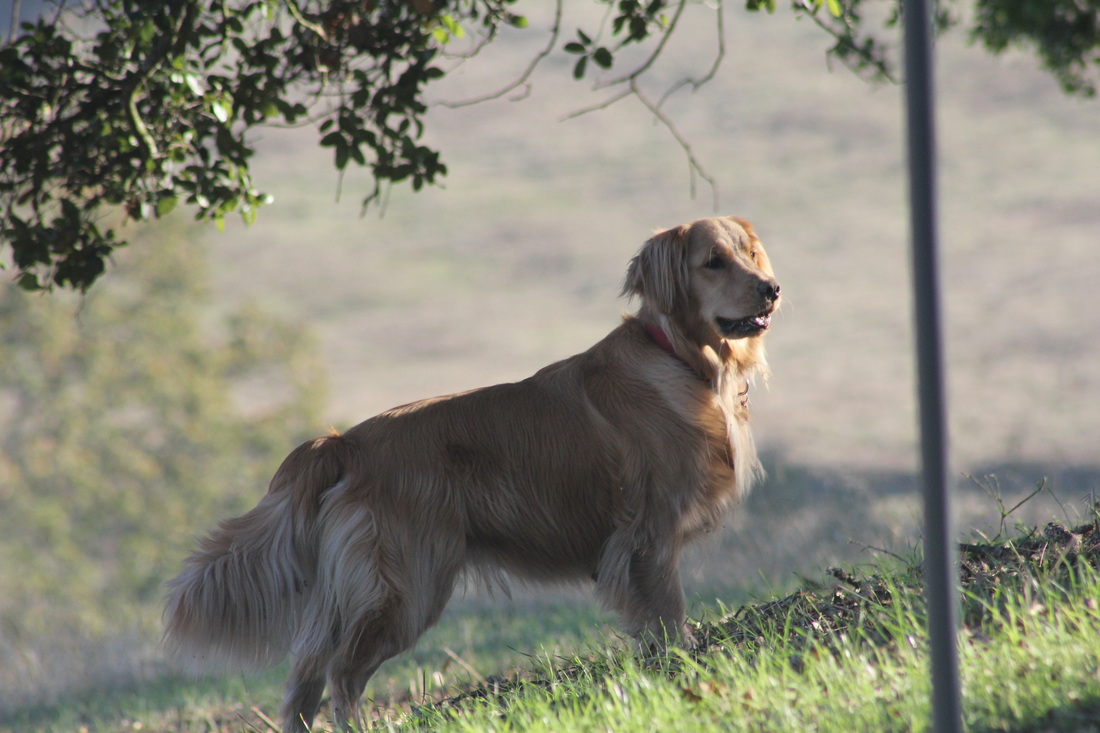 Had to add in this adorable picture of David's family's dog, Samantha. What a cutie! Great photo, David! 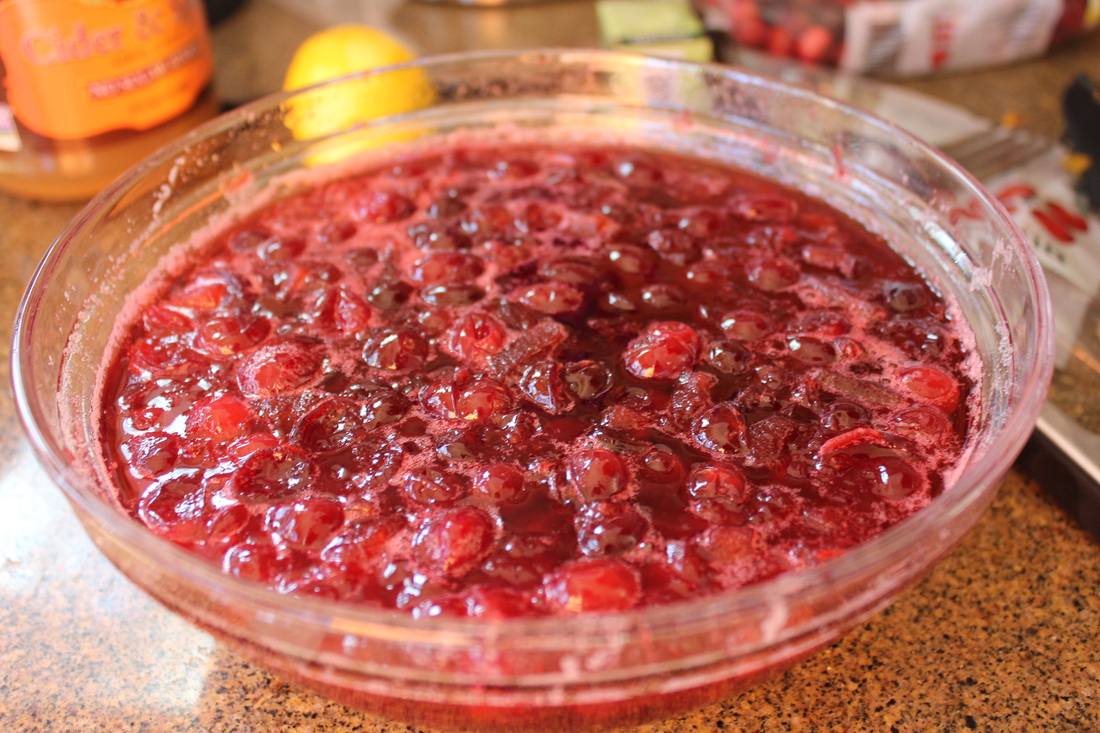 I can't take credit for this, as it was my sister-in-law, Kimberly's genius idea. She made a wonderful cranberry sauce - she actually steeped Earl Gray tea with lemons, oranges, star anise, lemon zest and sugar. She then cooked the fresh cranberries in there and let is boil down. It turned out delicious! We even used the juice to make some festive holiday cocktails.
I decided to do a blind tasting of different burratas from different stores. I wanted to get a variety of places and prices to try, and it was so much fun and interesting to see the differences. We tried DiStefano burrata from Whole Foods prices ($9.99), Bel Gioso from Safeway (price 8.99), Trader Joe's (price $5), and Belfiore Burrata, made in Berkeley from a local corner store (price $8). For the actual tasting, we poured some olive oil (non-flavored) on top along with some coarse sea salt. We ate off of spoons as to not ruin the texture or flavor. We paired up in partners, and each person selected the order of what to feed their partner, then that person ranked the order of the burratas. Here are the results: 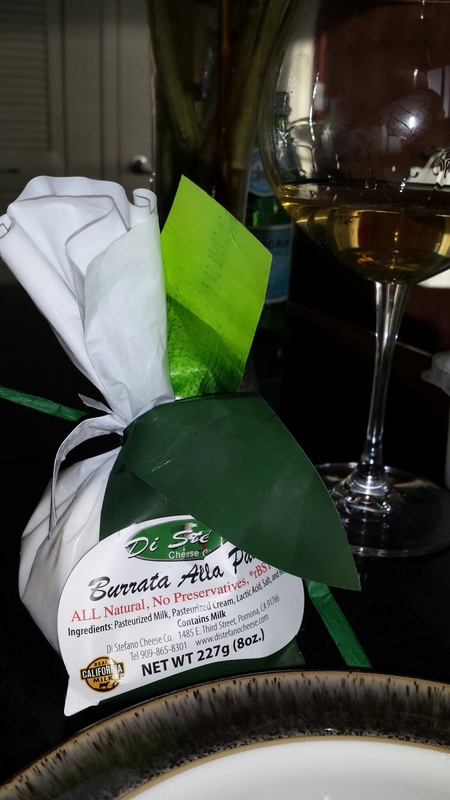 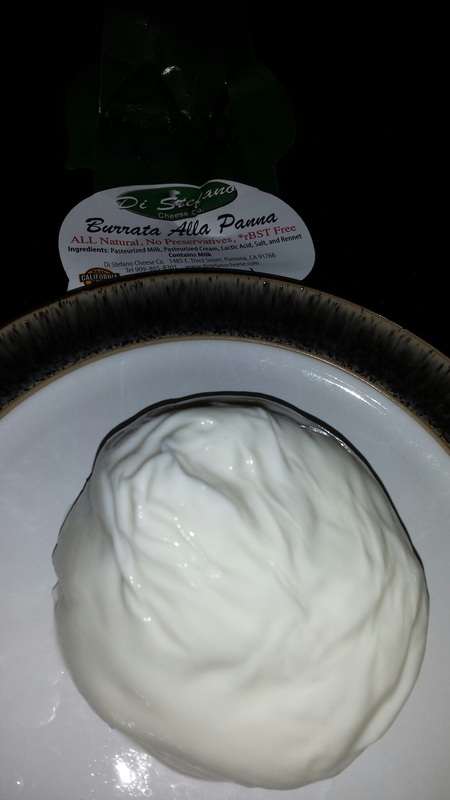 The Whole Food burrata was of course the favorite - the creamy texture just melts in your mouth and the cream actually tastes like cream. An absolute crowd pleaser, and if you can make it to a Whole Foods and really want to impress your guests, this is definitely the one to choose. However, the Bel Gioso was a close second! 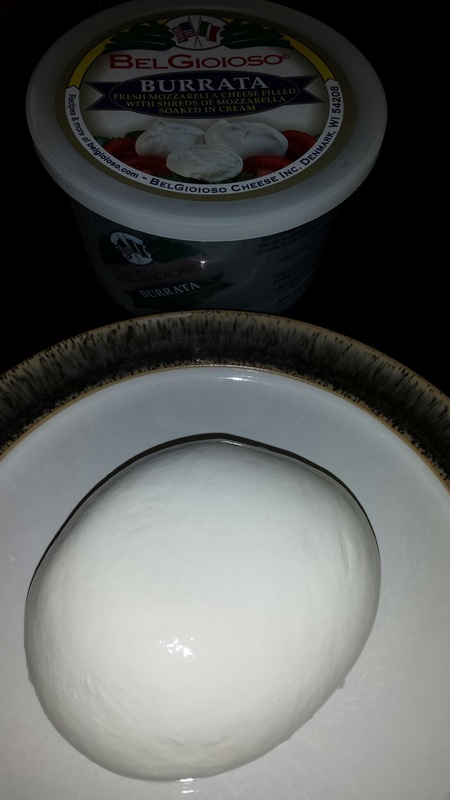 This Bel Gioso burrata can be easily accessible to those who shop at Safeway (providing they have it!). It has a great texture, although doesn't have the rich cream flavor as the Whole Foods selection, but a very close second! 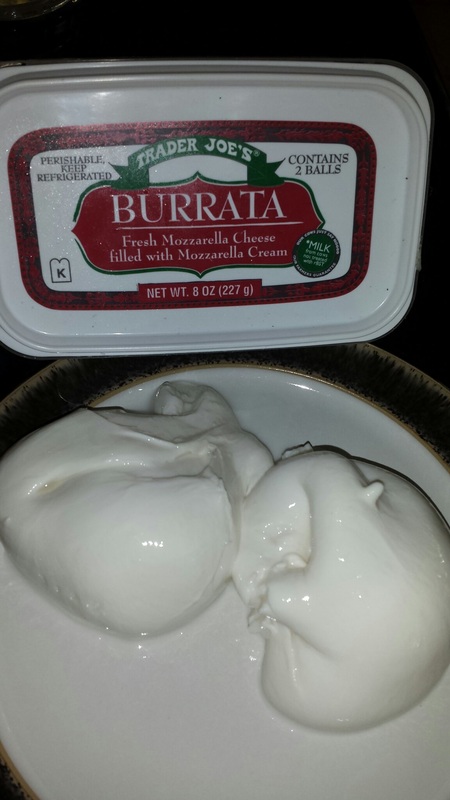 The Trader Joe's burrata came in third place in our selection, and I would definitely buy this again. You can't beat the price for 5 bucks! It had a slightly more pungent flavor than the first two, but still good texture. An absolute steal for two balls of burrata! 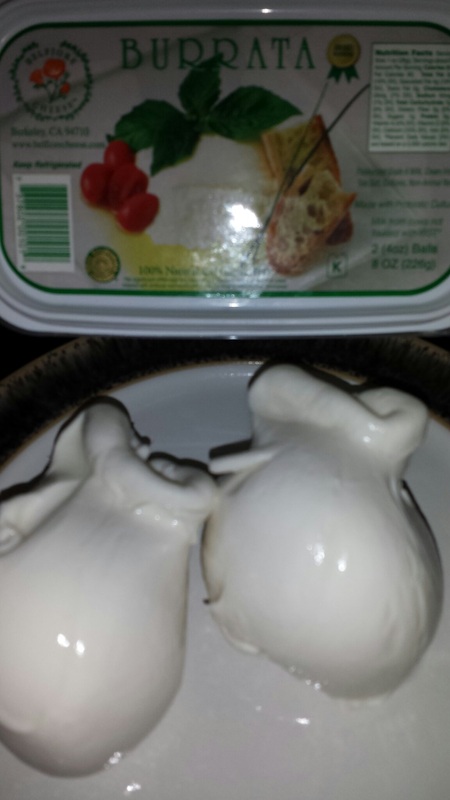 As much as I love supporting local dairies, we were really disappointed with the Belfiore was everyone's least favorite. The texture was very tough and not creamy at all. The flavor wasn't terrible, but lacked the creamy richness and softness that one desires in a good ball of burrata. 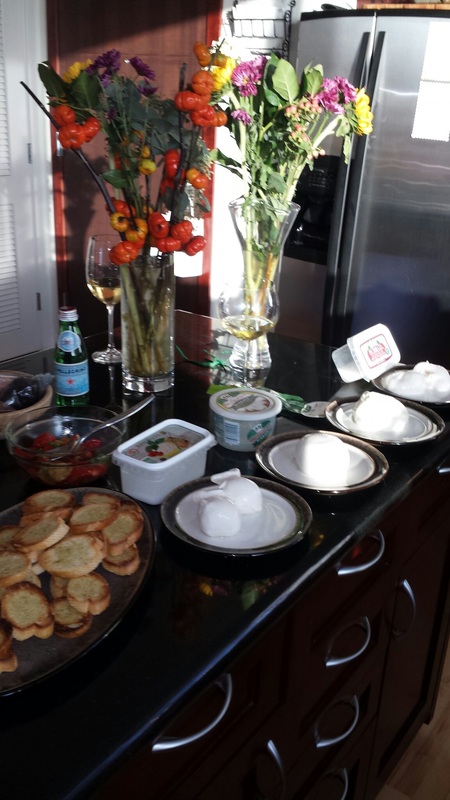 We had such a great time testing these different burratas, of course while drinking some buttery chardonnay, the perfect combination. The bottom line is, you really can't go wrong with a ball of burrata, some tomatoes with basil, and some fresh crostini.
We spent a wonderful weekend at the Ranch with David, Holly and Marc - full of jeep rides, pool time, and of course, some burrata and chardonnay. Nothing beats a cool glass of Rombauer on a sunny San Jose day at the ranch! Sprinkle a touch of olive oil with some basil, salt and pepper for the perfect burrata snack. 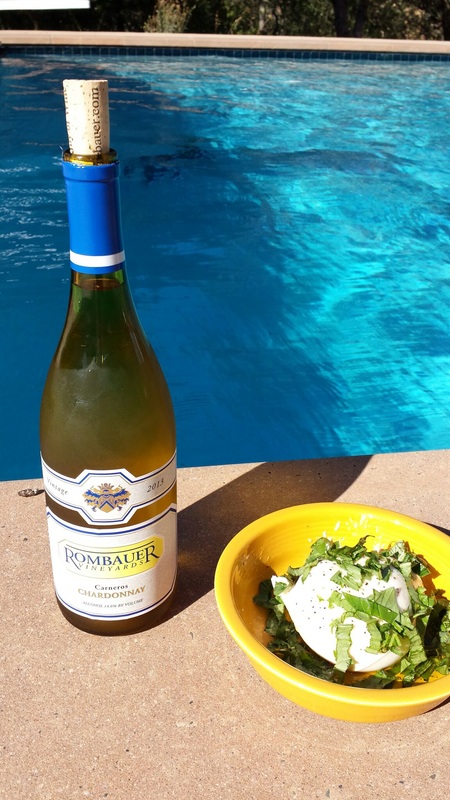
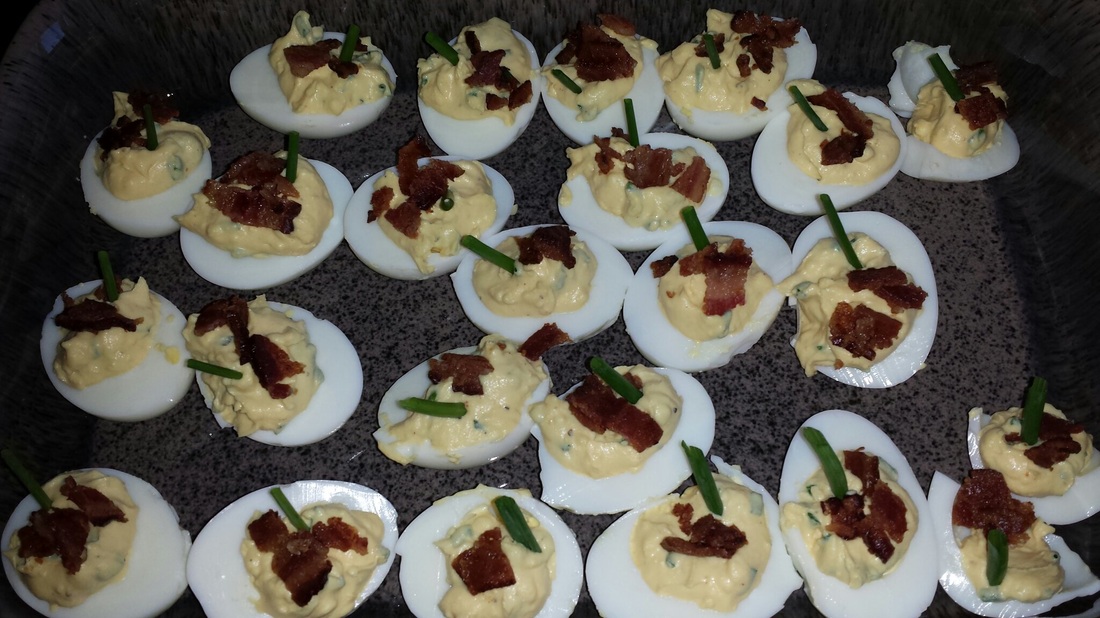
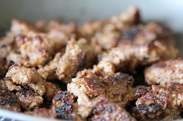
These were a delicious and low carb snack that I made for our friend Brianne's birthday party that David and I hosted at our apartment. Super easy ingredients, it just takes a little patience to cook and peel the eggs!
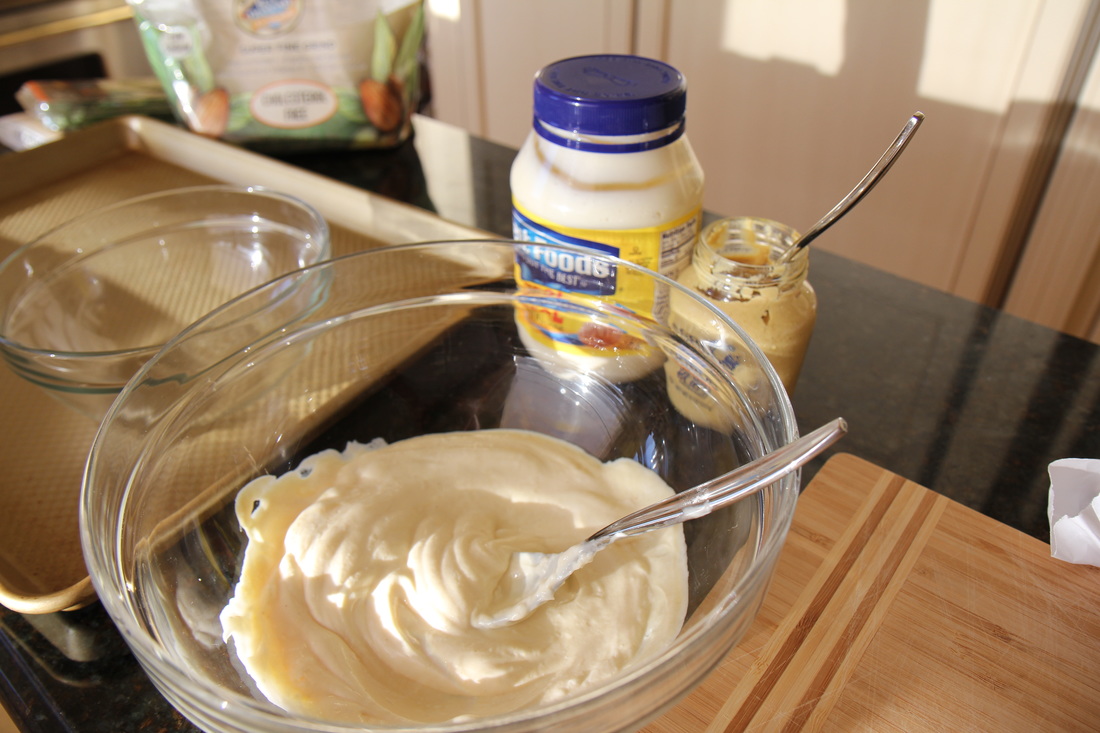
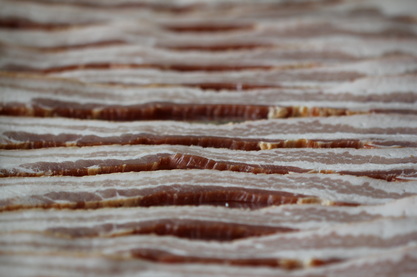
Ingredients: One dozen eggs (the fresher the better for easier peeling) Bacon Chives Mayo Mustard Frank's Red Hot sauce Salt & pepper to taste I cooked the eggs with my handy dandy egg timer that lets me know when the yolks are hard boiled (you place it in the pot with them - cheap and great tool from Bed Bath & Beyond!). As soon as the eggs are ready, put them in a bowl of ice water. This helps when it comes to peeling the eggs. Once peeled, slice in half and remove the yolks in another bowl. Smash the yolks up with a fork to make sure they stay nice and fluffy. Add in mayonnaise, yellow mustard, chopped chives and salt and pepper. For the bacon, I like to bake my in the over, flipping once. I bake at 400 degrees for a total of about 30 minutes (or until you get your desired crispiness). For this, I did bake it a little longer to make for the crispy crumbles to put on top. I also added a longer chopped chive to stick on top with the bacon for decoration (and also clues your guests in on what is in the eggs). Delish! 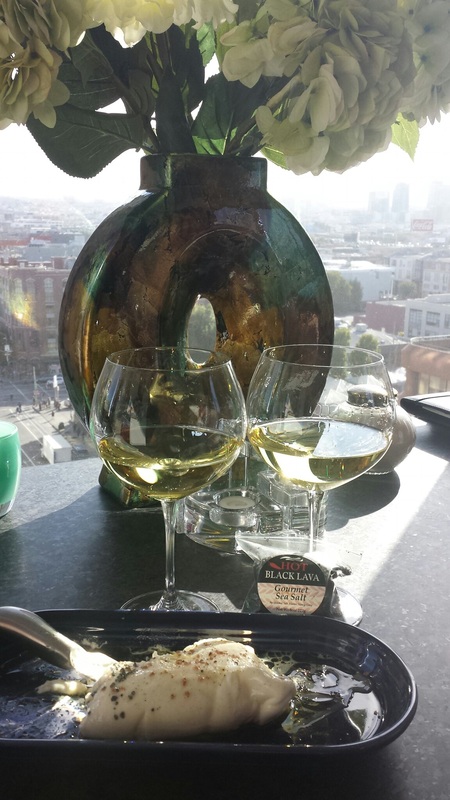 David and I bought this table from Room&Board, almost a year ago, and this was one of the first times we used the table. And what a fabulous way to use with by having burrata and chardonnay. This is actually burrata from Safeway - they are selling it there now, for only about $8.95, and it is really great! Not as good as what you would get from Whole Foods or Cowgirl Creamery, but I am just thrilled to know that it is more easily accessible and affordable. We paired it with black lava sea salt and Rombauer chardonnay.
Treat yourself! 
  Chimichuri sauce: Parsley, Cilantro, Garlic, Olive Oil - blend all together in Cuisinart. Dressing: Mayo, dijon mustard, tarragon, olive oil, salt & pepper. 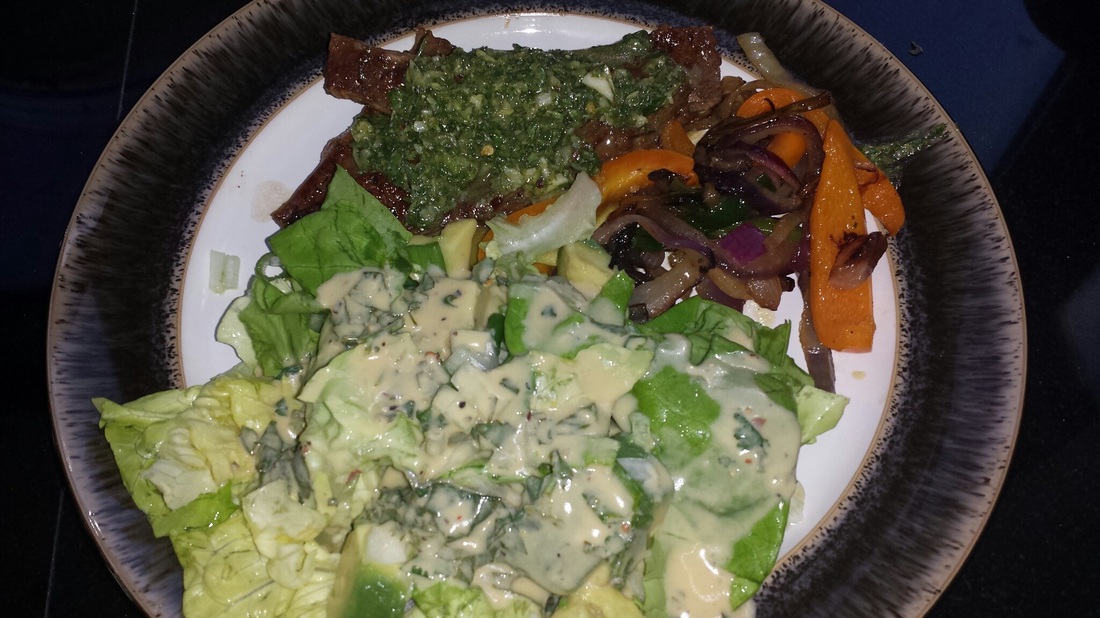 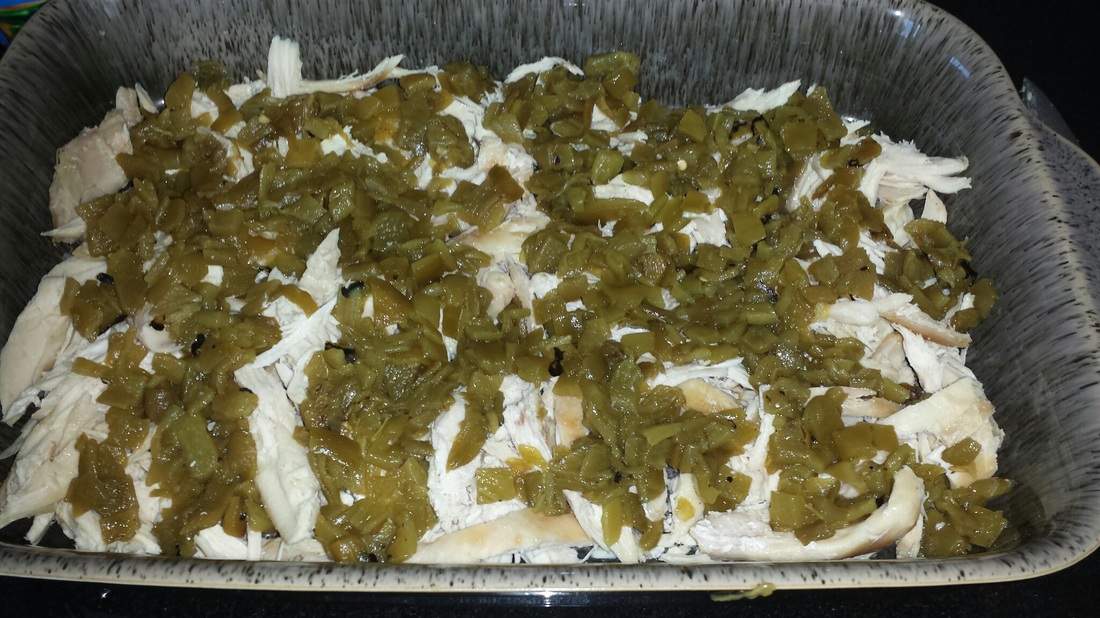 This dish was inspired by the Pioneer Woman's recipe from Food Network called "Lazy Chile Rellenos". You are supposed to use whole chiles, but I couldn't find them at the store, so decided to improvise. I also added chicken (store bought rotisserie!) to make it a heartier casserole. Ingredients: Chicken Canned green chiles - I used 2 small cans Fresh poblano pepper 1/2 red onion 2 cloves garlic Monterrey Jack Cheese Eggs Half & Half (or whole milk) Chicken stock Smoked paprika, dried chilies, cumin, garlic powder, salt pepper 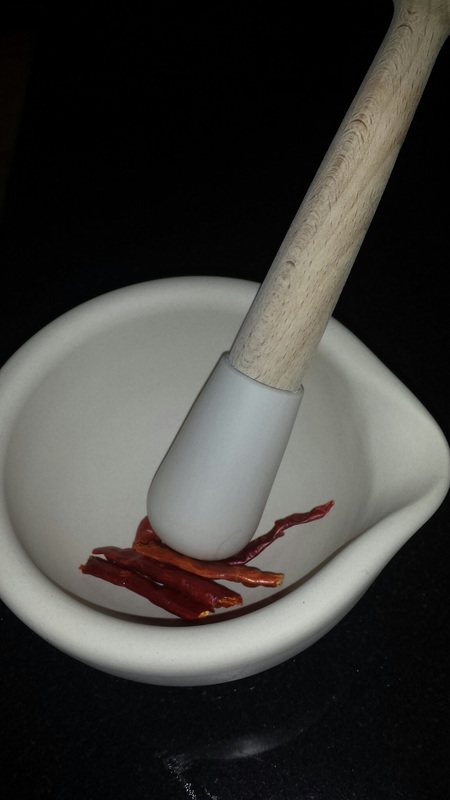 This was an amazing engagement present from my twin sister, Holly! A mortar and pestle from Williams Sonoma. It is great for grinding dried chilies! 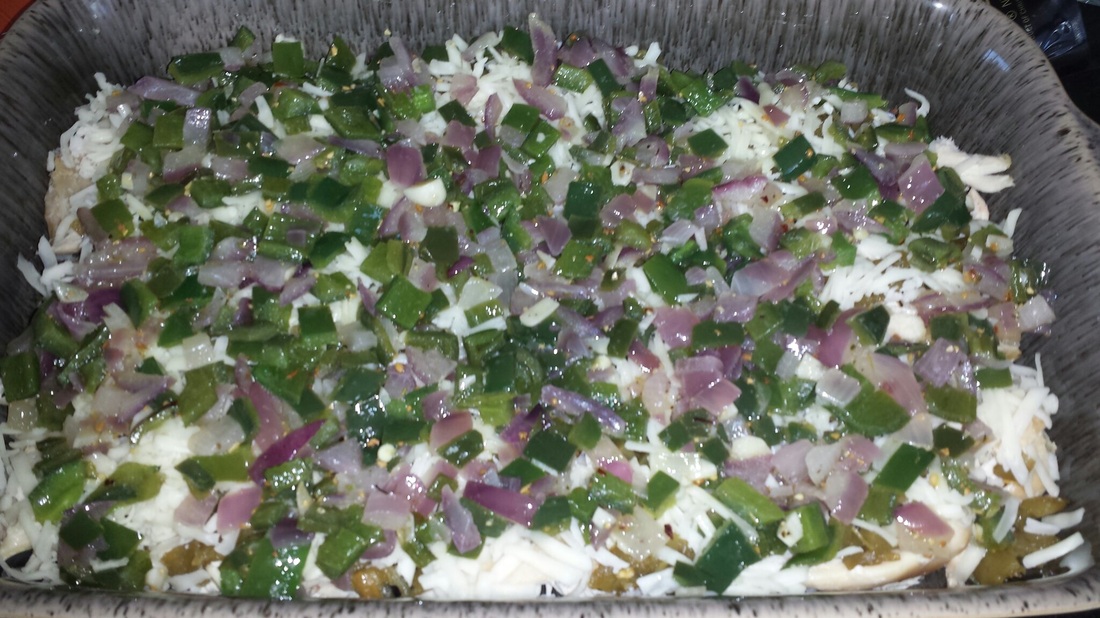 I wanted to add an extra element and layer, so sautéed 2 fresh poblano peppers, 1/2 red onion and garlic. This went on top of the chicken and canned green chilies, and a layer of cheese. 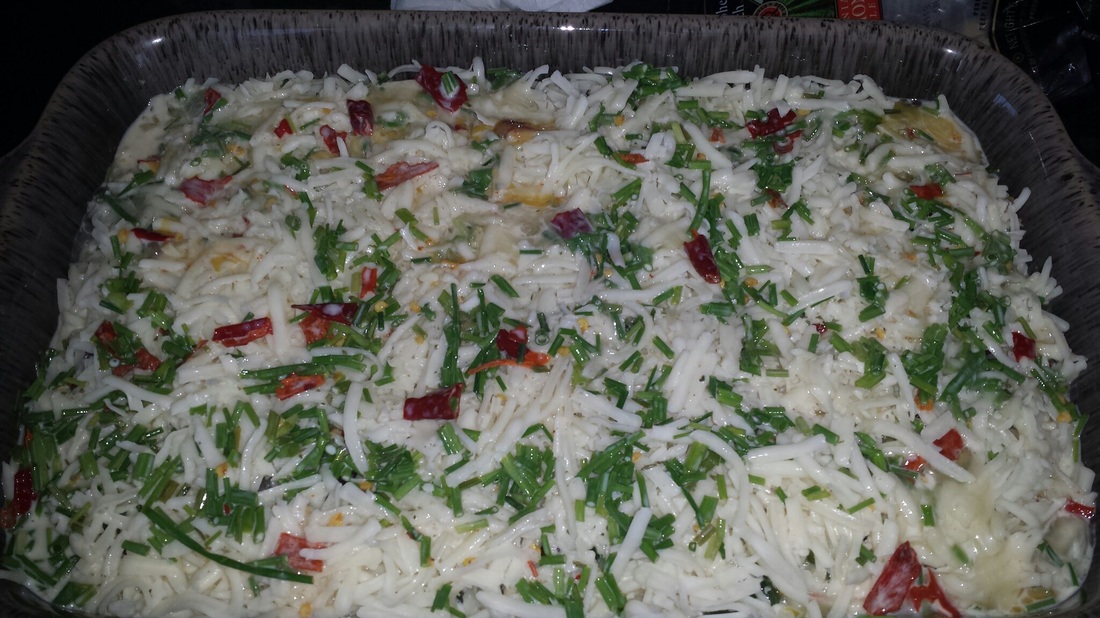 After you have all of your layers, you add the egg mixture on top which was 5 eggs, 1 cup of half and half, a splash of chicken stock, dried chilies, and chives.  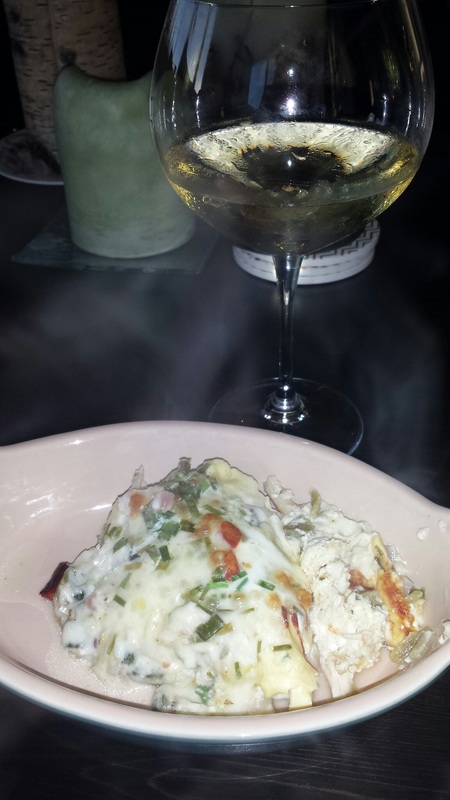 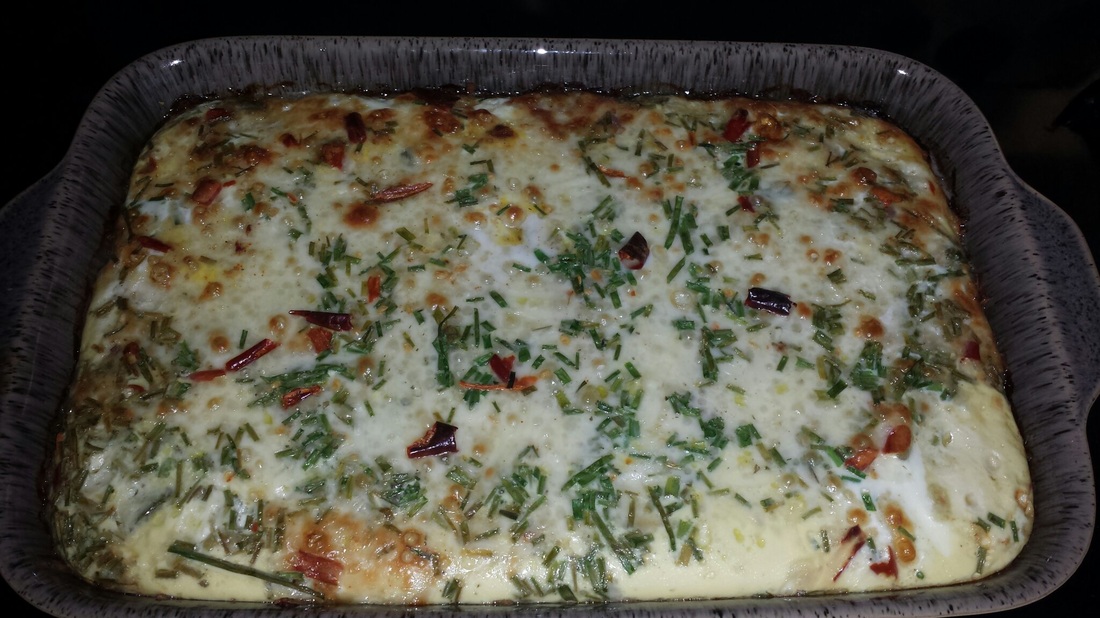 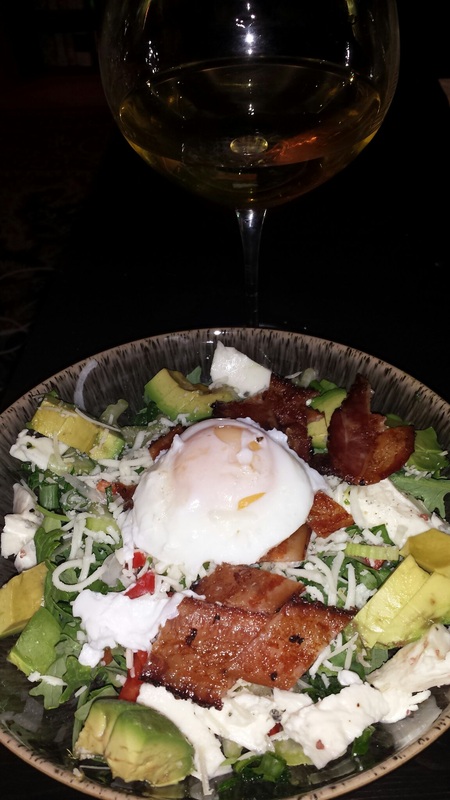 This is fast becoming one of my favorite salads to make! It is a bit challenging with the poaching of the egg, but everything else is super simple, especially how I cook the bacon.
Ingredients: Spinach / Arugula / Baby Kale (your choice or combo!) Bacon (definitely recommend the thick cut) Eggs (the fresher the better for poaching) Avocado Fresh Mozzarella Parmesan Green Onions Directions: Preheat the oven to 400 degrees. Line a baking sheet with tin foil (this makes for very easy clean up!) and place the thick cut bacon on the tin foil. I like to flip the bacon once during the cooking time. It usually takes about 30-40 minutes to cook, so definitely plan ahead. Once it looks like it is done to your liking, take out and let cool on paper towels. Eggs - simmer water in a pan with some added vinegar. This is supposed to help with the poaching process. I like to put the egg into a tiny glass bowl, then you gently drop it into the water. I like doing them one at a time. You can more easily maneuver the whites around the yolk this way to try and keep it in tact. It takes about 5 minutes, but keep a close eye on the eggs. You can put them on a paper towel to get some of the water out of them after cooking. I like to layer the salad for presentation, so just start adding all of your ingredients and top with the bacon, and then the egg on top. We like to use a vinaigrette, but the soft yolk also adds to act as a dressing as well. I like to put the bacon on when it is still warm, as it adds an amazing element to the salad. Enjoy! 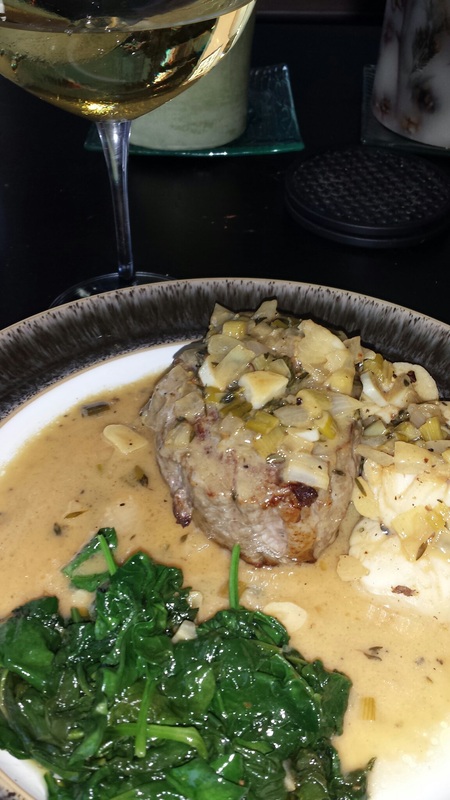 To celebrate some good news at work, David made me pan seared filet mignon with a white wine garlic cream sauce and a side of sautéed spinach. Absolutely delicious!
 This was an amazing bar called The Patterson House (David's friend from high school started it) where they specialize in cocktails and fresh ingredients. The bartender was so knowledgable. I got a Tom Collins which was gin, seltzer water, and some other yummy ingredients. They have great ice cubes there as well! 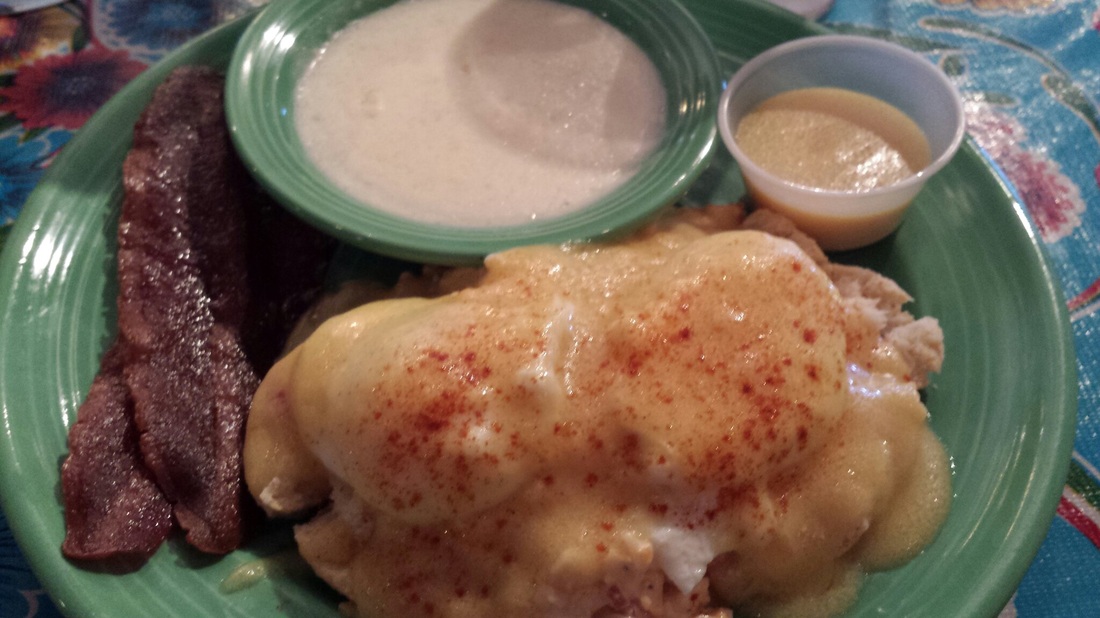 Ummmmm, yum - we went to The Flying Biscuit for brunch - of course I had to try the eggs benedict which was absolutely delicious. Oh, and a side of cheesy grits as well. I think this place is missing some greens, but when in the South.... View of downtown Nashville from David's house - lovely night for an outdoor BBQ!  David's amazing rib-eye BBQ'ed steaks - marinade consisted of olive oil, balsamic vinegar, worcestershire sauce, Tapatio, garlic powder...they turned out great!
|
Categories
All
AuthorWelcome to our blog! We are twins who love cooking, trying new restaurants, and taking photos of food in San Francisco. We love to improvise and come up with fun, creative and easy recipes. They are meant to be inspirations for you to come up with your own unique recipes, or follow along with what we do - your choice! We enjoy taking pictures of food whether at home or out at restaurants, and of course, we love our burrata and chardonnay. Enjoy! Archives
February 2018
|


 RSS Feed
